Preparation
Learn the steps to transfer data from Aurea.CRM to your word processor to generate document merges and single letters.
Follow the below steps:
- Select Extras > Document Directories from the menu. Choose the version of your word processor. You can also specify default directories for your documents, see Document Directories.
- Ensure that a label has been specified for the recipient (Label field in the Person or Person in Company info areas).
Define a label format by selecting Extras > Define Label, see Label Formats.
- Define a transfer fields format if necessary (by selecting Extras > Define Transfer Fields) containing the fields you wish to use in the letter, e.g. the order number, see Transfer Fields.
- Create the document that contains the body text for your letter and save the document.
- Define a transfer format (format type "Word processor"), Defining Transfer Formats
- Establish a connection with your word processor, see Establishing a Connection with the Word Processor.
Label Formats
To transfer the correct address and contact information to a letterhead, you need to define label formats. Assign a label format to each company or person record (in the Label field) to ensure that your mailings reach your customers.
Defining Label Formats
To define a label format:
- Select Extras > Define Label from the menu.
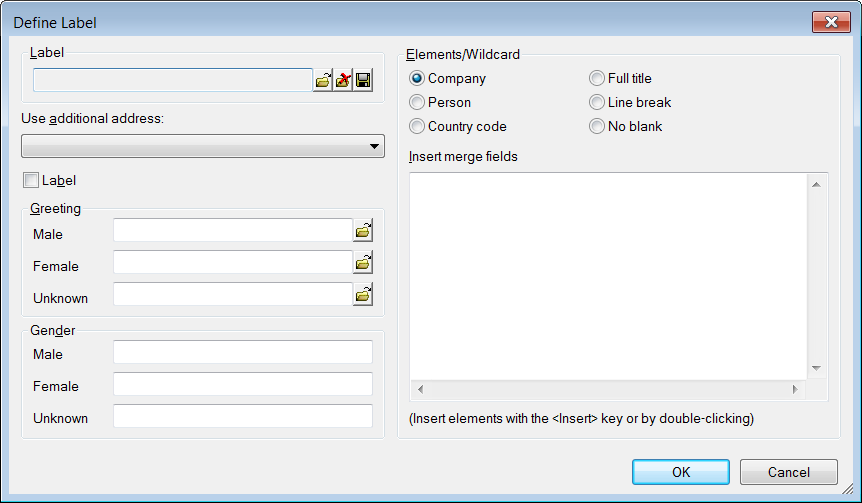
- By default, the fields used in the letterhead are transferred from the address in the Company info area. If you wish to use an address from the Additional Address info area instead, select an entry under Use additional address.
- If the label format is used to print labels, enable the Label
button. A line break is then inserted every 35 characters. Otherwise
lines are restricted to 250 characters.Note: If you use the same format for various tasks, you can use the Line Break 1-3 fields in the Company info area to determine where new lines are added. This information is saved automatically when the company name is first added if it contains line breaks.
- To add elements to the label, select an option under Elements/Wildcards
and double-click on the desired position in the Insert merge
fields text field. The following options are available:
- Company or Person: Select the desired fields from the dialog box.
Note: When defining labels for the Person (PE) info area, you can only use those fields that are assigned to the Person in Company (KP) info area, see Data Model (KP) in the CRM.core Administrator Guide. Fields in the Contact Person (CP) info area Felder cannot be used.Place the elements in the position you want them to appear in the letterhead. You can edit the elements as with normal text and add new lines using the Enter key.
When a letter is generated using the format, the placeholders are replaced by the corresponding entries from the database (e.g. FI2*Company would be replaced by the name of the company).
- Determine the greeting used in the letter under
Greeting.
The greeting is determined by the value in the Form of address field. If the field is empty, the Unknown greeting is used.
Placeholders in the Elements/Widcard area can also be added to this text field using the Insert key of by double-clicking.
- Determine how you want to address the genders (e.g. Mr., Ms.) based on the entry in
the Form of address field in the person record. This replaces
the {KP0*Form of address} placeholder in the letterhead. If no
form of address has been entered in a person record, the Unknown
entry is used.Note: The length of the fields in the Gender pane is restricted to 20 characters.
- Save the format and click on OK.
Use the Label info area to verify the contents and formatting of the label (select Info > Label from the menu).
Letterhead Examples
The following example demonstrates how to define the address and greeting:
Defining the Address:
- Select the company fields used to form the address of the company; e.g. {FI2*Company}{FI10*Street}{FI7*Postal Code}{FI8*City}.
- Select the person fields used to form the recipient; e.g. c/o {KP0*Form of address} {KP2*Last Name} To define the greeting "Dear Mr. Miller":
- Click in the Male greeting field.
- Enter the consistent part of the text, e.g. "Dear".
- Enable the Person radio button.
- Double-click in the Male greeting field to the right of "Dear".
- Select Form of address and Last Name
from the Field Selection dialog box, and confirm
with OK.
The chosen elements are inserted into the greeting:
Dear {KP0*Form of address} {KP2*Last Name}
- Enter spaces between the elements.
- Click on
 (Save).
The placeholders are replaced by data when transferred to the word processor.
{KP0*Form of address} is replaced by "Mr."
{KP2*Last Name} is replaced by the person's last name.
Preventing Blank Lines
To prevent blank lines from being output:
- Select Extras > Define Labels from the menu.
- In the Elements/Wildcard area, enable the No blank radio button.
- Place the cursor left or right outside the curly brackets enclosing the variable (e.g. {FI2*Company} | ).
- Double-click at this position.
An additional {!Empty} variable is added. Result: {FI2*Company}{!Empty}
If the transferred record does not contain a company name, a blank line is not inserted.
Defining Transfer Formats
To create transfer formats for (bulk) letters:
- Select Extras > Connection with Word Processor from the
menu.
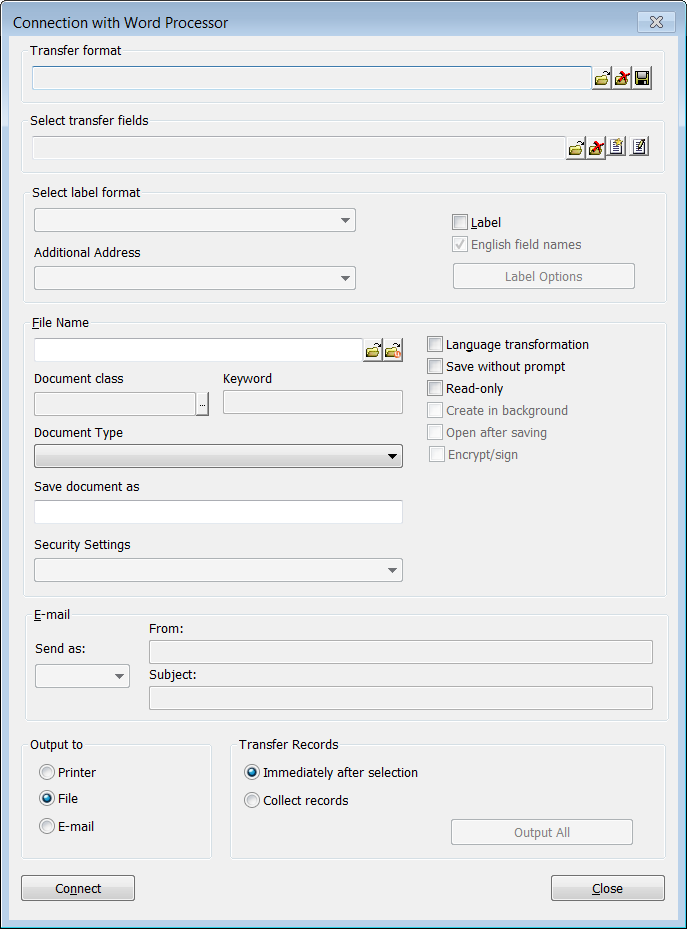
- Click
 (Load) next to the File Name field.
Select the document created earlier.Note: The target document may not contain any merge fields at this point.
(Load) next to the File Name field.
Select the document created earlier.Note: The target document may not contain any merge fields at this point.If the document is stored in Aurea.CRM's document repository, you can click
 (Select Document) or enter
the ID of the document in this field.
(Select Document) or enter
the ID of the document in this field.If you use a .docm file stored in Aurea.CRM's document management system, you cannot save once the mail marge fields have been inserted. To avoid this issue, add ".docm" as a file type that should not be deleted (see Configuration Info Area in the CRM.core Administrator Guide (Documents category, File types to retained option). You can then save the DOCM file locally and upload it to Aurea.CRM manually.
Enable the Language transformation check box if you want catalog values to be translated into the language entered in the person record.
- If you are creating a transfer format for a single letter, you can choose whether
and how to save the document. Mail merges are not saved in Aurea.CRM's document
management system.
- Enable the Save without prompt option to automatically save the letter in Aurea.CRM's document management system after transferring the data, see Single Letters and Document Management. The letter is saved using the document's name as a general document. You can additionally specify a Document class and Keyword.
- Enable the read-only option to save the letter as read-only.
- To save the letter under a different name, enter the name in the Save document as field. Enter the file name without an extension: The Document Type extension is used. If no type is selected, the document's file extension is used instead. You can also use variables for the document name.
Note: These options are not available if you select E-mail under Output to. - To encrypt or sign a document, enable the Encrypt/sign check
box and select an option from the Security Settings drop-down
list.
This option is only available if encrypting documents has been enabled in the Configuration info area, see Configuration Info Area (Security category, Single letter option)in the CRM.core Administrator Guide.
- If you want to use transfer fields, click (Load)
under Select transfer fields and select a format from
the list.
- Click
 (Delete) to remove a selected format.
 - Click
 (New) to define a new
transfer fields format, see Transfer Fields.
(New) to define a new
transfer fields format, see Transfer Fields. - Click
 (Edit) to edit a
selected transfer fields format.
(Edit) to edit a
selected transfer fields format.
- Click
- If you want to use transfer fields, click
- Enable the Label check box if you wish to create a letterhead
or output labels:
- The label entered in the person record is used.
- If no label is entered in the person record, the company label is used instead.
- If you select a label in the Select label format field, the label is used for all records, even those for a label has already been entered.
- If no label is found, the first label available from the Select
label format field is used.
Use the Other Addresses field to select a different address, e.g. a billing or delivery address. If the specified address type has not been entered for a record, the company address is used instead.
Use the Label Options button to define or edit labels.
Enable the English field names check box to transfer the label fields (Addr.0, Salutation) in English. This ensures that the letter is generated correctly with other Aurea.CRM language versions.
- Determine the output destination under Output to:
- Printer: The letter is sent to the printer.
- File: The letter is opened as a file. You can choose to save the resulting document, see Single Letters and Document Management.
- E-Mail: The letter is sent as an e-mail (an e-mail client must be configured in the Configuration info area, see Configuration Info Area (General Settings category, E-mail Client option)in the CRM.core Administrator Guide.
Note: You can only output single letters as e-mails, see .Creating a Single Letter If you wish to send out a mass mailing by e-mail, you can do so as part of a marketing activity, see Execution (Marketing Activity). - If you select E-mail under Output to,
you can determine the following settings in the E-mail
pane:
-
Send as: Select the e-mail format (TEXT or HTML).
You can include database contents in HTML e-mails directly using specific tags, see Contents of a Mass Mailing in the Business Logic Manual. In this case, you do not need to define transfer fields.
-
Send as: Select the e-mail format (TEXT or HTML).
- Click on (Save) under Transfer
format to save the transfer format (format type "Word
processor").
- Click Close.
Transfer format based on queries (created in Aurea.CRM web) instead of transfer fields cannot be used in Aurea.CRM win to generate single letters and mass mailings.
File Name Variables
You can define variable document names using placeholders enclosed in {}. These placeholders are replaced with the actual values when creating the letter.
The following placeholders are available:
|
Placeholder |
Description |
|---|---|
|
documentclass |
The document class as defined in the word processor format. |
|
extension |
The extension (e.g. ".pdf") for the MIME type (e.g. "application/pdf") of the document. If no mime type is defined the extension of the document template is used. If the document template has no extension ".docx" is used as a fallback. The placeholder {extension} includes a leading ".". |
|
formatname |
The name of the word processor format. |
|
infoareaid |
The info area ID of the record the letter is created for. |
|
keyword |
The keyword as defined in the word processor format. |
|
now |
The current time (HHMMSS). |
|
recordid |
The record ID of the record the letter is created for. |
|
rep |
The rep name of the current user. |
|
repid |
The rep ID of the current user. |
|
tablecaption[:name] |
The table caption of the record the letter is created for. Optionally the name of a custom table caption can be specified (separated by a colon): tablecaption:<TableCaption_Name> Note:
This placeholder is supported in Aurea.CRM web only. |
|
template |
The file name of the template document (without extension). |
|
today |
The current date (YYYYMMDD). |
|
user |
The login name of the current user. |
Examples:
|
Definition |
Result |
|---|---|
|
{template}_{tablecaption}{extension} |
Invitation_Mr. John Doe.pdf |
|
{formatname}{repid} |
Offer100026.docx |
|
order_{today} |
order_20120531.docx |
Establishing a Connection with the Word Processor
To establish a connection with your word processor and create the document template:
- Select Extras > Connection with Word Processor from the menu.
- Load a transfer format.
- Click Connect.The letter document entered in the Document field of the transfer format (word processor format) is opened in the background.
- Click on Close in the Connection with Word Processor dialog box.
- Select Extras > Transfer to Word Processor from the menu. (If Microsoft Word displays an error message at this stage, confirm this message with OK.)A second document is generated in the background.
- Close this second document without saving it.
- Switch to the original document in Microsoft Word.
- Click on
 (Mailings > Insert
Merge Fields).The address placeholders
(Addr.0-9, Salutation and
placeholders for transfer fields) are displayed.
(Mailings > Insert
Merge Fields).The address placeholders
(Addr.0-9, Salutation and
placeholders for transfer fields) are displayed. - Add the address fields (e.g. Addr.0 to
Addr.6) one after another to the appropriate place in the
document.
The address placeholders form a block. Each line of the address in the bulk letter has the same length so that the transferred address fits inside a standard envelope window.
If a line in the address is too long, it is output over several lines. No blank lines are added for unused address fields.
The greeting defined in the label replaces the Salutation merge field.
- Save the document and leave it open. It is now defined as your document template
used to generate letters.Note: To check the spelling of letters, make sure that the Do not check spelling or grammar check box in Microsoft Word is disabled (in the language settings), at least for those portions of the document you wish to check.
To save DOCM files stored in Aurea.CRM's document management system, DOCM files need to be defined as files that are not deleted, see Configuration Info Area (Documents category, File types to be retained option) in the CRM.core Administrator Guide.
- Return to Aurea.CRM win.
- If the document template is stored in Aurea.CRM's document management system, you are asked whether the file should be saved. Select Yes.
- Select Extras > Transfer to Word Processor from the menu to test the transfer.A letter is generated for the current record. Two documents are now open in Microsoft Word: the template and the letter.
- Select Extras > Connection with Word Processor from the menu of Aurea.CRM. Click on Disconnect to terminate the connection.The template in Microsoft Word is closed.
- Close the dialog box.
You can now use the transfer format and document template to generate mail merges and single letters, see Single Letters and Mail-merge Letters.