Label Formats
In order to transfer the correct address and contact information to a letterhead, you need to define label formats. Assign a label format to each company or person record (in the Label field) to ensure that your mailings reach your customers.
Defining Label Formats
To define a label format:
- Select Extras > Define Label from the menu.
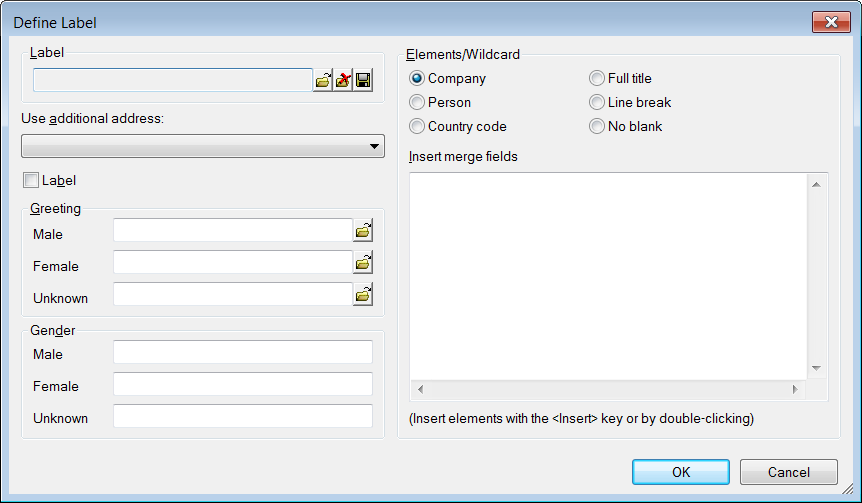
- By default, the fields used in the letterhead are transferred from the address in the Company info area. If you wish to use an address from the Additional Address info area instead, select an entry under Use additional address.
- If the label format is used to print labels, enable the Label
button. A line break is then inserted every 35 characters. Otherwise lines
are restricted to 250 characters.Note: If you use the same format for various tasks, you can use the Line Break 1-3 fields in the Company info area to determine where new lines are added. This information is saved automatically when the company name is first added if it contains line breaks.
- To add elements to the label, select an option under Elements/Wildcards
and double-click on the desired position in the Insert merge
fields text field. The following options are available:
- Company or Person: Select the desired fields from the dialog box.
Note: When defining labels for the Person (PE) info area, you can only use those fields that are assigned to the Person in Company (KP) info area, see Data Model (KP) in the CRM.core Administrator Guide. Fields in the Contact Person (CP) info area Felder cannot be used.Place the elements in the position you want them to appear in the letterhead. You can edit the elements as with normal text and add new lines using the Enter key.
When a letter is generated using the format, the placeholders are replaced by the corresponding entries from the database (e.g. FI2*Company would be replaced by the name of the company).
- Determine the greeting used in the letter under Greeting.
The greeting is determined by the value in the Form of address field. If the field is empty, the Unknown greeting is used.
Placeholders in the Elements/Widcard area can also be added to this text field using the Insert key of by double-clicking.
- Determine how you want to address the genders (e.g. Mr., Ms.) based on the entry in the Form of
address field in the person record. This replaces the {KP0*Form of address}
placeholder in the letterhead. If no form of address has been entered in a person record, the
Unknown entry is used.Note: The length of the fields in the Gender pane is restricted to 20 characters.
- Save the format and click on OK.
Use the Label info area to verify the contents and formatting of the label (select Info > Label from the menu).
Letterhead Examples
The following example demonstrates how to define the address and greeting:
Defining the Address:
- Select the company fields used to form the address of the company; e.g. {FI2*Company}{FI10*Street}{FI7*Postal Code}{FI8*City}.
- Select the person fields used to form the recipient; e.g. c/o {KP0*Form of address} {KP2*Last Name} In order to define the greeting "Dear Mr. Miller":
- Click in the Male greeting field.
- Enter the consistent part of the text, e.g. "Dear".
- Enable the Person radio button.
- Double-click in the Male greeting field to the right of "Dear".
- Select Form of address and Last Name from
the Field Selection dialog box, and confirm with
OK.
The chosen elements are inserted into the greeting:
Dear {KP0*Form of address} {KP2*Last Name}
- Enter spaces between the elements.
- Click on
 (Save).
The placeholders are replaced by data when transferred to the word processor.
{KP0*Form of address} is replaced by "Mr."
{KP2*Last Name} is replaced by the person's last name.
Preventing Blank Lines
To prevent blank lines from being output:
- Select Extras > Define Labels from the menu.
- In the Elements/Wildcard area, enable the No blank radio button.
- Place the cursor left or right outside the curly brackets enclosing the variable (e.g. {FI2*Company} | ).
- Double-click at this position.
An additional {!Empty} variable is added. Result: {FI2*Company}{!Empty}
If the transferred record does not contain a company name, a blank line is not inserted.