Adding New Info Areas
Learn how to add new info areas.
- Start the Maintenance module.
- Switch to the Data Model info area.
- Click the Generated entry under Info Area
in the tree view.
The Info Area: Generated table is displayed.
- Click in the No. or Name column in the
first free row.
The Selection dialog box opens.
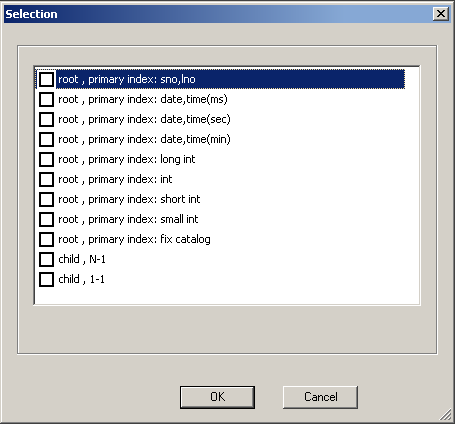
- Select the type of info area:
- root: Independent info area; i.e. not a child of any other info area
-
primary
index: sno, lno: The primary key is composed of the
station number and serial number. A column named ID of the
type long integer is added to the database and stores the two values together.
When a new record is added, the station number is automatically entered and a
serial number generated.
This type of index is used to generate unique system-wide keys. Data of this type can also be linked. For this reason, the Gen.ID field is automatically enabled for info areas of this type.
Note: Aurea recommends using this index for all independent info areas. In contrast to other primary keys it guarantees that data is communicated correctly between stations without any undesired merging of records. - primary index: date, time(ms): The primary key is composed of the Date and Time fields. A column named ID of the type long integer is added to the database and stores the two values together. The time is displayed including milliseconds. When a new record is added, the current date and time are entered automatically.
- primary index: date, time(sec): As above, except the time is displayed with seconds.
- primary index: date, time (min): As above, except the time is displayed with minutes.
- primary index: long int: The primary key is composed of the ID field of the type long integer.
- primary index: int: As above, but the ID is an integer.
- primary index: short int: As above, but the ID is a short integer.
- primary index: small int: As above, but the ID is a small integer.
-
primary
index: fix catalog: An ID field of
the type long integer is created. Assign this field to a fixed catalog: Click in
the Info Area column in the Info
Area table. The associated Info Area table
is displayed. Click in the Catalog column in the
Info Area table. Select the desired catalog from the
list.Note: The first value in all fixed catalogs has the ID '0'. If you use a fixed catalog as an index, records with the first catalog value cannot be saved as there is no primary key for '0'.
- child N-1: The new info area is a child info area, and any number of records in the new info area can be assigned to a record in the parent info area. The station number (sno) and a serial number (lno) are used to form the primary key. The LINK_XX_Sno and LINK_XX_Lno fields are added as a link to the parent info area, with XX the abbreviation of the parent info area. Two columns are added to the database, ID and ID_XX, which store the station and serial number together as a long integer.
- child 1-1: The new info area is a child info area, and each record in the parent info area can be associated with a single record in the child info area. This allows info areas to be defined that function as an extension of other info areas. The LINK_XX_Sno and LINK_XX_Lno fields are added as a link to the parent info area, with XX the abbreviation of the parent info area. The ID column is added to the database, which stores the station and serial number together as a long integer.
Note: Info areas that have a different primary key than the station number and serial number should not be communicated. Without a unique station and serial number, records could be merged incorrectly. If you wish to define an info area that should be communicated, use the primary index: sno, lno option to form the primary key.Depending on the type of info area, system fields are added automatically, for example DelCd. (delete code) and the station number, see System Fields.
- Select Test info area from the context menu to test the info
area for errors. Select Apply info area from the context menu to
apply all changes to the info area to the active data model.Note: You need to lock the system for all active users before you can apply the info area to the active data model.
- Close all tables.
More information on editing info areas can be found under Info Area Options and Field Options.
You need to integrate the new info area in a level in order to use it in Aurea CRM, see Defining New Levels in the Aurea CRM win Administrator Guide.