Transferring a CRM Target group to Lyris HQ
Learn to transfer a CRM target group to Lyris HQ.
Once you have transferred the marketing activity to Lyris, you have to create the target group and execution definition for the marketing activity, for more information see Adding the Target Group and Execution Definition. Next, you can transfer the target group to Lyris.
Transferring a target group to Lyris involves the following phases:
- Pick CRM Fields—select the CRM fields listed for the info areas. These fields
are added as attributes of a contact that is created in Lyris for each of the target
group members transferred to Lyris. The CRM fields are limited to the following infoareas:
- Company (FI)
- Contact Person (CP)
- Person (PE)
- Person in Company (KP)
- Map CRM fields—the fields selected in the first step are mapped to equivalent demographics present in Lyris or new demographics can be created and added to the Lyris demographics.
- Create Segment—associate the target group with a segment in Lyris. This is important because multiple marketing activities can use the same mailing list. And segments enables you to identify the mailing list members in the context of a marketing activity.
- Overview—this phase displays the number of active target group entities that are eligible to be transferred to Lyris.
- Schedule Transfer—this phase schedules the transfer and ensures that the transfer process remains active until all the entities are transferred to Lyris. For example, if a connection time out happens during the transfer to Lyris, then CRM would try again at a later time until the transfer is complete.
On transferring a target group, an instance for each of the target group member is created in Lyris, using their email contact and demographic details. The target group members are then added as participants to the corresponding mailing list created in Lyris. Aurea CRM ensures the inclusion of the target group members to the segment created in Lyris. You can transfer a target group to Lyris HQ from the campaign designer or from the standard editor for marketing activities
Transferring from the Campaign designer
To transfer a target group for a marketing activity to CRM designer:
- Open the marketing activity in the campaign designer.
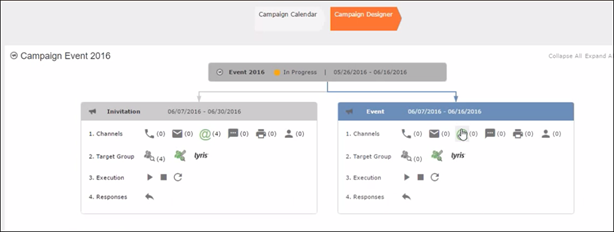
- Click in the Target Group row. The Transfer Target Group to Lyris page
displays.
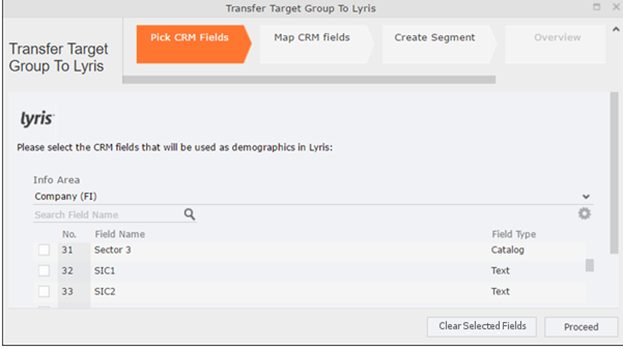
- Click the Pick CRM Fields tab. To select the required CRM fields to be included as
attributes for the contacts in the target group, perform the following:
- Select the required Infoarea from the Info Area dropdown list.
- Click the check box to select the required field from each infoarea. You can search for specific fields by typing the field name in the Search Field Name filter. You can sort the displayed fields by name or type by clicking the respective field headers: Field Name or Field Type.
- Repeat the above steps to select the required fields from different infoareas.
- The SeqNo, and StatNo fields.
- The fields for which the user does not have view rights.
- The fields containing email addresses. They are automatically transferred.
- Click Proceed. The Map CRM fields tab gets activated and the following message
displays: Please wait until the mappings between CRM fields and Lyris demographic
mappings are loaded...
Aurea CRM communicates with Lyris server to retrieve the corresponding Lyris demographics and displays the mapping table.
To map the CRM fields listed in the table with the retrieved Lyris demographics, perform the following:- Click in the Lyris Demographics column to display the list of demographics
retrieved from the Lyris server and select the appropriate demographic for each
of the listed CRM field. The demographics listed available are the ones that
are compatible with the CRM field based on the CRM Field type. See the
screenshot below:
If you cannot find an appropriate Lyris demographic for the CRM field, you can create a new Lyris demographic. See the next step.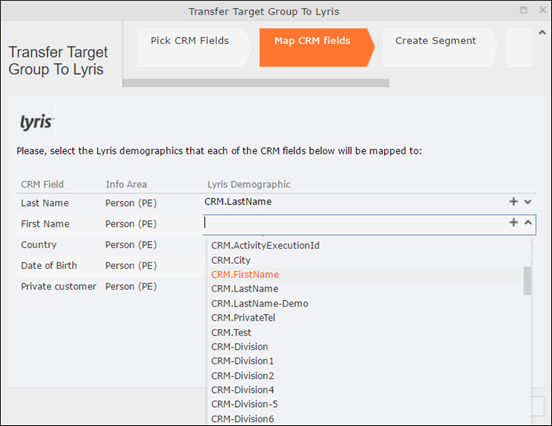
- To create a new demographic, perform the following:
- Click +. The Create new demographic dialog displays.
- Enter a name for the demographic. A suggested name (name of the corresponding CRM field) is displayed for the demographic to be created in the Name textbox. You can also specify a name according to your preference.
- Select the type of the demographic from the Type field.
In the screenshot below a new demographic for the field private customer is created. It is named CRM.PrivateCustomer and the type selected is a Checkbox.
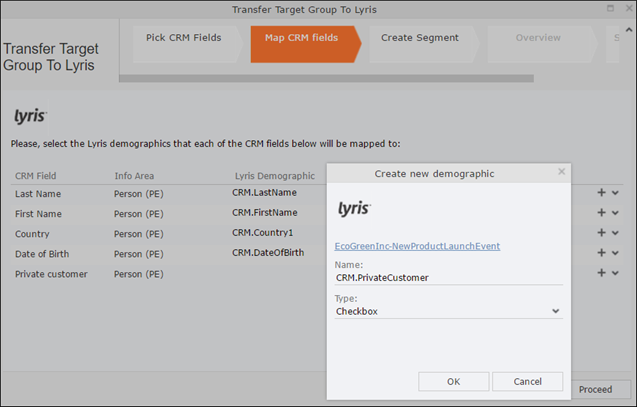
- Click OK. The new demographic is created in Lyris.
- To view the mapped demographic attributes in Lyris, open Attributes tab
and select the required mailing list from the List filter. The Attribute
column should show the list of mapped attributes from CRM. See the
screenshot below.

- Click in the Lyris Demographics column to display the list of demographics
retrieved from the Lyris server and select the appropriate demographic for each
of the listed CRM field. The demographics listed available are the ones that
are compatible with the CRM field based on the CRM Field type. See the
screenshot below:
- Click Proceed. The Create Segment tab displays.
- Click Create Segment. A segment for this mailing list is created in Lyris.
The name of the segment created in Lyris is displayed. Clicking the named URL opens the required Lyris segment in a new tab. The name generated is a concatenation of the name and the record id of the marketing activity.

When the segment for this target group is created in Lyris, it generates the Segment generated event. You can view the segment information in the Segment tab of the Edit/View Target group window.
- Click Proceed. The Overview tab displays.
The number of active target group entities that are eligible to be transferred to Lyris is mentioned. Note: If there are no target group entities for the email channel available to be transferred to Lyris, then a message “No target group entities are eligible to be transferred to Lyris” is displayed. You should go back and create the target group.
 - Click Proceed. The Schedule Transfer tab displays.
- Click Schedule Target Group Transfer. A tick mark appears signifying that the
transfer process is scheduled.

- To check the status of the transfer, open the Collaboration > To-Dos menu and search
for the required scheduled activity. The status of the scheduled transfer should be
visible. The following screenshot shows the status of the transfer is In
Progress.
The transfer status changes to Completed, once the target group is transferred successfully.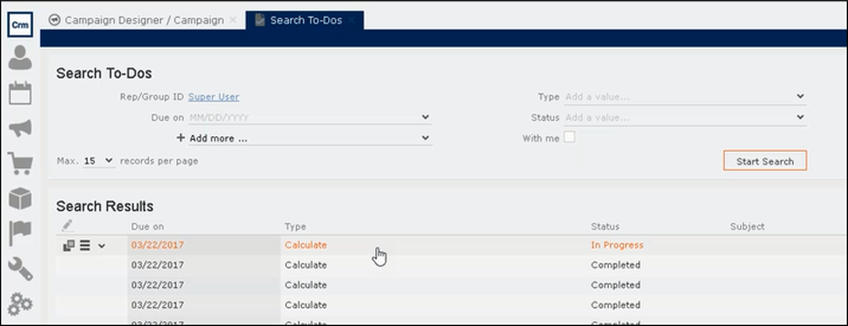
- To view the details of the transfer process, open the scheduled entity from the
To-Do search list. The Related Data tab contains a link to a text file that contains
information about the target group transfer process.
Open the document to find the information on the transfer process.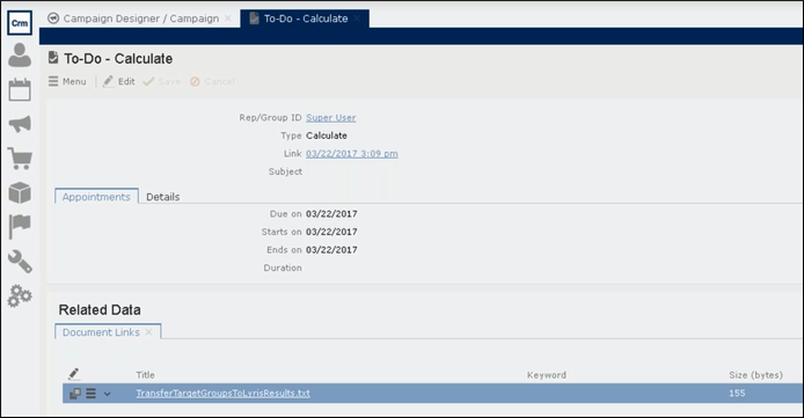
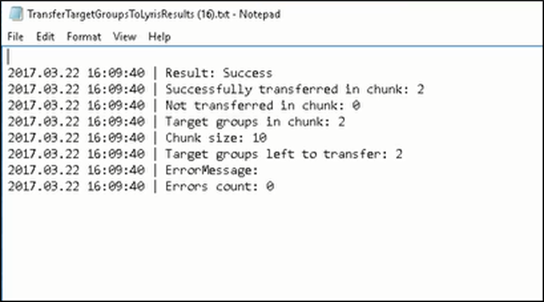
- You can check the contacts created in Lyris for the transferred target group
members. To list the contacts in Lyris and view the contact details created, perform
the following:
- Open the Contacts tab and select the mailing list from the List filter. The
contacts created for his mailing list is displayed.

- Click View to open the details of the contact generated. The View Contacts
dialog displays.
The field values of the mapped fields are transferred from CRM and populated in the corresponding mapped demographics in Lyris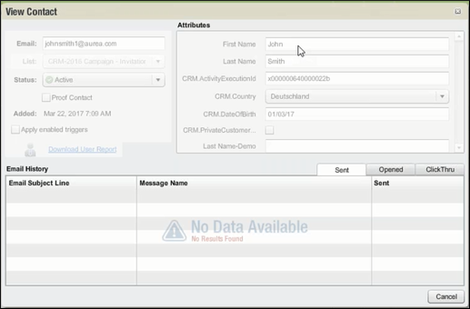
- Open the Contacts tab and select the mailing list from the List filter. The
contacts created for his mailing list is displayed.
Transferring from the Standard Editor
If you prefer to use the standard editor for creating marketing activities instead of the Campaign Designer, you can still transfer a marketing activity to Lyris from the standard editor.
To transfer a marketing activity from the standard editor to Lyris, perform the following:
- Select Marketing > Marketing Activities from the CRM menu. The Search Marketing activities page displays.
- Enter the search filters and click Start Search. The search results list displays.
- Open the context menu of the required marketing activity from the result list and
select Tab View or Tree View. The
Marketing Activity window displays.
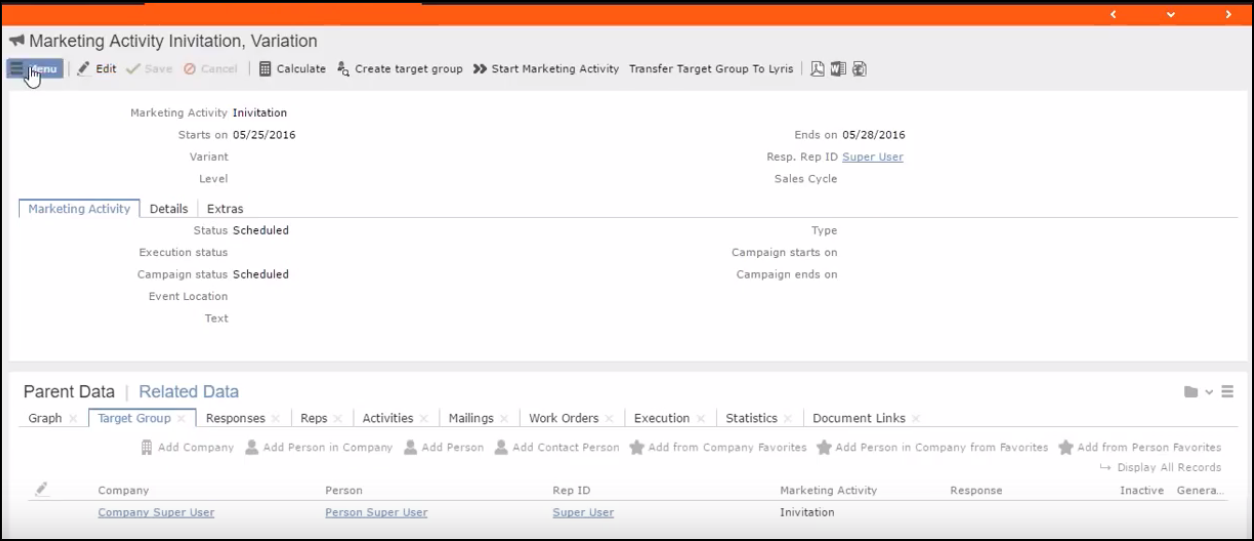 Note: Double clicking a marketing activity from the result list opens the marketing activity in the campaign designer.
 - Select Related Data > Target Group tab.
- If there are no items listed in the Target Group Tab, click on the Create Target Group link.
- Once your target group is defined, click the Transfer Target Group to Lyris link.
The Transfer Target Group to Lyris page displays.
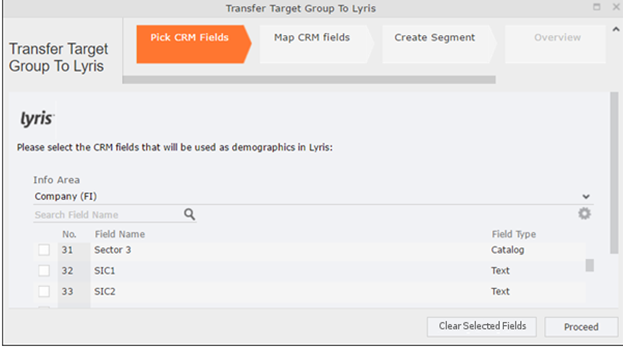
- The rest of the steps to transfer the target to Lyris from the standard editor is similar to the way the target group is transferred from the Campaign Designer. Perform the steps 3 to 12 as described in the topic Transferring from the Campaign designer.
The remaining sections in this chapter talk about the effect of making changes to the target group in Aurea CRM and the corresponding changes in Lyris.
Adding or Deleting member(s) from a Target group
When you add a member to or delete a member from a target group that is already transferred to Lyris, a corresponding member entity is added or deleted from the corresponding mailing list on Lyris.
Adding a member to the target group
In the screenshots below, a fourth member is added to the target group and the corresponding change in Lyris is shown.
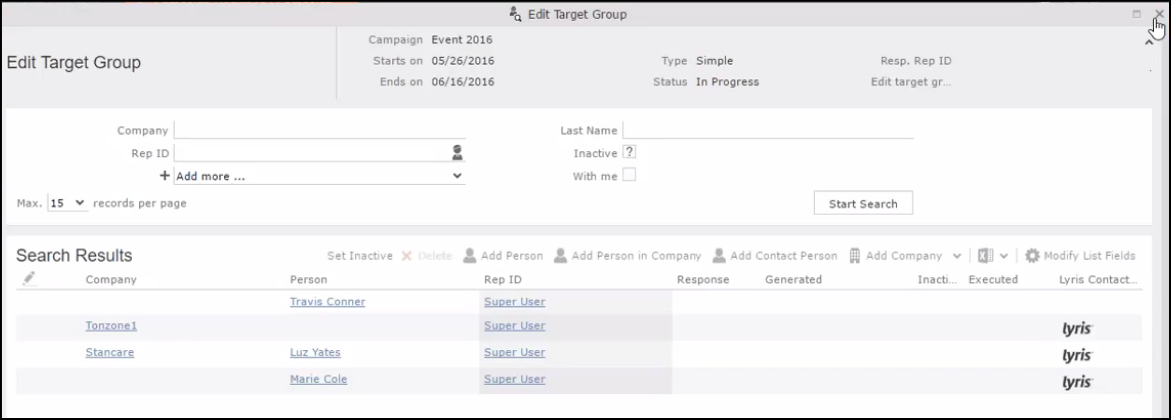
As visible in the screenshot above, a new member (Travis Conners) is added to the target group. The user is automatically added to the corresponding mailing list participants on Lyris, as shown in the screenshot below.

As you can see the new person is added to the list of active participants in the corresponding mailing list.
Deleting a member from the target group
If you delete a member from the target group on Aurea CRM, the corresponding mailing list member in Lyris is moved from Active members to the Admin Trash list.

Member Marie Cole is deleted from the target group.

Member Marie Cole is moved from Active Members list to Admin Trash list.
Activating or deactivating a target group entity
Deactivating a target group member in Aurea CRM, moves the corresponding member record to the unsubscribed list in Lyris. The following screenshot shows the person entity (Travis Conners) deactivated (Inactive) in Edit Target Group window.
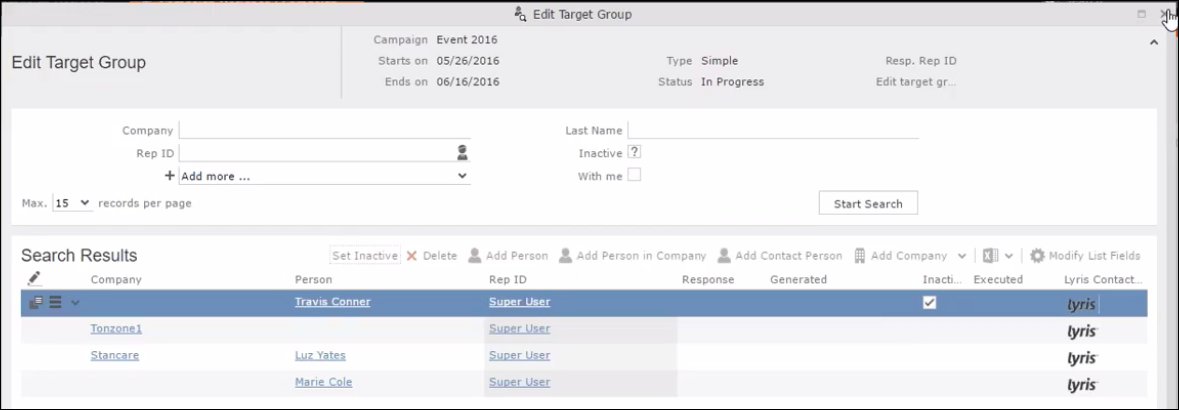
The corresponding entity is now moved to the unsubscribed list of member records in Lyris.

Similarly, activating an inactive member in the Edit Target Group window, moves the member record in Lyris from the Unsubscribed list to the Active Members list.
Changing the attributes of a target group entity
If the attribute of a target group member already transferred to Lyris is changed, the changes are automatically transferred to Lyris.
In the following screenshots the last name of person entity Conner is changed to Smith, and his email id is changed to the same is reflected in Lyris.
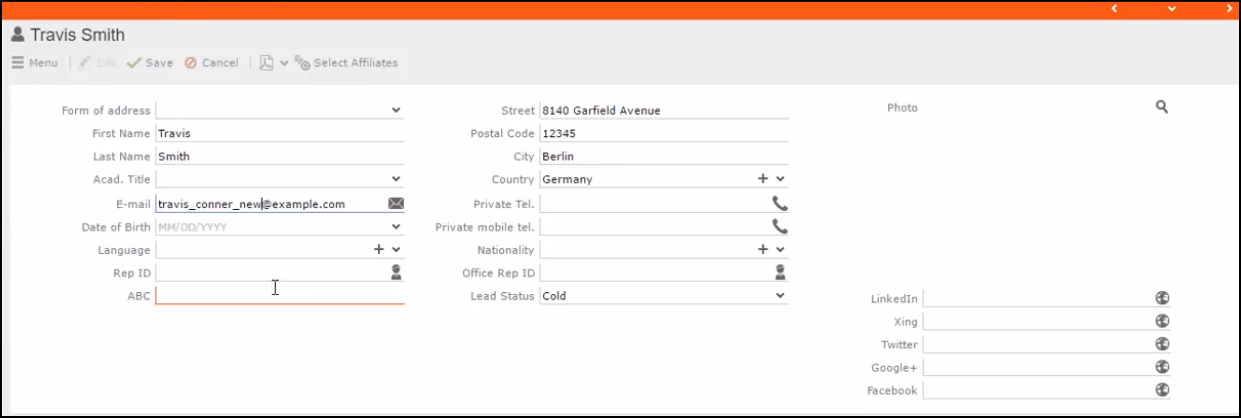
The corresponding changes to the member record in Lyris is shown in the screenshot below.
