Opportunity Process
Opportunity management allows you to manage and analyze sales opportunities.
You can manage and analyze sales opportunities, starting from when you first hear of a sales opportunity until the opportunity is concluded either successfully or unsuccessfully.
Opportunities can be added for interested parties, as well as for existing customers. Throughout the sales process, you can collect information relating to the opportunity. The opportunity process and the various phases that make up the process guides you through these steps. Different information is collected in each phase. You initially only need to enter basic information; in later phases you then begin adding more detailed information, such as participants (decision makers; those affected by the opportunity) or products.
The opportunity process stores all data relating to the opportunity (participants, activities, offers etc.) and you can access this information throughout the entire negotiation period. You can always identify the current phase and which steps still need to be completed.
The opportunity process consists of the following phases:
![]()
In order to progress to the next phase, certain conditions need to be met, e.g. a participant and an activity need to have been added. Switching to the next phase occurs automatically once the necessary conditions have been met. You cannot switch between phases manually.
|
Phase |
Related Areas |
Requirements for the Next Phase |
|---|---|---|
|
1) Identification |
Opportunity Participants Activities Tasks |
An opportunity has been added and the basic information entered. An opportunity participant must exist An activity must exist |
|
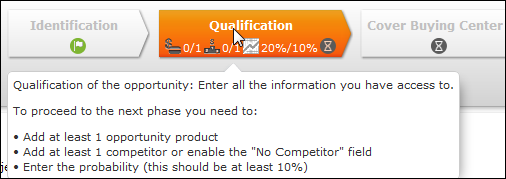
2) Qualification |
Opportunity Participants Activities Opportunity Products Competitors Portfolio Note Opportunity Comments Documents Tasks |
An opportunity product must exist A competitor must exist or the No Competitor field must be enabled The Probability must be at least 10% (20% is entered by default) |
|
3) Cover Buying Center |
as in phase 2 |
The ABC Status of the opportunity must be entered At least one opportunity participant must exist (the "Decider" At least one activity must have the status "Completed" |
|
4) Offer |
Offers Orders Opportunity Participants Activities Opportunity Products Competitors Portfolio Note Opportunity Comments Documents Tasks |
An offer must exist (which has progressed up to phase 5 (Decision in the offer process) An activity must exist for the activity (the activity is transferred to the opportunity) and its status must be "Completed" |
|
5) Negotiation |
as in phase 4 |
An order must exist (convert the offer to an order) or The status of the opportunity must be set to "Won", "Canceled" or "Lost" |
|
6) Completed |
as in phase 4 The opportunity can no longer be edited. No new offers can be added. |
You can enter new data or edit existing data in the related areas of a phase, see Related Data.
Further information on a phase is displayed using icons in the phase arrows. Move your mouse cursor over the arrows or icons to display a tooltip.
 (Timeline) to display an overview of the participants, offers
etc. added for an opportunity, see Timeline.
(Timeline) to display an overview of the participants, offers
etc. added for an opportunity, see Timeline.You can exit the opportunity process at any time and continue at a later date. If you open an existing opportunity, it is opened at the phase in the current phase. If you open and edit an offer added for an opportunity in the offer process, the conditions required to move to the next opportunity phase may be met and the opportunity is therefore opened in the next phase. The opportunity can also move to the next phase if you open an activity in the calendar and set its status to "Completed".
Users with the necessary access rights (e.g. administrators) can access the History tab under Related Data.
Tasks can be generated automatically in each phase.
For more information, see Technical Documentation ISI Template.
Starting the Opportunity Process
If you add a new opportunity of open an existing opportunity, the opportunity process is either started or continued.
To add an opportunity and start the opportunity process, do any of the following:
- Select
 (Sales) >
Opportunities. Start the search and click on
(Sales) >
Opportunities. Start the search and click on  (New). Search for the company that you wish to add the
opportunity for.
(New). Search for the company that you wish to add the
opportunity for. - Select (Sales) > New
Opportunity. Search for the company that you wish to add the
opportunity for.
- Switch to the company that you wish to add the opportunity for. Click on the
Opportunities node in the tree. Click on
(New).
The opportunity process is started in phase 1 (Identification).
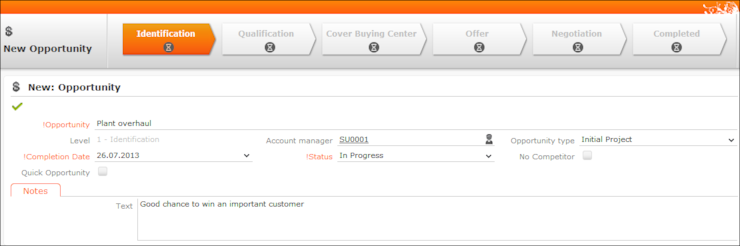
- First enter the general information concerning the opportunity:
- The name of the Opportunity, the Completion
Date and Status are mandatory fields.
Default values are entered in some fields.
- You are automatically entered as the Account manager. You can edit this field if required.
- The name of the Opportunity, the Completion
Date and Status are mandatory fields.
- Save the record.
The input mask for phase 1 (Identification) is displayed.
The company the opportunity was added for is automatically entered as a participant with the Participation set to "End Customer".
You can
also select (Sales) > Opportunities to search
for the opportunity and open it from the results list.
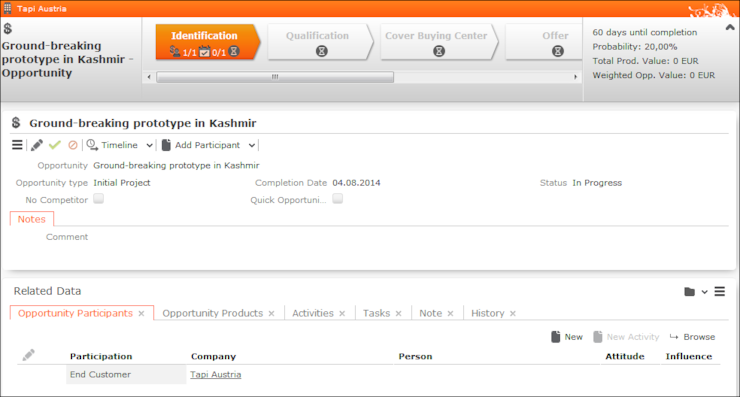
Phase 1 - Identification
Requirements for switching to the next phase
In phase 1 (Identification), you collect basic information concerning the opportunity. You need to add a participant and an activity. The company the opportunity was added for is automatically entered as a the first opportunity participant. You can also add tasks, >> Tasks.
- Click on
 (Edit) in the
Overview section to edit the opportunity’s details.
(Edit) in the
Overview section to edit the opportunity’s details. - You can add the data such as:
- Opportunity participants, see Participants and Roles
Select a participant and click on New Activity to add an activity for the participant.
- Activities, see Activities
- Tasks, see Tasks
- Opportunity participants, see Participants and Roles
To add additional data:
- Click on
on a tab under Related Data.
- Click on
in the upper area (Add Participant/Add Activity etc.). The
options available to you depend on the current phase.
Once you have added an activity, the opportunity progresses to phase 2 (Qualification).
Phase 2 - Qualification
- An opportunity product must exist
- A competitor must exist or the No Competitor field must be enabled
- The Probability must be at least 10% (20% is entered by default)
In this phase, you enter the probability of realizing the opportunity and begin entering opportunity products and competitors.
- Click on Edit in the Overview section
to edit the opportunity’s details.
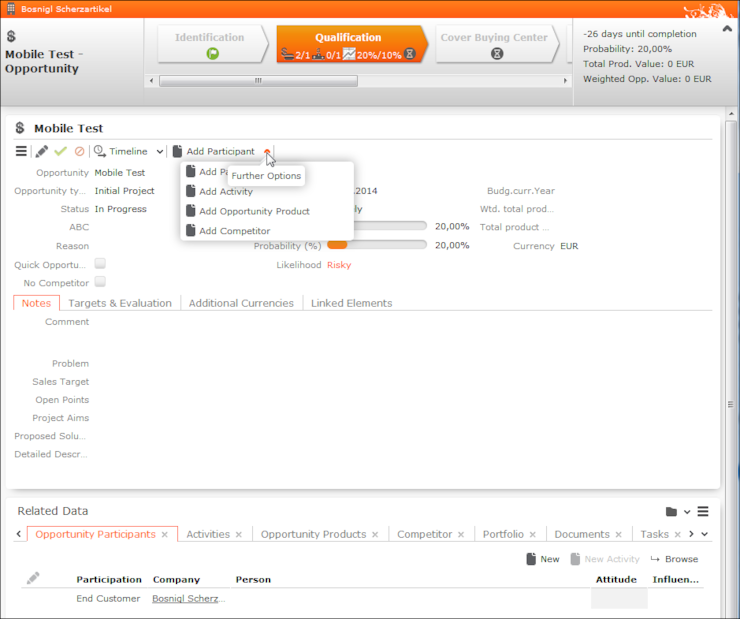
You can enter the Probability (%) manually. You can also Enter details on the customer’s attitude, budget etc. on the Target & Evaluation tab. The Probability (%) is then calculated based on your entries, see Opportunity Fields and Calculations. Once you enter a rating on the Targets & Evaluation tab, you can no longer edit the probability manually.
- Click on the New button in the Opportunity
Products and Competitors tabs to add products
and competitors to the opportunity, see Opportunity Fields and Calculations.Note: You can only select companies whose Co. Type is "Competitor".
If you set the Competitor Status to either "Competitor won Against Me" or "Competitor won Opportunity", the Status of the opportunity is set to "lost" if the Status was either "In Progress" or "Rests". You can then no longer edit the opportunity.
Once you have added an opportunity product and a competitor (or have enabled No Competitor), the opportunity progresses to phase 3 (Cover Buying Center).
Phase 3 - Cover Buying Center
- The ABC classification of the opportunity must be entered
- An opportunity participant must exist whose Participation is set to "Decider"
- At least one activity must have the status "Completed"
In this phase, you enter additional information concerning the opportunity and intensify contact with the potential customer. You need to identify at least one participant as the decision maker for the opportunity.
- Enter the opportunity participants and create activities, see Participants and Roles and Activities.
- Click on
(New) on the Portfolio tab to select
a portfolio, see Portfolios. Answer
the questions and save.
The result of the portfolio is written to the ABC field.
Once you have entered an ABC classification, added an opportunity participants with the Participation "Decider" and one activity has the status "Completed", the opportunity progresses to the phase 4 (Offer).
Phase 4 - Offer
- An offer must exist (which has progressed up to phase 5 (Decision in the offer process)
- An activity must exist for the activity (the activity is transferred to the opportunity) and its status must be "Completed"
In this phase you add a new offer.
Click on New on the Offers tab to start the offer process, see Offer Process.
In the course of the offer process, at least on activity must be added and its Status set to "Completed". This activity is automatically transferred to the opportunity.
Once you have reached phase 5 (Decision) of the offer process and have added an activity and set its Status to "Completed", the opportunity progresses to phase 5 (Negotiation).
If your administrator has activated the Invoices info area, the Invoices tab is displayed in the opportunity process from phase 4 (Offer) onwards, see Invoices – ISI.
Phase 5 - Negotiation
- An order must exist (convert the offer to an order)
or
- The status of the opportunity must be set to "Won", "Canceled" or "Lost"
In this phase, negotiations concerning the offer are conducted. Enter date relating to the results of these negotiations in the opportunity process.
- If the customer places an order:
- Open an offer (on the Offers tab) and create an order
from the offer, see Phase 5 - Decision.
The order is automatically linked to the opportunity.
- Switch to the Offers tab and select Copy to Order from the desired offer's context menu.
- Click on Add existing Order button on the Orders tab to add an existing order to an opportunity.
Note: Once you add an order to the opportunity, the Status of the opportunity is set to "Won". - Open an offer (on the Offers tab) and create an order
from the offer, see Phase 5 - Decision.
- If the customer does not place an order based on an offer:
- Open the offer (on the Offers tab), see Phase 5 - Decision.
If the offer is rejected (Offer has been rejected - lost) you need to enter a competitor in the offer.
The Status of the opportunity is set to "Lost" and the competitor entered in the offer is transferred to the opportunity (Competitors tab).
Note: If you create a new version of the offer (Offer was rejected - create new version), the Status of the opportunity remains unchanged. The new version of the offer is linked to the opportunity and you can renegotiate the offer. - Open the offer (on the Offers tab), see Phase 5 - Decision.
- If you do not add an order to the opportunity, you need to set the opportunity’s status to "Won", "Canceled" or "Lost" manually.
Once you have added an offer or set the status of the opportunity to either "Won", "Canceled" or "Lost", the opportunity progresses to phase 6 (Conclusion).
Phase 6 - Conclusion
You can no longer edit the opportunity and related data in this phase.
You can complete the opportunity from any of the previous phases, in which case the opportunity progresses to this final phase. You can complete the opportunity by setting the Status to one of the following values:
- "Won"
If you set an offer linked to an opportunity as having been accepted (won), the status of the opportunity is automatically set to "Won", see Offer Process.
- "Lost"
After setting the status of the opportunity to "Lost", you are prompted to enter the competitor that won the opportunity. Select the competitor from the list or click on New to add a new competitor.
Click on Back to Overview ti return to the process without entering a competitor.
If you set the Competitor Status to either "Competitor won Against Me" or "Competitor won Opportunity", the Status of the opportunity is set to "lost" if the Status was either "In Progress" or "Rests".
- "Canceled"
Related Data
Depending on the opportunity’s phase, various child areas are available where you can enter information on participants, activities, competitors etc. These child records are linked to the opportunity.
Click on a record to select it. Click on New to add a new record; click on New Activity for Participant etc. to add a new record for the selected record. New records are automatically linked to the opportunity.
Double-click on a record to open and edit it.
Click on Back to Overview to return to the process overview from a child record without saving your changes. If you have edited data, you are asked whether you wish to discard your changes.