Direct Debit/ACH Payments
Learn about Direct Debit/ACH Payment type.
Direct Debit/ACH payments is an old method of performing payments and is non PCI compliant. This is the existing functionality for Suppliers who are not using the CASH module. To learn more about CASH, see PCI-DSS Compliance and CIS Solution - CASH.
To process a Customer’s payment via credit/debit card or ACH, follow the steps below:
- Go to Administration Menu > Deposit/Payment > Post CreditCard / ACH Payment.
- On the REAL-TIME CREDIT CARD / ACH PAYMENT POSTING page, enter the Customer account number in the Account No. field and click Add.
- Click Post Payment or Manage Autopay depending on the need:
To Post a Payment
- Click on Post Payment button to make a payment.
- Select the already added payment type from the dropdown and enter the amount then click on Submit button on Make a payment page.
- If no payment type is added, select New ACH or New Credit Card from Payment Type dropdown.
- On the Make a payment form, set the following fields:
Fields Description Payment Type Select payment type. Amount Enter the amount. Card Details Enter the card details. Note: If you select New ACH from Payment Type dropdown, you need to enter bank details instead of card details.Name Enter the first and last name. Email Enter the e-mail address. Phone number enter the phone number. Address Enter the address. 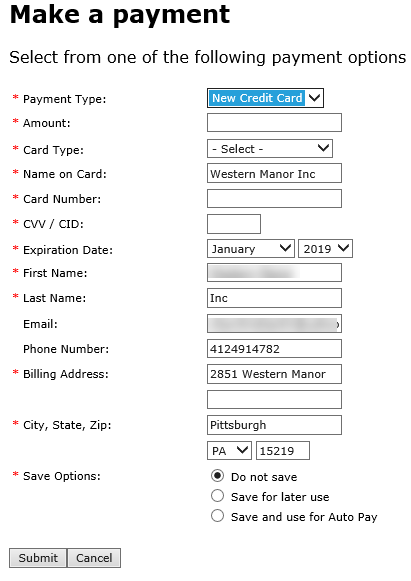
- To save, use one of the following options:
- Select Do not save for real time payment.
Here the amount gets applied to the list of invoices or is left as an unapplied payment for the future invoices if there are no current invoices with pending payment. The transaction is then posted to customer's account and it starts reflecting in the AR balance. The payment detail is also assigned to be included in the next file export.
- Select Save for later use to save card details for later payments.
A scheduled payment is handled just like real-time payment. The only difference to the user is that the Scheduled Future Payment checkbox must be checked from the payment screen, and the Scheduled Date must be included. This payment is not immediately posted against the Customer’s AR, but instead waits for the payment service to collect the payments that are due.
- Select Save and use for Auto pay for recurring payments.A Customer can schedule recurring payments which is then applied to invoices after a fixed number of days, as per business rule, after they are posted. Once recurring payment is configured, the payment service monitors the system for invoices that need to be paid, and collect them to include in the daily export file.Note: The payment service monitors the system for invoices that need to be paid, and collects them to include in the daily export file.
- Select Do not save for real time payment.
- Click Submit to process payment. Click Cancel to close the Make a payment page.
To Manage Autopay
- Click on Manage Autopay button. Manage Auto Pay page is opened. This page displays the existing autopay, if present.
- If you want to disable auto pay, click on Stop using Auto pay button.
- Click on Add payment Method to add a new auto pay.
- A new form to add and save the payment method opens. This form should be filled in the same way as Post Payment form.