Masks Tab
Learn how to configure global settings for masks, lists and document fields.
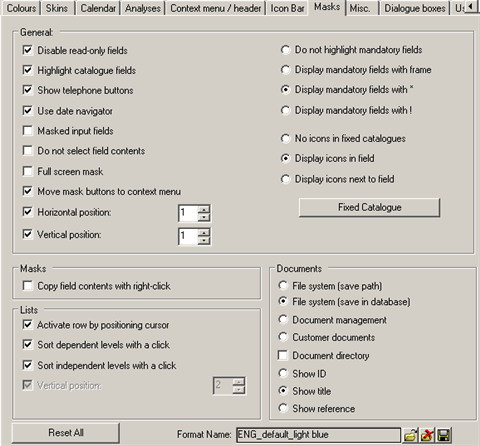
Use the Masks tab to configure global settings for masks, lists and document fields:

General
- Disable read-only fields: Determines whether read-only fields are displayed with a gray background in edit mode.
- Highlight catalog fields: Determines whether the color settings defined for catalogs in the mask (in the Mask Generator, Tab Group Properties window, Colors tab) are also applied to catalog fields in edit mode, see Colors Tab.
-
Show telephone buttons: Determines whether the telephone icon
is displayed in telephone fields. Click on
 (Make Call) to dial the number. Note
that CRM.phone must be installed.
 -
Use date navigator: Enable this option to use Aurea CRM's
dedicated date and time fields, see Entering the Date Directly in the User
Manual.
Disable the option to use normal input fields to enter date and time values.
- Masked input fields: Enable this option to use masks (input formats) defined for specific fields in the data model, see Mask in the CRM.core Administrator Guide.
- Do not select fields contents: Determines whether the field contents in masks, lists and tables are automatically selected when a field receives focus.
- Full screen mask: Enable this check box to adjust the mask to the screen resolution, see Screen Resolution.
- Move mask buttons to context menu: Enable this option to determine that buttons defined in individual masks are only displayed as entries in the context menu. This setting can be overridden by individual buttons by enabling the Never in context menu option in the Mask Generator, see Button Properties.
- Horizontal/Vertical position: Determine how far (in grid units, see Grid Units) the mask should be displayed from the left and top edge of the window. This settings can be changed for individual masks (Position and Size section) in the Mask Generator, see Mask Properties.
- Do not highlight mandatory fields: Mandatory fields are not highlighted.
- Display mandatory fields with frame: A frame is displayed surrounding mandatory fields. The color of the frame is defined in the Mask Generator (Tab Group Properties), see Colors Tab.
- Display mandatory fields with *: Mandatory fields are indicated using "*".
- Display mandatory fields with ! : Mandatory fields are indicated using "!".
- No icons in fixed catalogs: Displays catalogs without icons.
- Display icons in field: Displays icons directly in catalog fields.
- Display icons next to field: Displays catalog icons to the right of catalog fields.
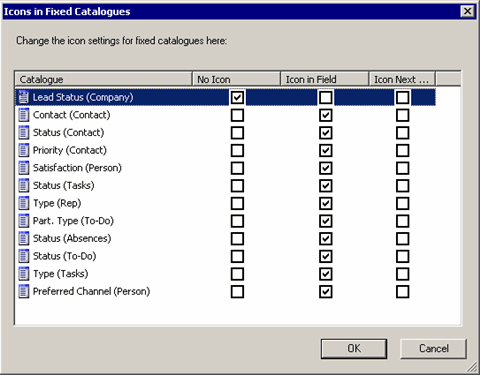
Click on Fixed Catalog to configure the icon settings for individual catalogs:

These settings take precedence over the global settings (No icons in fixed catalogs, Display icons in field and Display icons next to field).
Masks
Copy field contents with right-click: Enable this check box to allow users to copy the contents of read-only and link fields to the clipboard by selecting Copy from the popup menu.
Lists
- Activate row by positioning cursor: Enable this check box to allow users to select a record by positioning the mouse over the left border of the list.
- Sort dependent levels with a click: Enable this check box to allow users to sort dependent levels by clicking on column headers in list view, see Sorting Records in the User Manual.
- Sort independent levels with a click: Enable this check box to allow users to sort independent levels by clicking on column headers in list view, see Sorting Records in the User Manual.
-
Vertical position: Determines how far from the top edge of the
window the mask should be displayed. The units are grid units, see Grid Units.Note: This option is only available if the Vertical Position option in the General pane is disabled.
Documents
Use these options to determine where users can search for documents and what information is displayed in document fields, see Document Management in the User Manual.
-
File system (save path): Clicking on
 (Load) in
document fields allows user to search for documents in the file system. The path to
the file is entered in the document field; the document is not uploaded to the
database.Note: Select a field with at least 256 characters to display the path.
 -
File system (save in database): Clicking on
 (Load) in
document fields allows user to search for documents in the file system. The selected
document is saved in the database.
 -
Document management: Clicking on
 (Select
Document) opens the search mask for the
Document info area.
 -
Customer documents: Clicking on
 (Select
Document) opens the search mask for the Customer
Document info area. This is only possible if the current info area is
dependent on the Company or Person in Company
info area.
 - Document directory: Enable this option to determine that the directory specified under Extras > Document Directories is opened when adding external documents. Otherwise the My Documents directory is opened.
- Show ID: Enable this option to display the document ID (e.g. A100-1) in document fields.
- Show title: Enable this option to display the name of the document in document fields. This setting only applies to view mode. The document ID is always displayed in new and edit mode.
- Show reference: Enable this option to display the document's reference in document fields. This setting only applies to view mode. The document ID is always displayed in new and edit mode.