Visit Planning
You can schedule customer visits for yourself or other reps in Aurea CRM web, helping you optimize your working week.
You can generate automatic suggestions for routes, edit the suggested route and then automatically generate activities for the stops on your route. When generating a route, the system takes into account your work hours and the location (geo-coordinates) and contact times of your customers. Existing appointments, absences, public holidays (defined in the calendar), visit durations (default: 60 minutes), breaks between visits (default: 15 minutes) are all taken into account. You can also take other criteria such as open work orders, the customer’s ABC classification, the ratio of actual visits to target visits etc. into account when planning routes.
You can also plan routes manually without suggestions by adding customers to a route. Routes you have planned manually can be optimized by Aurea CRM web.
Routes can be planned for a single day or over several days. Only the stops on the route on the day selected in the calendar are displayed. If you edit a route (e.g. add customers or activities), the route is recalculated automatically.
Select  (Collaboration) > Visit Planning or select Visit Planning from a company or person’s context menu to open the visit planning area.
The visit planning area is divided into several areas:

Map
- The location of your customers on the map are color-coded:
- Orange: The location of your customers (
 companies and
  persons).
 - Orange circle with number (
 ): Indicates several companies are display at a single
location as there is not enough room to display them all on the map. The number
indicates the number of companies at the location. Zoom in to display the
customers’ individual locations.
): Indicates several companies are display at a single
location as there is not enough room to display them all on the map. The number
indicates the number of companies at the location. Zoom in to display the
customers’ individual locations.Click on the orange circle to display a list of all customers at that location.
- Blue (
 ,
,
 ,
,  ): Visits that are part of the
route (either existing appointments in your calendar or suggestions). The
number indicates the order in which customers are visited. The house icon
indicates the start of the route and the flag the end.
): Visits that are part of the
route (either existing appointments in your calendar or suggestions). The
number indicates the order in which customers are visited. The house icon
indicates the start of the route and the flag the end.Activities and suggestions are only displayed for the date selected in the calendar.
- Violet (
 ): Customers originally suggested in the route, but that you have manually
removed from the route.
): Customers originally suggested in the route, but that you have manually
removed from the route. - Gray (
 ):
Customers that are either part of a route or suggested as part of a route on
another day.
):
Customers that are either part of a route or suggested as part of a route on
another day. - The currently selected location is indicated by a circle below the pin (
 ).
).
- Orange: The location of your customers (
- Click on a pin or a customer in the list if multiple customers are grouped at the same location. Information on the customer and the activity/suggestion is displayed below the mini calendar. The activity/suggestion is highlighted in the timeline (if it exists).
- Click on a location on the map or click on
 (Show Menu) in the list of customers at a location to open the context menu. Select Add to Route or Remove from Route to add the customer to the route or remove them from it. Select Edit to edit the corresponding visit suggestion.Note: If you add a customer to a route or remove a customer, the start and end time of existing suggestions are not updated. Click on Optimize to recalculate the route.
 - Messages, e.g. concerning long idle times, exceeded travel times,
conflicting appointments and appointments outside of work hours or on holidays are
displayed and highlighted with an icon according to severity (
 (information),
  (warning),
  (error)). These messages are either
displayed on the route between two locations, or at the starting location if the
message applies to the starting location. Click on an icon to display the message.
The record the message applies to is highlighted in the timeline.
(error)). These messages are either
displayed on the route between two locations, or at the starting location if the
message applies to the starting location. Click on an icon to display the message.
The record the message applies to is highlighted in the timeline.
Sidebar
- Use
 to display or
hide the sidebar.
to display or
hide the sidebar. - Select a date in the mini calendar to display the route on the selected date or to plan a route on that date.
- To generate visit suggestions:
- Click on
 (New Suggestions) below the calendar.
A window is opened where you can define the settings used to generate the suggested route.
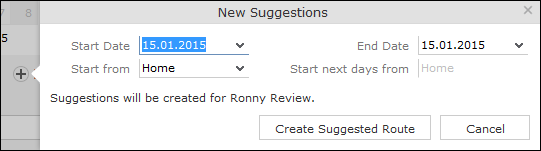
- Choose where to start the route from (Home, Office, Last Visit) and the start and end date (by default, the start and end date are the same). If the route spans several days, determine where the route should start from on the subsequent days (Last Visit starts the next day from the location of the last visit on the previous day).
- Click on Create Suggested Route. The route is created (any existing visit suggestions are deleted) and is displayed on the map. You can now edit the route (e.g. add customers).Note: Calculating the route may take a while. By default, the route is created for you. To generate a route for another rep, click on
 (Select Rep) in the header and select the desired rep. The selected rep is remembered and reused the next time you access the visit planning area. When planning a route for another rep, variable values defined in the corresponding info areas (Z5/Z6) are applied to the current rep, not the rep the route is planned for. If you apply a filter (
 (Settings) in the header), the filter is taken into account when generating visit suggestions. If you add or reschedule an activity outside of the rep’s work hours, the rep’s work hours for that day are extended accordingly. Routes can span 31 days at most.
- Click on
- Click on Optimize to optimize the route if you have edited it or added the route manually. The route is recalculated. The order of visits in the route may change. Existing activities and the starting location are not changed.Note: Calculating the route may take a while. A message is displayed if the route is already optimized or cannot be optimized further.
- Once you are satisfied with the route, click on Save as Visits. Activities are automatically generated (type = "Visit") based on the suggestions in the route.
If you are planning a route over several days, you can choose whether to generate activities for all the suggestions or only for a specific day.
- Click on
 (Discard all Suggestions) in the sidebar next to the number of suggested visits. All visit suggestions are deleted (not just those on the current day).
 - Click on a location on the map or on an activity/suggestion in the timeline to display information on the record in the sidebar.
Move your mouse cursor over the record’s header (e.g. the name of the customer) to display the icons used to access the menu (
) and quick view ( ). Select Remove from Route from the menu to remove the customer from the route.
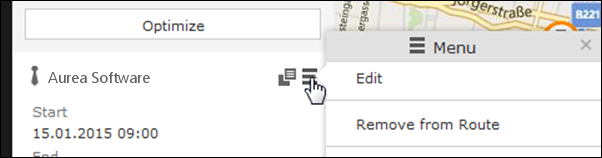
Timeline
- A timeline is displayed above the map containing suggestions that are currently part of the route (blue) or not part of the route (violet). Existing activities and absences are colored the same as they are in the calendar.
- Visit suggestions are indicated by the
 icon in both the
timeline and sidebar. Existing activities and absences are indicated using the same
icon as in the calendar (e.g.
icon in both the
timeline and sidebar. Existing activities and absences are indicated using the same
icon as in the calendar (e.g.  for a visit).
 - Click on an activity or visit suggestion to highlight the customer
on the map with a circle beneath the pin ().
- You can reschedule activities and suggestions by dragging them to the desired time in the timeline. Drag the left or right borders to change the start and end time (and the duration).
- Double-click on an activity or visit suggestion to open a popup where you can edit its details.
Header
- The rep the route is being planned for is displayed in the header. By default, routes are created for you.
Click on
(Select Rep) to select a different rep. The selected user is stored and selected by default the next time you open the visit planning area. - Click on
 (Map) and
  (Calendar) to switch
between the map and calendar view of activities and suggestions. You can edit
activities in the calendar view, e.g. move an appointment to reschedule it.
(Calendar) to switch
between the map and calendar view of activities and suggestions. You can edit
activities in the calendar view, e.g. move an appointment to reschedule it. - Click on
 (Legend) to display the legend.
 - Select (Settings) >
 (Filter) to determine which customers are displayed on the map (e.g. companies, persons) and define filters, >> Defining General Filters. The system remembers which filters are active and applies them again the next time you open the visit planning area. Filters are applied when generating visit suggestions.