Defining Filters
Defining filters in Aurea CRM.
In Aurea CRM.Web and the CRM.Designer you can define and edit filters using the AQL syntax. For further details, see AQL Syntax and Filters in the Aurea CRM.Web User Interface documentation. You can also edit the AQL syntax in the AQL editor.
To define a filter in CRM.Designer:
- Enter a Name.
- Select the root info area from the Infoarea drop-down list.
- Click New.
The info area ID of the root info area is automatically added to the filter's name as a prefix uniquely identifying the filter in CRM.Designer. Example -
FI.MyFilterThe prefix is not displayed when selecting the filter in Aurea CRM.Web. - Click
 (Edit).
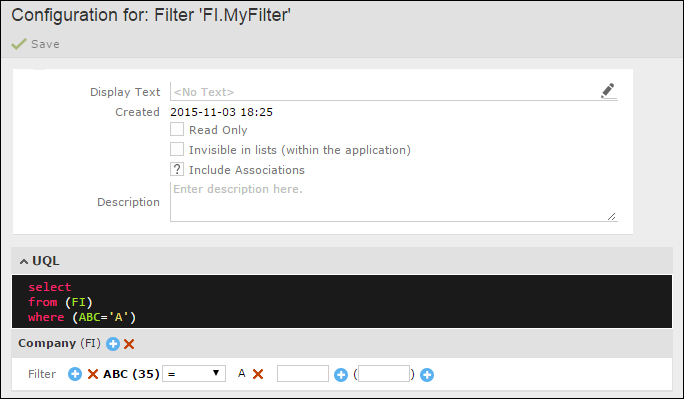
- Specify the following:
-
Display-Text (optional): You can enter a multilingual name
for the filter. This name is used when selecting filters in Aurea CRM.Web. The
text is saved in the
net_filternamestext group. For further details, see Texts. - Readonly: If checked, users cannot edit the filter in Aurea CRM.Web.
- Invisible in lists: If checked, users cannot select the filter in Aurea CRM.Web. If unchecked, users can select and edit the filter. Visible filters from parent configurations are read-only.
- Description: Add an internal description visible in CRM.Designer only.
-
Display-Text (optional): You can enter a multilingual name
for the filter. This name is used when selecting filters in Aurea CRM.Web. The
text is saved in the
-
Filter: Define the filter criteria:
- Select a field and click
 (Add).Note: Filters on decoded fields (Z-fields) are not supported. For further details, see Data Types in Aurea CRM.
 - Select an operator from the drop-down list.
- Enter a value, a variable expression or function and click (Add). For
further details, see Advanced Filter Criteria.
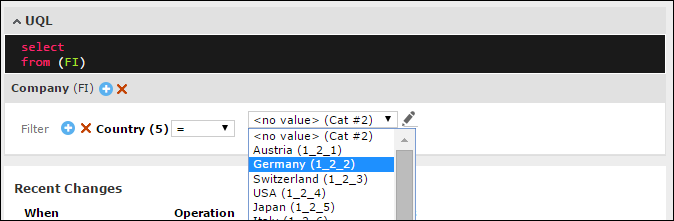
For catalog values you can either enter the text in the default language or the catalog code (as
#<code>). In addition, you can search by external key (#xk:) or by (part of) the value's description (#desc:). For a complete description of the syntax plus examples, see Filtering by Catalog Values.For synchronized catalogs (see Updating Catalogs and Catalog Value Synchronization) you can select the value from the drop-down list:
To filter by values from hierarchical catalogs, define the filter for the child catalog and define the parent and child value as values:
 Note: The AQL notation using "~" is not supported in CRM.Designer.Note: For hierarchical catalog values, the parent catalog value must be the same for all values of one filter node. You need to enter different parent catalog values as multiple nodes.
- Select a field and click
- To add a related info area, click
(Add) beside the root info area and select the desired info
area.
- Specify the following:
- LinkId: If you want to use another than the default link, specify the LinkId. For further details, see Link IDs.
- Max Rows: Defines how many linked records are read for each parent.
- Optional: Check Optional to display the root record only if a related record exists in at least one of the sub-info areas.
- Select the desired Relation type:
-
HAVING:Returns the root record only if at least one related record exists. -
WITHOUT:Returns the root record only if no related record exists.
-
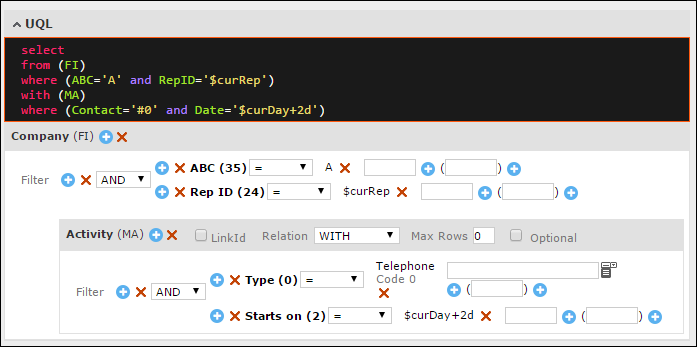
- Define filter criteria for the related info area(s) if applicable, e.g. to filter for companies with at least one Activity record of type "Telephone" on the day after tomorrow.
- Specify the following:
- Click Save.
select from (FI)
where (ABC="A" AND RepID="$curRep")
 with (MA as FIMA)
where (Contact="#0" AND Date="$curDay+2d")