Example: Customer Complaints
This example uses a new table that is used to store complaints from customers.
The table should be dependent on the Company info area; i.e. complaints are stored for companies.
Adding the Customer Complaints table
First you need to define the properties of the new table:
- Open the Maintenance module.
- Switch to the Data Model info area.
- Click Generated below Info Area in the
tree structure.
The Info Area: Generated table is displayed.
- Click in the No. or Name cell in the first empty row to add a new table.
- Choose "child, N-1" from the dialog box and click OK. This defines an N-1 relationship between the parent info area (Company) and this info area; i.e. a company can be linked to any number of customer complaint records, and each customer complaint is linked to a single company.
- Select "Company" as the parent info area in the next dialog box and click
OK.
Your new line should look like the following:

- Click in the Info Area cell to display a table containing the fields in the new info area. A number of fields are added by the system. These include system fields, such as time stamps, delete and communication codes, as well as the fields required to establish the link between the new info area and its parent, key and index fields.
- To add the Description field, used to store a description of
the complaint:
- Click in one of the first four columns in an empty row.
- Select "Text" as the field type, and click OK.
- Specify the length for the text field in the Length column.
- Add the other fields in the same manner, but select the corresponding field type
from the dialog box:
- Product Group: Select "var catalog" as the field type. Select "Product Group" as the catalog to link the field to the Product Group catalog.
- Product: Select "var catalog" as the field type. Select "Product" as the catalog to link the field to the Product catalog. You are then asked to specify the parent catalog. Select "Cat.Var" (the only option) to link the Product catalog with the Product Group catalog.
- Rep: Select "uid" as the field type. 4 new fields are added, that display the rep's name, ID, group and group ID.
- Reply by: Select "date(4Byte)" as the field type.
- Click on
 (OK).
(OK). - In the row of the new info area click in the Text
column.
The info area and a list of the fields in the info area are displayed.
- Enter the name of the info area (e.g. "Customer Complaints) and fields (e.g.
"Description", "Product Group", "Product", "Rep", "Reply by") in the
Language Independent and language-specific columns.

- Click on
(OK).
- Select Apply info area from the context menu to apply the changes to the data model used by Aurea CRM.
Integrating the new Table
In order to use the Customer Complaints table in Aurea CRM win, a level containing the info area needs to be defined.
- Start the Aurea CRM win main module.
- Select Extras > Define Desktop from the menu.
- Click on Define Levels.
- Click OK.
- Click on
 (New) in the Levels pane.
 - You are prompted for an ID for the level. Accept the default value by clicking OK.
- Enter the name of the level ("Customer Complaints") in all available languages.
- Click on
 (Edit) next to Info area
selection.
(Edit) next to Info area
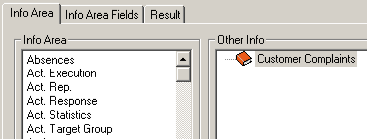
selection. - Select the Customer Complaints info area from the list.
- Click OK.
- Select a mask and list to be used by the level.
- Click on (Edit) next to the Settings
field.
- Enable the Select All check box in the Level
commands pane:
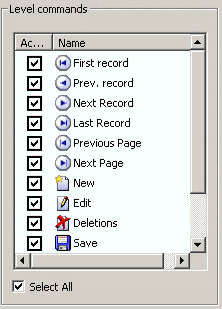
All the commands are then available in the Customer Complaints level.
- Click OK.
- Click on (Edit) next to the Predecessor
field.
- Select Company + Person as the predecessor level.
- Click OK.
- Click on (Edit) next to the Relationship with Parent
field.
- Select "Ratio n:1" and enable the Mandatory check box for the
Company info area.
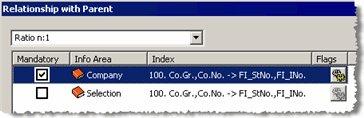
- Click on
 (Flags) next to the
Company info area and enable
PRO_PREL_KEY. This setting causes the system to
automatically enter the company group and number when adding a new customer complaint
record.
(Flags) next to the
Company info area and enable
PRO_PREL_KEY. This setting causes the system to
automatically enter the company group and number when adding a new customer complaint
record. - Click OK three times.
Accessing the Level
In order to access the new level, you need to add commands used to open the level to the desktop format. You can open levels from the Info menu, the level header, context menu or icon bar, see Desktop in the Aurea CRM win Administrator Guide.