Editing the Data Model - General Procedures
Learn about the identical steps needed to be carried out for all info areas, fields and catalogs you wish to edit, when editing the data model.
If you make changes in the data model of an info area and the changed fields are also listed in another info area, then you should ensure that similar data model changes are performed on the second info area.
For example, if you make changes in the data model for the CP or PE info areas and if the changed fields are listed in the KP info area, you should ensure that the same changes are made in the KP info area.
To edit the data model, perform the following steps:
- Click on the desired entry in the tree view (Core or
Generated under Fixed catalog,
Variable catalog or Info Area).
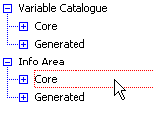
The selected level is displayed.
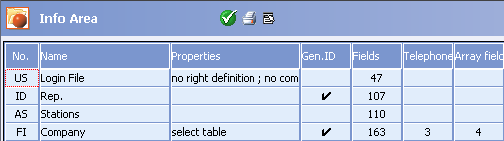
- Click in the cell to define settings, see Tables in the Aurea CRM win User
Manual. You can:
- Edit existing elements, see Editing Predefined Fixed Catalogs, Renaming Predefined Variable Catalogs, Editing Predefined Info Areas and Renaming Fields.
- Define new elements, see Adding New Fixed Catalogs, Adding New Variable Catalogs, Adding New Info Areas and Adding New Fields.
- Delete elements, see Deleting Entries.
Note: Enable the Sort selection lists alphabetically option under Extras > Other Options in the main module to sort options (info area type, field type, link etc.) alphabetically in dialog boxes. If you open a sub-level, you need to click in the newly opened level to ensure it has focus before scrolling etc.Any changes you make are color-coded as follows:

New entries are yellow, edited entries pink and deleted entries red.
Note: Note: If you make changes to fields used in a View, then you have to make manual changes in the View.When closing the Data Model level, any changes you have not yet applied to the data model are saved in the design data model. Click on
 (Save) to save the current state of your design data model
without applying the changes.
(Save) to save the current state of your design data model
without applying the changes. - To apply changes to the active data model, right-click on a new, edited or deleted
entry to access the context menu. The following options are available:
For catalogs:
- Select Apply change to apply the change to the current line to the active data model.
- Select Apply all changes to apply all changes to catalogs and catalog entries to the active data model.
- Select Undo to undo any changes in the design. The line is displayed in its original color.
For fields:
- Select Apply field format to apply the change to the field definition to the active data model.
- Select Apply all field formats to apply all changes to fields in this info area to the active data model.
For info areas:
- Select Test info area to test the info area.
- Select Apply info area to apply all changes to the info area to the active data model.
Note: You need to lock the system for all active users before applying changes to info areas to the active data model see System Locks.- Select Apply attribute to apply changes to the Properties field to the active data model.
- Select Apply text to apply the changes in the Text column to the active data model.
- Select Apply
all texts to apply changes to all fields in the
Text column to the active data model.
For details, see Applying Text Changes.
- Select Undo to undo all changes to this info area in the design. The line is displayed in its original color.
For variable catalogs, info areas and fields:
- Select Reference search to check which formats etc. refer to a catalog (value), an info area or field, see Reference Search.
Changes to "core" info areas that have been applied to the data model are highlighted in green.

- Click on
 (OK) to close a level.
 - The following options are used to manage your data models:

Right-click on a data model under Design:
- Archive Design: Saves a back-up copy of the selected design data model in the Archive.
- Delete design: Deletes the selected design data model.
- Import Data Model to Design (<- E-mail): Imports a data model from a suitable e-mail in the current user's inbox, see Merging Data Models.
Right-click on the data model under Active:
- Archive current data model: Stores a backup of the current data model. The backup is listed under Archive.
- Verify current data model: Tests whether the active data model and the database are identical. If an error message is displayed, you need to remedy the problem to guarantee the consistency of your data.
- Export Data Model (-> E-mail): Exports the current data model as a file. An e-mail is created with the subject "MM_BLOB_2" and a file with the same name is added as an attachment. This file can be imported on other stations and merged with the data model used on the target station, see Merging Data Models.
Right-click on a data model under Archive:
- Copy archive to design: Copies an archived data model to the design. The current design is overwritten. The data model is only copied once the Maintenance module is closed and after answering a prompt. After copying, the differences to the current data model are highlighted accordingly. These changes is then transferred to the active data model the next time changes are applied.
- Delete Archive: The selected archived data model is deleted.
Right-click on a data model under Data Model:
- Lock system: Opens the Lock System dialog box where you can lock the system for active users. This is necessary to apply changes to info areas to the active data model, see Lock System Dialog Box.
-
Select user group: You can log in as an Aurea partner or
user if you have the necessary password. Depending on the selected user group, IDs
for new catalogs, info areas, fields, links and indices are assigned from
different number ranges, see Number Ranges in Aurea CRM.Note: On a station with a number > 10000, do not select a user group when modifying the data model. The station number already determines the number ranges to be used.
- Analysis: Opens the Analysis level, where you can analyze the structure and contents of your Aurea CRM database, see Database Analysis. The Analysis option is only available to the SU or users granted access to the "Data Model" process in the process configuration, see CRM Process Configuration.
- Migration: Opens the Migration level, see Migrating Data. The Migration context menu option is only available to Aurea and its partners (select Select user group from the context menu to enter your password).