Campaigns
Learn all about campaign.
You can add or edit a campaign:
- In the Campaign info area, see Campaign Info Area.
- Using the campaign planning function, which simplifies the process of adding marketing activities and related records to your campaigns. You can also create new campaigns using existing campaigns as a template, see Campaign Planning.
- In graphical form in the campaign designer using marketing activity templates, see Campaign Designer.
- You can also monitor the success of the campaign, see Calculating Campaign Statistics.
Campaign Info Area
To add a campaign:
- Select Info > Campaign from the menu.
- Click
 (New).
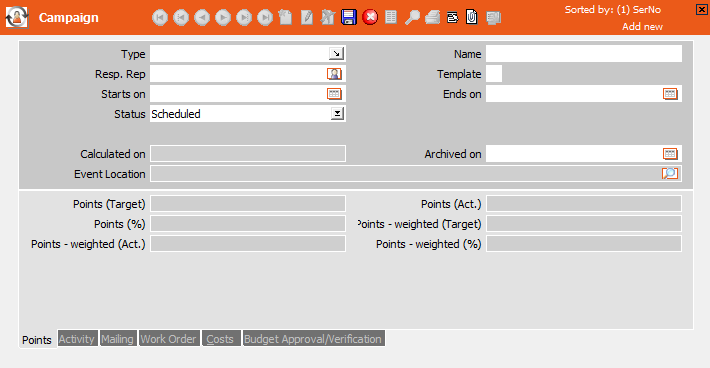
- Enter the following data:
- Name: The name of the campaign.
- Status: The status of the campaign (Scheduled, In Progress, Completed, Canceled, Archive, Template and Budget approval).
- Starts on / Ends on: The start and end of the campaign.
- Resp. Rep: The rep responsible for the campaign.
- To add a new marketing activity to your campaign, save the campaign and select
Marketing Activity from the context menu.
The campaign name is automatically entered in the Campaign field in the marketing activity. The rep is also transferred from the campaign record to the marketing activity.
- To assign an existing marketing activity to a campaign, click on
 (Search) next to the Campaign field
in the Marketing Activity info area and search for the desired
campaign. The campaign-specific fields in the marketing activity are automatically
updated. Note that the CM_StaNo and CM_SerNo
fields in activity and mailing records are not updated for performance
reasons.
(Search) next to the Campaign field
in the Marketing Activity info area and search for the desired
campaign. The campaign-specific fields in the marketing activity are automatically
updated. Note that the CM_StaNo and CM_SerNo
fields in activity and mailing records are not updated for performance
reasons. - Save the record.
Campaign Planning
Use the campaign planning feature to add or edit a campaign (possibly using a campaign template).
To add a new campaign using the campaign planning feature:
- Select Info > Campaign from the menu.
- Switch to the desired campaign record if you wish to edit or use an existing campaign as a template.
- Select Campaign Planning from the context menu.
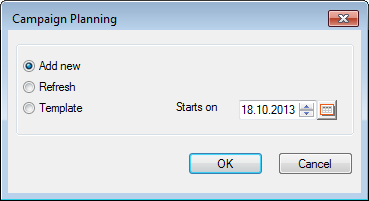
- Choose one of the following options:
- Add new: Adds a new campaign.
-
Template: Adds a new campaign based on the current
campaign.
Enter a start date for the campaign in the Starts on field. All other dates are transferred from the template and adjusted to the new start date.
The campaign-specific records in the Campaign, Marketing Activity, Rep (Marketing Activity), Response (Marketing Activity) and Execution (Marketing Activity) info areas are duplicated (with a new serial number). All those fields that are filled out during the initial planning stage of a campaign are transferred (e.g. Type). The contents of fields that are calculated or entered in the course of the campaign (e.g. statistical fields) are not copied.
Data is not copied from the following info areas: Statistics (Marketing Activity), Log (Marketing Activity), Target Group (Marketing Activity), Activity, Mailing and Work Order.
If the template campaign includes responses in the Response (Marketing Activity) info area that lead to follow-up marketing activities within the same campaign, the follow-up marketing activities are also duplicated (i.e. copied to new records with new serial numbers) within the new campaign. If, however, the marketing activity is added for another campaign or is campaign-independent, the original follow-up marketing activity including the original station and serial numbers is used.
-
Refresh: Displays an overview of the most important information in the current campaign. You can also edit the campaign.
- Confirm with OK.
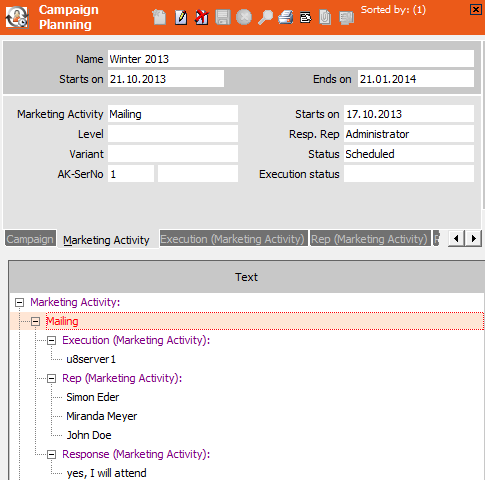
- You can edit the fields in the upper portion of the window. An overview of the
campaign is displayed below. Marketing Activity names are displayed in red. Dependent
info areas are displayed in purple and additional information in black.Note: Your administrator can determine which information is displayed in tree view (configured in the desktop settings, see Fields Tab in the Aurea.CRM win Administrator Guide).
- To add a new dependent record (Marketing Activity,
Execution (Marketing Activity), Rep (Marketing
Activity) and Response (Marketing Activity)),
click on the name of the corresponding info area in the overview and then on
(New). Enter the details in the upper portion of the
mask.
- You can also edit dependent records by clicking on them in the
overview, editing them in the upper portion of the mask and saving them with
 (Save).
 - To define the follow-up marketing activity for a specific response, click on the
response, hold down the mouse button for a few seconds, and drag the response to the
desired marketing activity. The marketing activity is entered in the
Follow-up Act. field in the response.

- Select Save Plan from the context menu.Note: This step is required to save your changes. Otherwise the changes are lost as soon as you leave the Campaign Planning info area.
- Select Load Campaign from the context menu to switch to the campaign record.
Campaign Designer
The campaign designer provides you with a graphical overview of your campaign's structure. You can display existing marketing activities and responses and add new ones.
To edit a campaign in the campaign designer:
- Select Campaign Designer from the context menu in the
Campaign info area.
Details on the campaign are displayed to the left. A graphical overview of the campaign is displayed to the right.

- Right click on the campaign element and select New: Marketing Activity to add a marketing activity to the campaign.
- You can choose from the available marketing activity templates.Note: You can choose from those marketing activities where "Template" is entered in the Status field. Leave fields that directly affect the campaign empty (Campaign Status, Campaign Key, Campaign Type, Campaign Starts on, Campaign Ends on). This data is automatically transferred from the current campaign.An overview of the new element is displayed at the bottom of the screen.

- Click on Next and Back to navigate between fields in the marketing activity. Enter the desired data.
- Save the marketing activity. It is displayed in the graphical overview.
- You can edit the marketing activity in the following ways:
- Select the corresponding entry from the context menu to display/create/edit responses or reps (entered in the Rep (Marketing Activity) and Response (Marketing Activity) info areas). New responses added to the marketing activity is also added to the campaign overview, once the response has been saved. New responses are added without a follow-up marketing activity assigned.
- Close the marketing activity mask and add further elements to the campaign. You can assign responses to marketing activities, and marketing activities to responses and the campaign).
Note: You cannot edit the campaign until you have closed the mask at the bottom of the screen.- Right-click on an element and select Delete from the menu to delete it and all dependent elements.
- Right-click on an element and select Edit from the menu to edit the element. The element is displayed in mask view at the bottom of the screen.
- You can use the mouse to edit the graphical overview and flow of the campaign:
- Reposition an element:

- Reposition a connector:
- Link a marketing activity to a response without a follow-up marketing activity (drag the top end of the connector):
- Link a response without a follow-up marketing activity to a marketing activity (drag the arrow end of the connector):

- Right-click on an empty area in the campaign designer to access the context menu.
The following options are available:
- Enlarge: Enlarges the graphical overview.
- Shrink: Shrinks the graphical overview.
- Full View: Zooms the overview such that the entire overview fits on screen.
- Original View: Reverts to the original view.
- Rearrange: Rearranges the elements.
- Arrange Connections: Rearranges the connections between elements.
- Click on
 (Marketing Calendar) in the
command bar to display the marketing calendar at the bottom of the screen, see Marketing Calendar.
(Marketing Calendar) in the
command bar to display the marketing calendar at the bottom of the screen, see Marketing Calendar.
Calculating Campaign Statistics
Select Calculate from the context menu in the Campaign info area to calculate the statistics relating to the campaign. You can choose to calculate statistics for all campaigns or just the current one. The status of all activities, mailings and work orders is automatically calculated and entered in the corresponding activities, mailing and work order statistics fields in the campaign mask.
The target, actual and target percentage are calculated for the campaign from all its marketing activities (in the Points - weighted (Act./Target/%) fields).