Configuring a Timeline
This topic explains how to configure the timeline in Aurea.CRM web.
The Timeline configuration defines the content of the timeline, info areas of child records, filters, bubble style, icons.
On the CRM.Designer main page in the Filter | Query | Analysis area
click ![]() Timelines to display all available Timeline configurations and
create new ones. For further details, see Designing Configuration Units.
Timelines to display all available Timeline configurations and
create new ones. For further details, see Designing Configuration Units.
To configure a timeline:
- Select an info area from the drop-down list and click
 (Add). The timeline can display records from all info areas that contain at least one field of type "date".
 - For each info area you can define the following:
- Link ID: Check Link ID to specify another than the default link. For further details, see Link IDs.
- Date Field (mandatory): Select the date field that is used to calculate the record's position on the timeline. Only date fields from the selected info area are available.
-
Filter: Select a filter to filter timeline items, e.g.
MA.Contacts_Done. Only filters defined for the selected info area are available. -
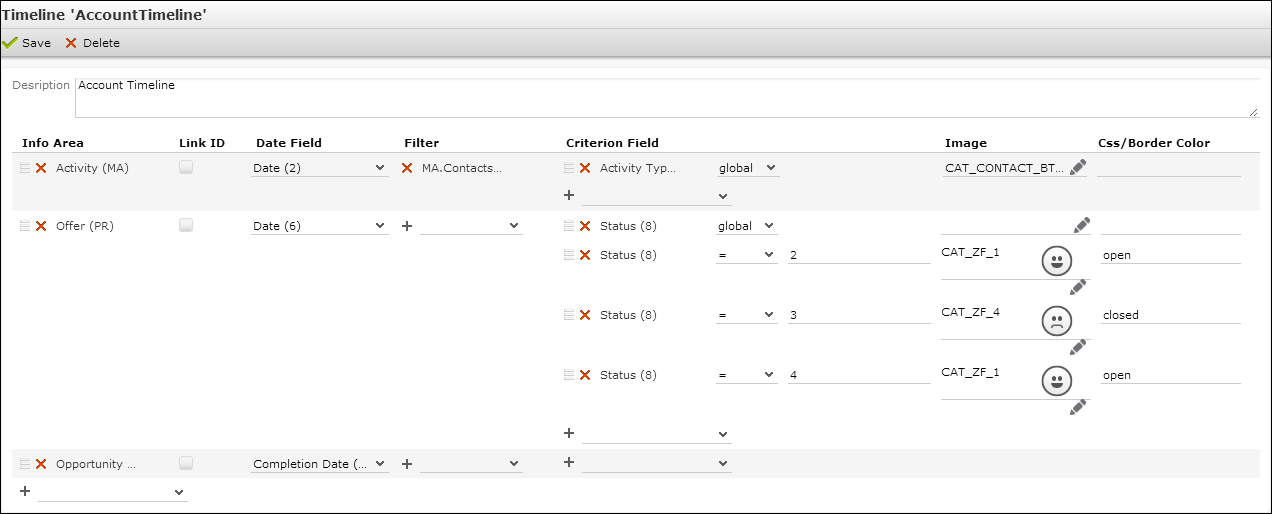
Criterion Field: Define criteria for displaying images in
the bubble and/or applying a specific border color depending on a field value,
e.g. activity type images for activity bubbles, red border for opportunity bubbles
if Status = lost etc.
The input method and available operators depend on the field type and the selected operator:
- Catalog fields: If the catalog is synchronized (see Catalog Value Synchronization), you can toggle between text input (
 ) and catalog input (
 ), otherwise you need to enter the value's code as
text. In this example MA:Type has been synchronized, PR:Status has not:
), otherwise you need to enter the value's code as
text. In this example MA:Type has been synchronized, PR:Status has not:
- Number fields: If you select a number field, you can use the "range"
operator:

You can use variable expressions like
$curDayetc. For further details, see Using Variable Expressions. - Catalog fields: If the catalog is synchronized (see Catalog Value Synchronization), you can toggle between text input (
-
Image: Specify an image to be displayed in the bubble (in
addition to an info area image configured in the table caption). Depending on the
selected operator you can
- set an image for a specific field value, e.g. if
Status = 2 show
CAT_ZF_1. - If you select "global" as operator you can use the
Small Image Templatesyntax:<image_name>_{VALUE}Example: Defining
CAT_CONTACT_BTB_{Contact}for the Type field in MA displays the activity type image in the bubble.
- set an image for a specific field value, e.g. if
Status = 2 show
-
Css/Border Color: Specify the bubble border color using the
hexadecimal color code e.g. (
#ff0000) or by providing a CSS class (e.g. selected, open etc.) or .For a list of available predefined bubble styles (CSS classes), see the article “How to Configure the Timeline” at https://support.aurea.com.
Note: For a selected criterion field and its comparison value you can define both an image and a border color (in one row).
To reorder items, click
 (Drag&Drop) in the respective row and drag it to the
desired position.Note: Both info areas and criterion fields can be added more than once.To make the timeline available in Aurea CRM.Web configure a
(Drag&Drop) in the respective row and drag it to the
desired position.Note: Both info areas and criterion fields can be added more than once.To make the timeline available in Aurea CRM.Web configure aTimelineaction referencing the Timeline configuration. For further details, see Timeline.