Working with Marketing Activities
Learn to work with marketing activities.
Creating a marketing activity involves the following steps:
- Creating channels and formats used in a marketing activity.
- Adding the target groups to the marketing activity, see
 .
. - Defining the execution definition, see
 .
. - Executing a marketing activity, see Executing a Marketing Activity
- Editing and viewing responses to a marketing activity, see Editing/Viewing the Responses for a Marketing Activity
Defining Channels and Formats used in a Marketing Activity
To define the channels and formats for a marketing activity, perform the following steps:
- Open the required campaign in the campaign designer.
- On the marketing activity container, click OK to expand the
container.

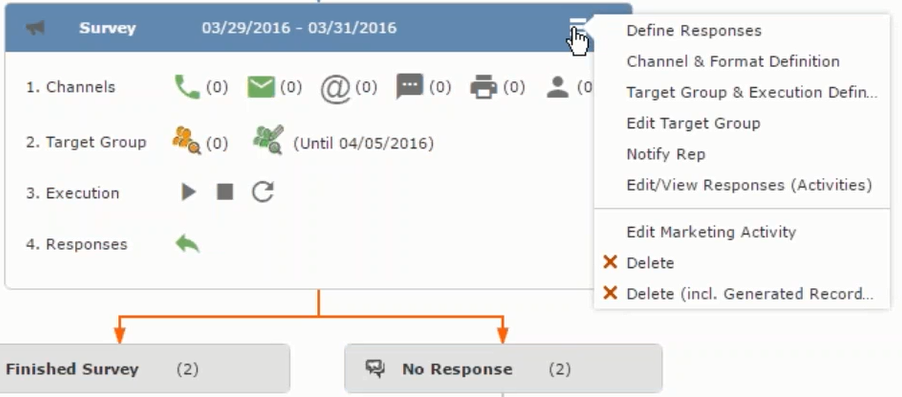
The following screenshot shows the Survey marketing activity container.
The following is a brief description of the components of a marketing activity:
Channels - The first row shows the available channels of communication for a marketing activity. The following channels are available:- Phone
- Letter
- Email
- SMS
- Fax

- In-person

Target Group – In this step you can define the target groups (customers etc) who are to be the participants of this marketing activity.
Execution – In this step, you can execute and start the marketing activity.
Responses – After the execution of the marketing you can evaluate the responses from participants.
- Phone
- Click on any of the channel icons to open the Channel &
Format Definition window.
The channel and format definition process contains three phases: . The window opens on the Define Channel(s) phase.
- Define Channels – In this phase you can select the channels that are used to approach the customers for the marketing activities.
- Define Format – In this phase you can define the formats to be used for each of the channels you selected in the first phase. For example a template document for an email or fax, the fields that are used in the generation of a letter and similar formats for each of the required channels. The fields you want to include from different CRM info areas in the templates.
- Define Default values – You can define the default values for the marketing activities that are generated.
- Provide the following information in the Define
Channel(s) phase:
Format Definition
- Format Name – You can give a name to the format definition or retain the automatically generated name. This field is mandatory.
- Lock – Select this check box to lock the message format for the marketing activity.
- Private - Select this check box to keep the message generated for the marketing activity private.
Preferred Channels
-
Fixed – You can select one fixed
channel.Note: You cannot select variable channel, if you select a fixed channel.
- Variable (Priority) – You can select multiple channels with variable priorities for the channels.
- Generate – This selection generates activities for all entities to represent the successful generation during the marketing activity execution. This is selected by default and cannot be changed.
Save Channel(s) – Click this button to save the Channel format details you configured on this page.
Load Format – Click this button to open the Channel Formats search window. Select the required format previously created, from the search result and load it. You can then edit the format as required.
Proceed – Click this button to go to the next step, Define Format.
Note: If you have not saved the channel definition, you are prompted to save the channel configuration details before proceeding. - Click Save Channel(s). Click
Proceed to open the Define
Format window.

The Define Format window opens with tabs for each of the channel you selected. You can define the information required for the message formats required for the selected channels by clicking each of the tabs.
Note: The Phone and In-Person channels do not require and further configuration information. The remaining channels Letter, Email, SMS, and Fax require further configuration information you can define in this window. The fields that are in Orange are mandatory fields. If you do not fill the mandatory fields then you can still save the channel format but you cannot execute the channel definition.If you do not fill in a mandatory field and save the channel format, then if you go back to the Campaign designer you can see that the channels you selected is not green in color. See the screenshot below. The phone channel is in green color, but the Letter and Email channels are in grey.
- Click on the Letter icon and it directly opens the Letter tab in the
Define Format process step. Enter the format details of the channels
including all the mandatory steps.
- After providing the required information, click Save Default
Values. Then click Proceed to
move to the Define Default Values phase.
You provide a Default Values Name or use the automatically generated one. You can also search for and load a previously saved default values by using the Load Default Values button.
- After entering the default values, click Save Default
Values and then click Proceed
to return to the campaign designer window.
Notice that the Phone and Letter channels icons are now in green.
Adding the Target Group and Execution Definition
To define the channels and formats for a marketing activity, perform the following steps:
- Open the required campaign in the campaign designer.
- On the marketing activity container:
- Click to expand the container.

- Click the target group icon to open the Target
Group.


You can create the target group and define execution type using the following buttons:
- New Query – Use this to create a target group using the Standard Query process.
- New Quick Query – Use this to create a target group using the Quick Query process.
- Load Query – Use this to search for and load a query that is already created and saved.
- Select/Rework Target Group – Use this to select a different target group or modify the target group.
- Define Execution Type – This allows you to define the dates until which the queries are executed to update the target group. You can also define the execution types.
If you were to start creating the target group, but stop in between and reopen this window it also shows the current query you were working on. It now have options to edit or unlink the current query from the marketing activity. For example:

the above screenshot shows the current query that was being worked on to create the target group. The flag icon indicates that the current query is a standard type query.
- Click to expand the container.
- To create the target groups and define the execution type, perform one
of the following:
- Using the New Query button:
- Click New Query to open the standard New: Query
window.

- Enter the Query Name and
the UQL syntax for the
query and run the query to get a list of entities
for the target group. These are added to the
target group.Note: Instead of using an UQL, you can specify the infoarea, the fields to search, and the conditions by using the buttons in the Formatted and Conditions sections.
- Click Save to proceed to
the next step, Define Execution
Type window.
 In this window you can
specify the following information:
In this window you can
specify the following information:- Edit target group until – Specify the date until the target group can be updated based on the result of the query.
- Execution Type – Select the execution type from the drop-down list.
- Click
 to
open the Create Target
Group step window.
If any of the items in the previous two steps are incomplete, you get warning messages. For example, if you had not defined the execution type and edit target group until date fields in the Define Execution Type window then Create Target Group window displays the incomplete steps as shown below. Also notice that the Create Target Group tab at the top has a red dot in it instead of a green dot.

- Click Create Target Group
to complete the creation of the target group
process. A notification window along with some
progress indicators are created as shown in the
screenshot below.

The Target Group icon is now orange in color to indicate that the target group creation is in progress. Also the Target Group row now has date until which the target group list can be updated. Once the target group is processed then the channels and target group icons has the target group numbers in the brackets besides the respective icons.
Once the server creates the target group and updates the marketing activity is to be executed on the date specified. The icons is displayed in green. See the screenshot below.
- To edit the target group click
 . The Edit Target Group
window opens.
 You can use
the search queries to add more recipients to the
target group.Note: The target group icon turns Red (
 ) after
the “Until” date.
- Click New Query to open the standard New: Query
window.
- To create the target groups and define the execution type
using the New Quick Query option, perform one of the
following:
- Click the New Quick Query button from the Target
Group & Execution Definition window. The
Create Target Group using Quick Query window is
opened.
- Select the Root Info Area from the dropdown list.
- Click Run Query. The query results are listed. Click Finalize Query.
- Define if the query results are Private Query or Public Query. Enter a name in Save As … field.
- Click Save to finalize the results and attach
the query results to this marketing activity. The
Create Target Group window opens.
If any of the intermediate process steps are incomplete, you get a warning message, including if the target group is already created. A sample screenshot is provided below:

- Click Create Target Group to complete creating the target group.
- Click the New Quick Query button from the Target
Group & Execution Definition window. The
Create Target Group using Quick Query window is
opened.
- Using the New Query button:
Selecting or modifying the target group
- Open the required campaign in the campaign designer.
- On the marketing activity container:
- Click OK to expand the container.

- Click the target group icon to open the
Target Group

- and Execution Definition window.

- Click OK to expand the container.
- Click Select/Rework Target Group.
The Select/Rework Target Group
window displays.
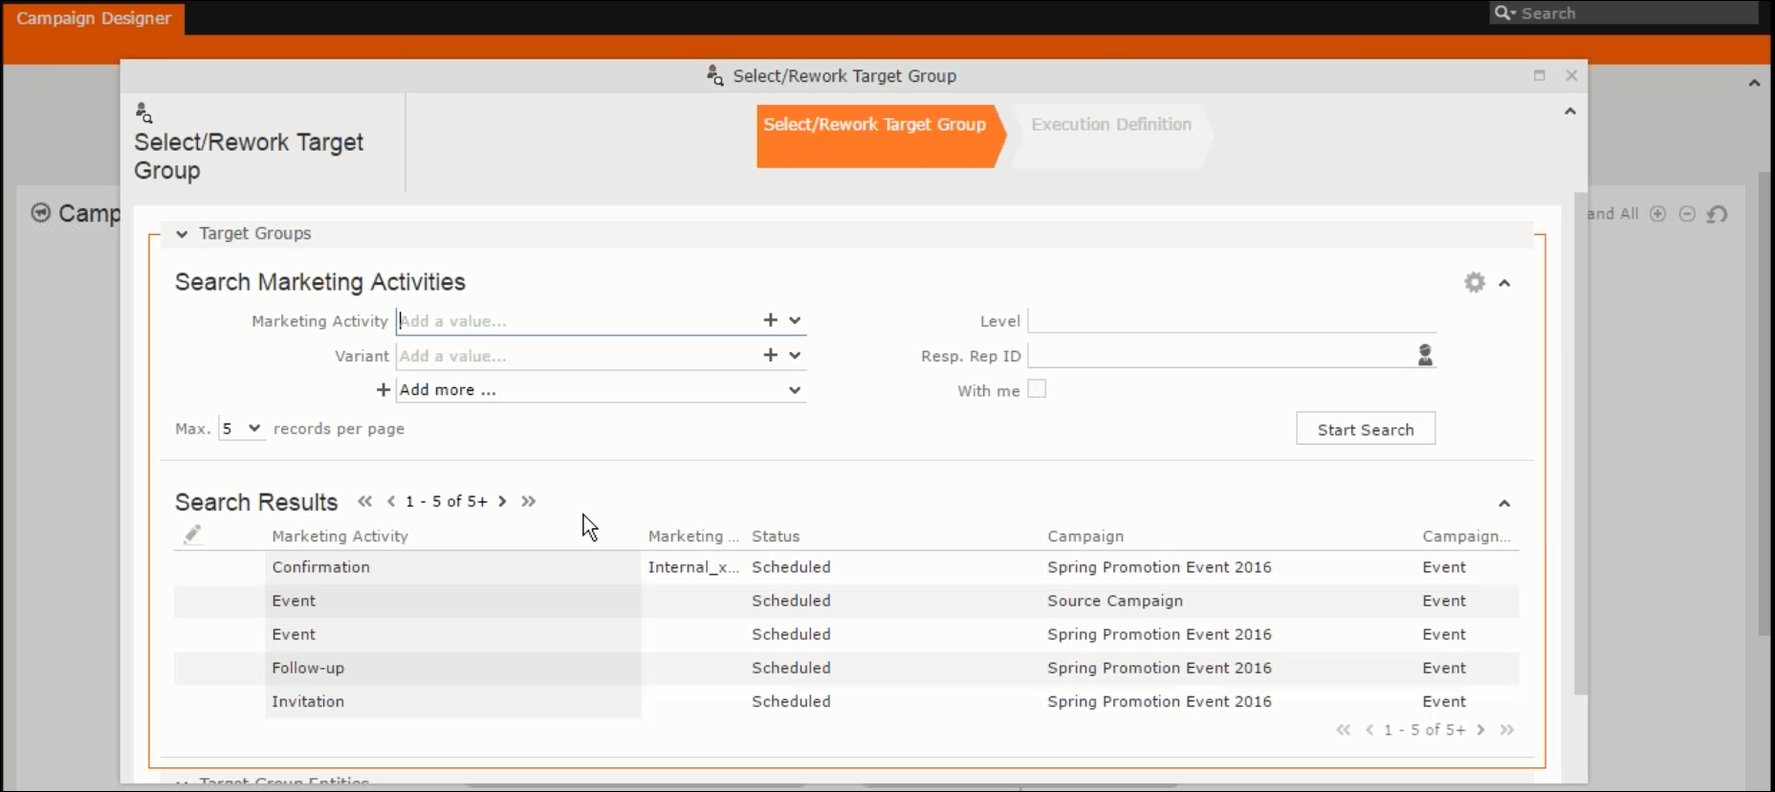
- You can search for marketing activities and select the desired
marketing activity. The target group entities for the selected
marketing activity are listed below.
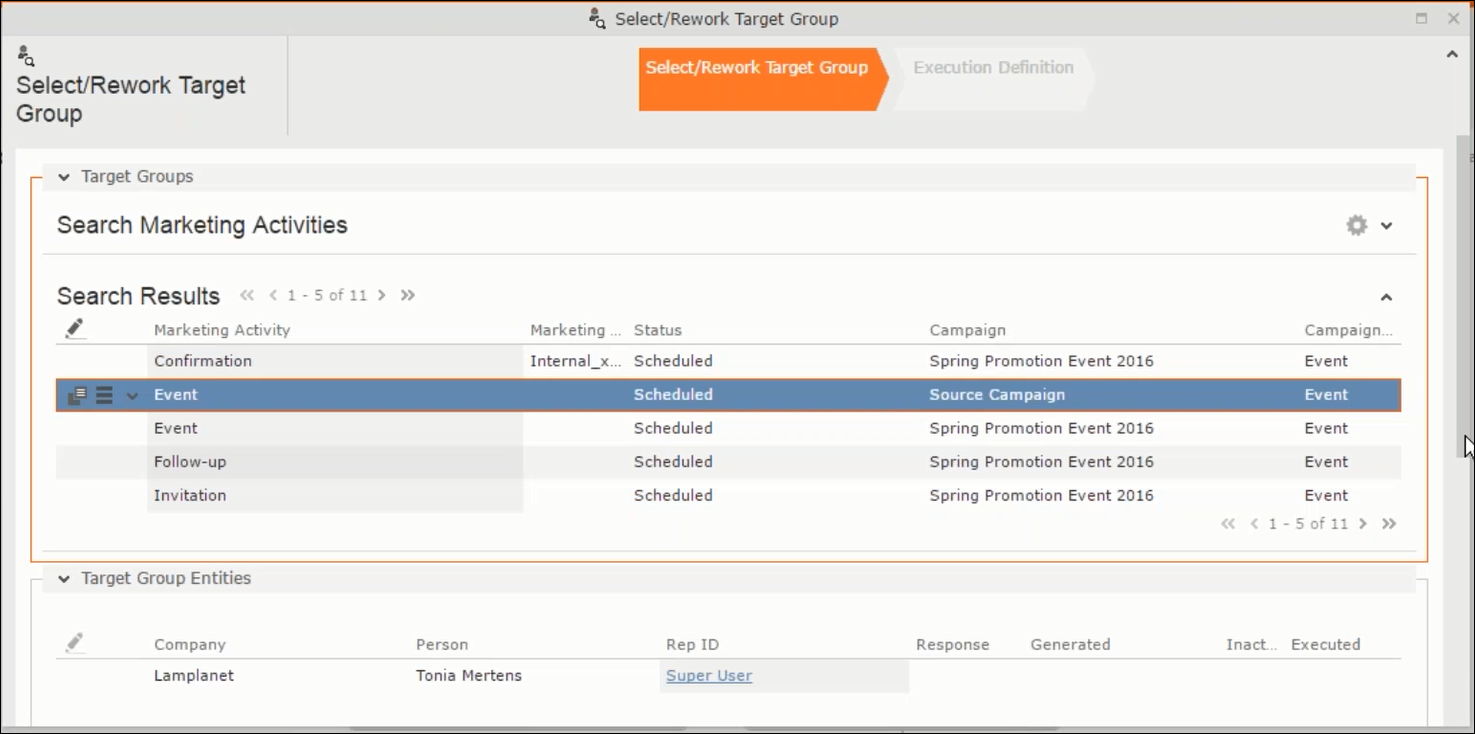
- Double click on the marketing activity to add the target group
from the selected marketing activity to the target group of the
current marketing activity. The Execution Definition window displays.

- Specify the following information:
- Edit target group until – Specify the date until the target group can be updated.
- Execution Type – Select the execution type from the drop-down list.
- Click Proceed. The campaign designer window opens.
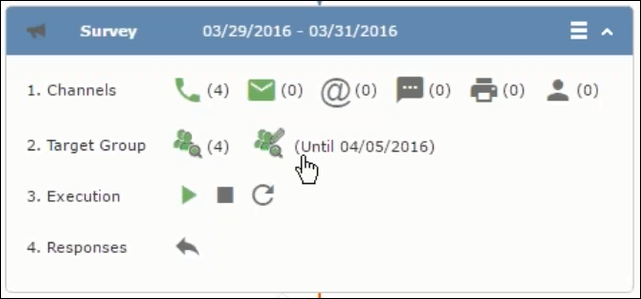
- Click
 to view the newly
added participant to the target group.
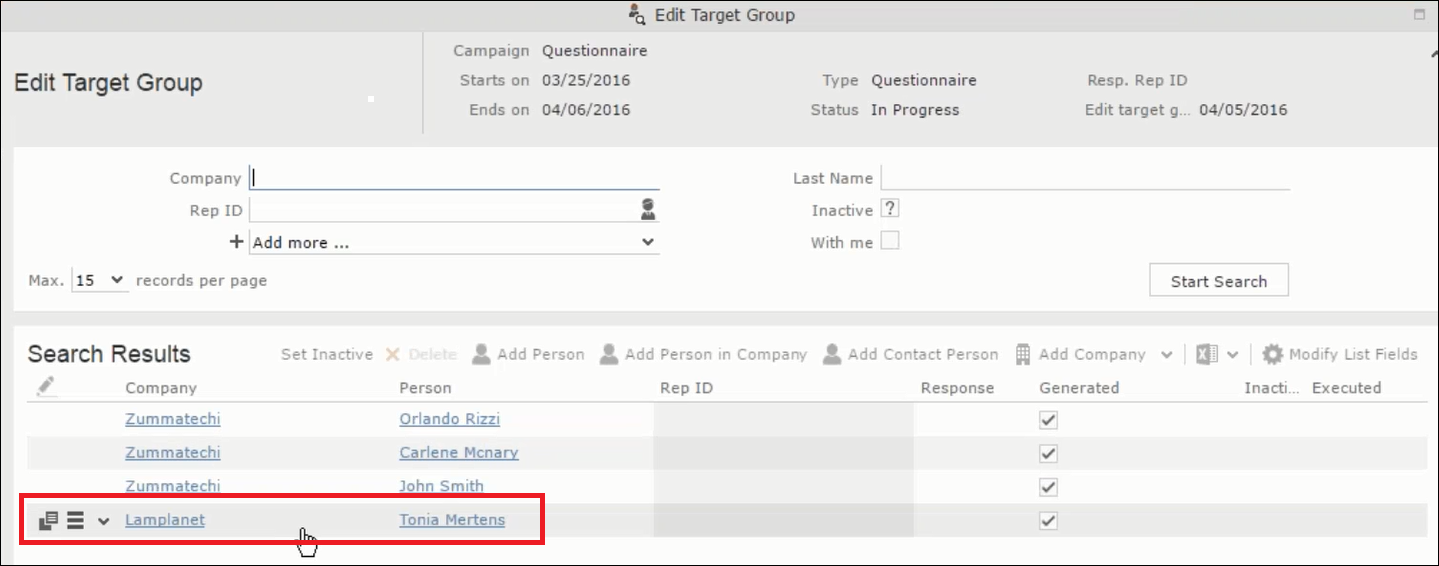
Defining Execution Type
To define an execution type, perform the following:
- Open the required campaign in the campaign designer.
- On the marketing activity container:
- Click OK to expand the container.

- Click the target group icon to open the Target
Group

- and Execution Definition window.

- Click OK to expand the container.
- Specify the following information:
- Edit target group until – Specify the date until the target group can be updated.
- Execution Type – Select the execution type from the drop-down list.
- Click Proceed. The campaign designer window opens.

Executing a Marketing Activity
To execute a marketing activity, the following conditions should be met:
- All the selected channels and their formats should be defined. The selected channel icons would be green in color.
- The target groups should be defined. The Target group icons would be green in color.
- The current date should be within the scope of the start and end dates of the campaign.
- The “Edit target group until date” has to be defined. This date is
visible besides the edit target group icon (
 ).
).
To execute a marketing activity, perform the following steps:
- Open the required campaign in the campaign designer.
- On the marketing activity container:
- Click OK to expand the container.

- The following screenshot shows the
Survey marketing activity container.

- Click OK to expand the container.
- Click the
 button on the
Execution row. A query window pops up
asking you to confirm the operation.
- Click OK. A server notification informs you that
the marketing activity has started and informs you when it is
completed.
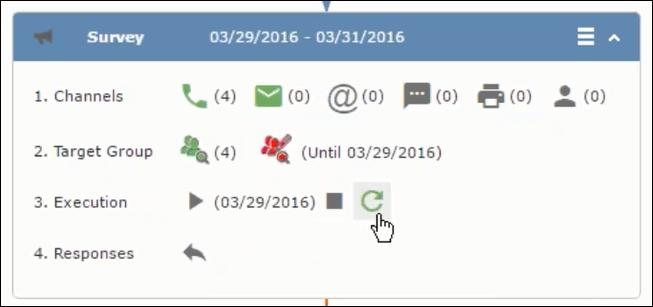
The Execute button is now greyed and the date on which the execution starts automatically is displayed in brackets besides it.
Note: The edit target group icon is now in red ( ).
The abort button is greyed out once the execution starts. And
reset button is now activated. The Responses button remains grey
until the all the participants have responded.
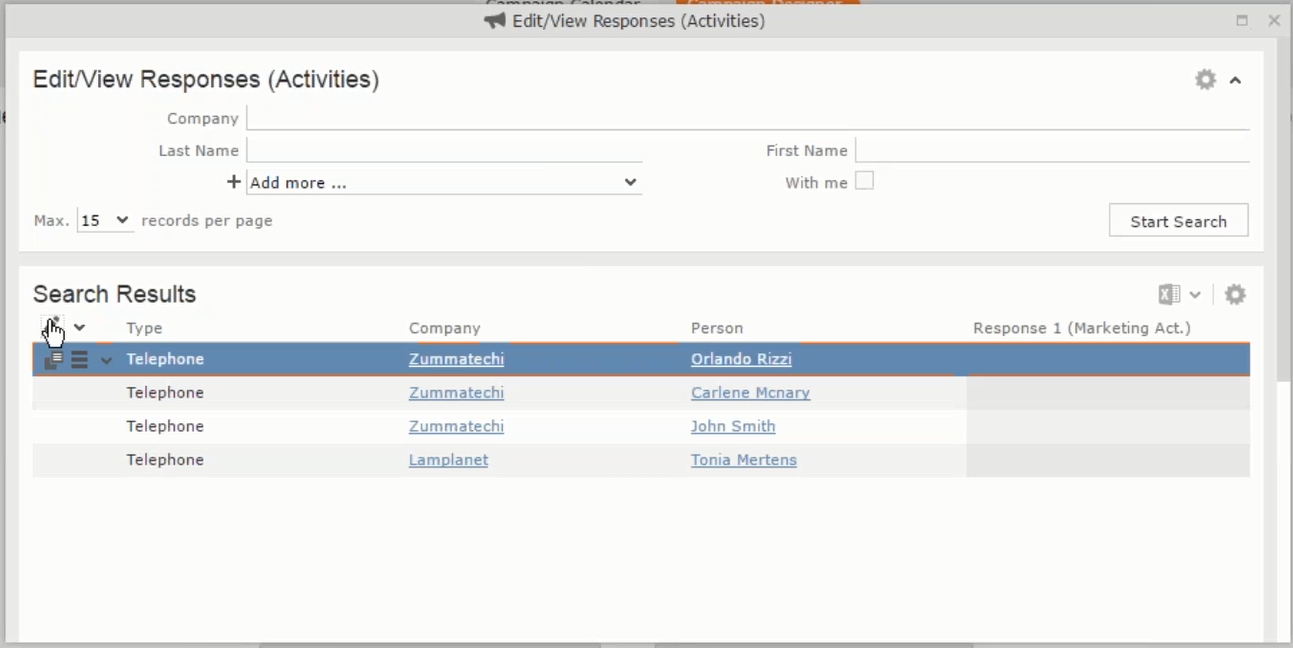
Editing/Viewing the Responses for a Marketing Activity
To edit or view the responses for a marketing activity, perform the following steps:
- Click
 icon in the responses row. The
Edit/View Response (Activities) window opens.
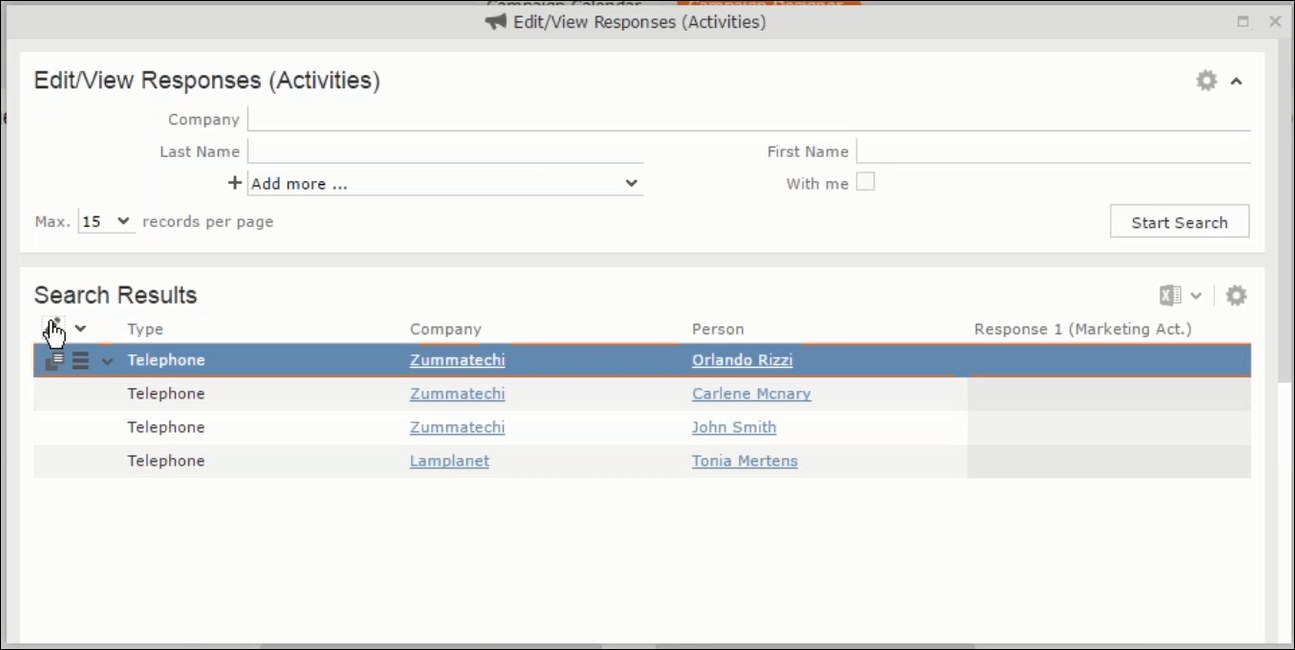
You can search for specific participants and view/edit their responses.
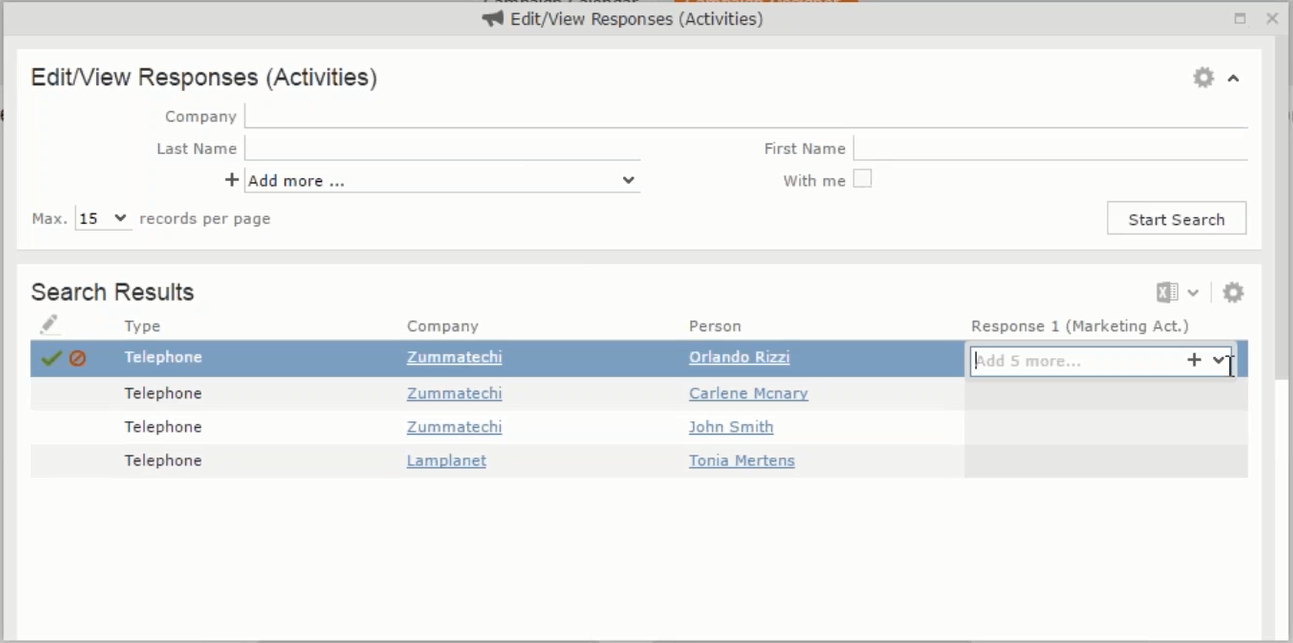
- Select a row and click on Response 1 (Marketing Act.) column to activate
and record the response.
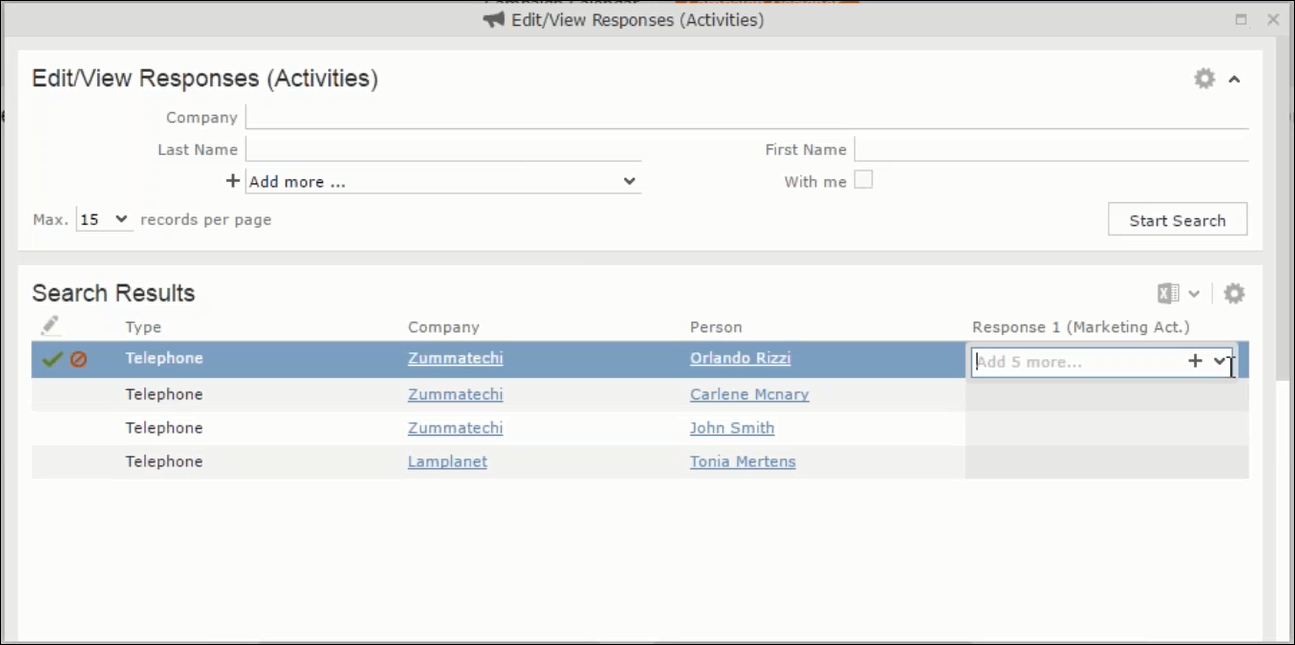
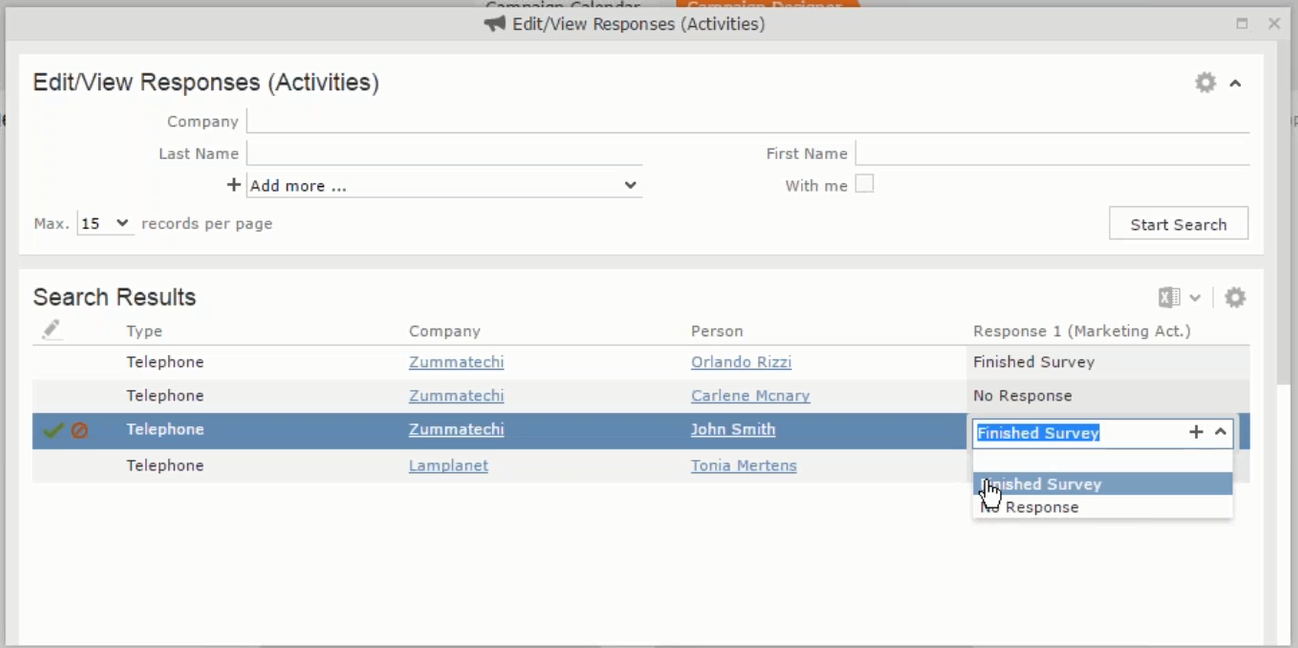
- Click the drop-down list to select the response type. Click on the +
button to add more response types to the response catalogue entries.
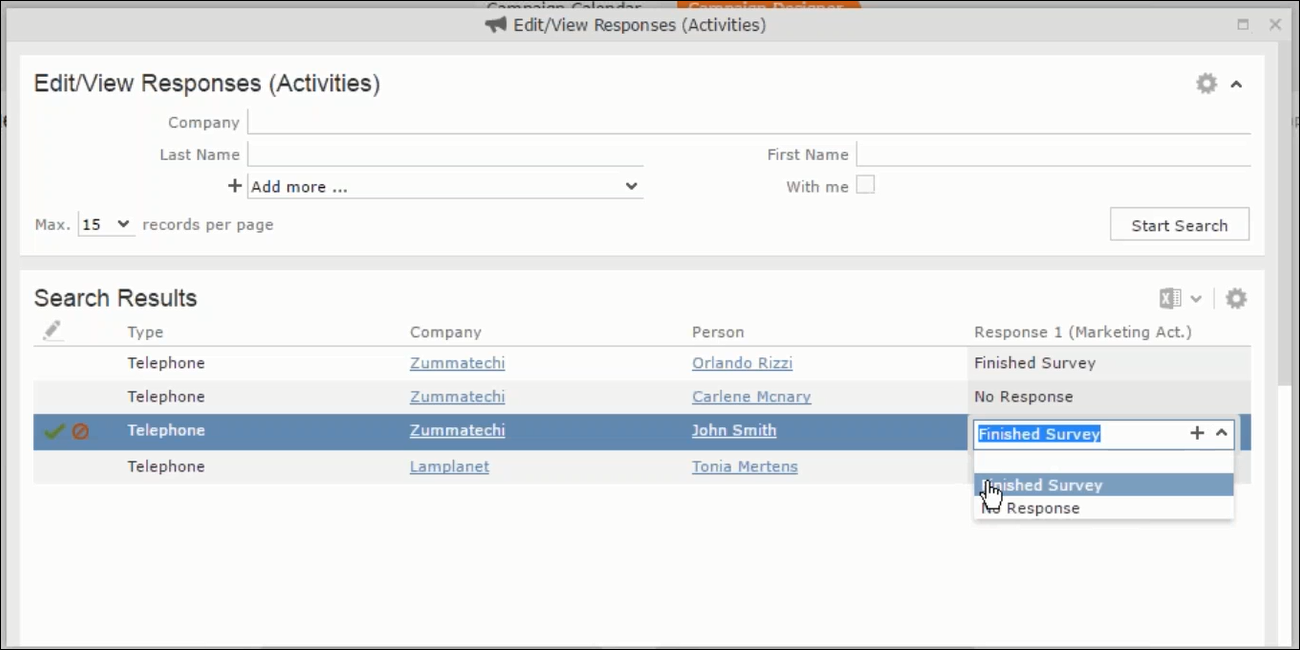
Edit the responses for all the participants.
- Close the window to come back to the campaign manager window. The
response icon is be green in color. This shows that response for all
the participants is recorded.
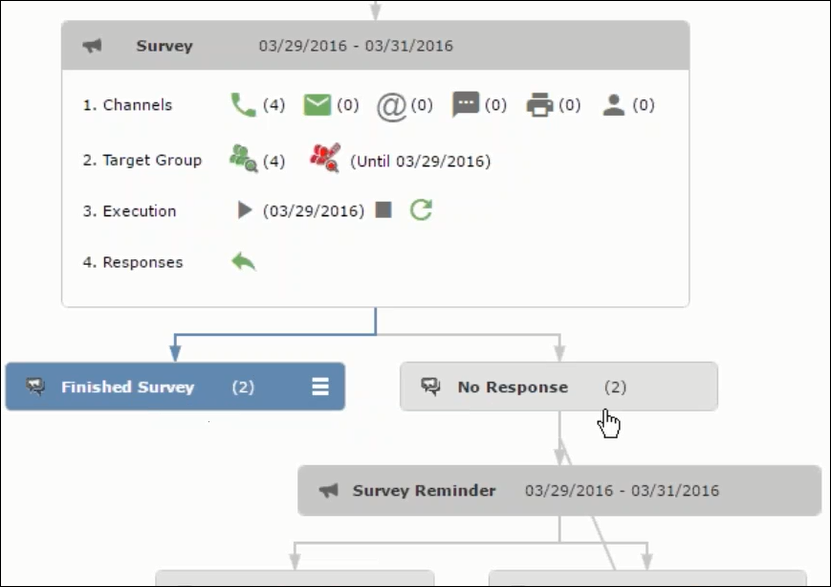
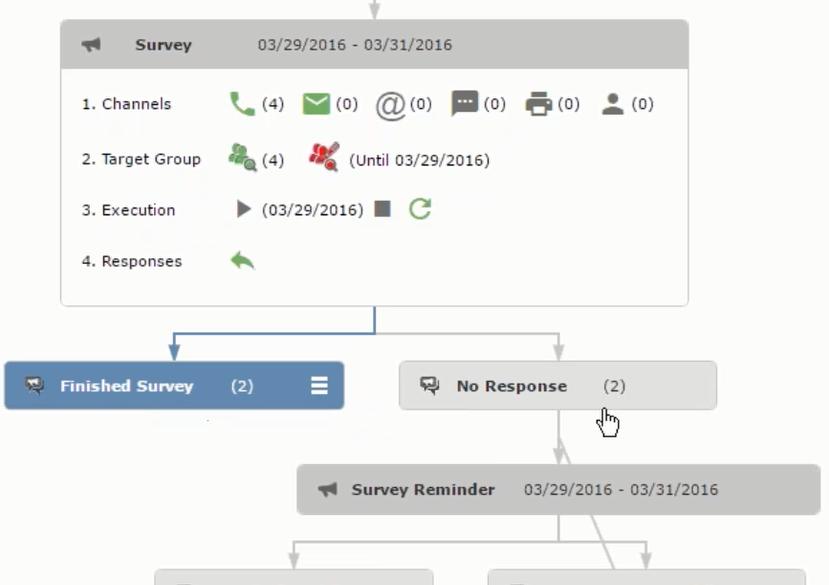
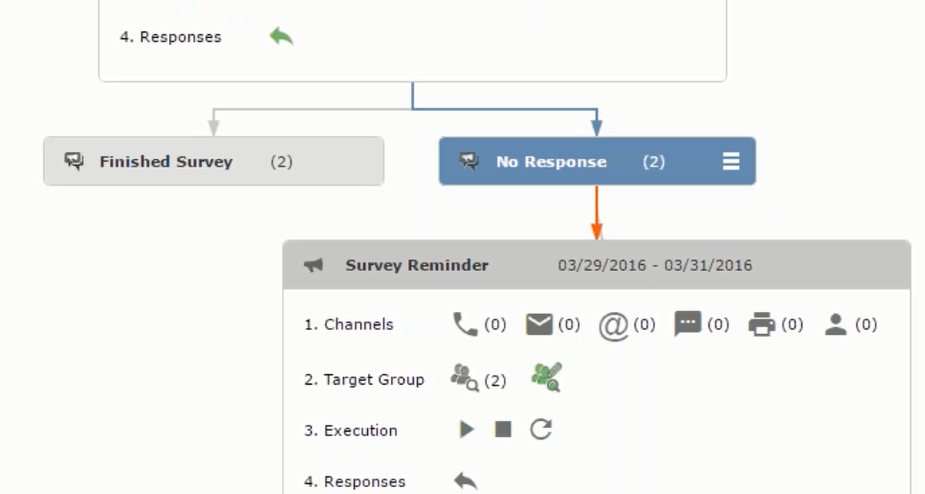
Notice the “(2)” in the response containers for the Survey marketing activity: Finished Survey and No Response show. This indicates that two participants completed the survey and two members did not respond.
- Click the button to expand the Survey Reminder
follow-up marketing activity container for those participants who did
not respond to the Survey.

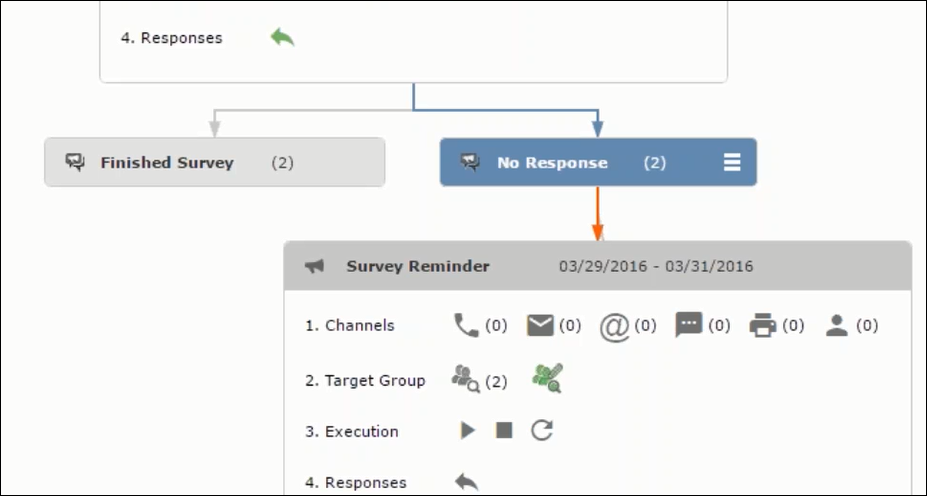
You can see that two participants who did not respond are already added to the target group of the follow-up marketing activity.
- Click
 to open the Edit Target
Group window for the Survey
Reminder follow-up marketing activity.
You can see that the two members with “No Response” in the Response column are listed.
Resetting the Marketing Activity Execution
Restarting a marketing activity is possible if the marketing activity execution is completed. It results in the following:
- All generated target group entities marked as “Generated” are deleted.
- The target group entities marked as “non Generated” are retained.
- The target group entities are regenerated based on the selection/query attached to this marketing activity.
- The target group entities that are marked as executed remains in the same state for the current target group.
To reset a marketing activity execution, perform the following:
- Open the required campaign in the campaign designer.
- On the marketing activity container, click to expand the
container.

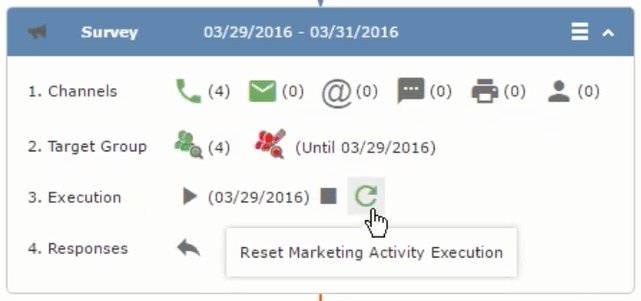
The following screenshot shows the Survey marketing activity container.
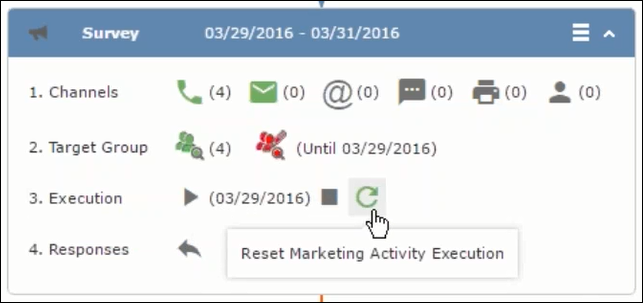
Notice that the execution button and the abort button are in grey. The reset button is in green and is active.
- Click
 to reset the marketing activity
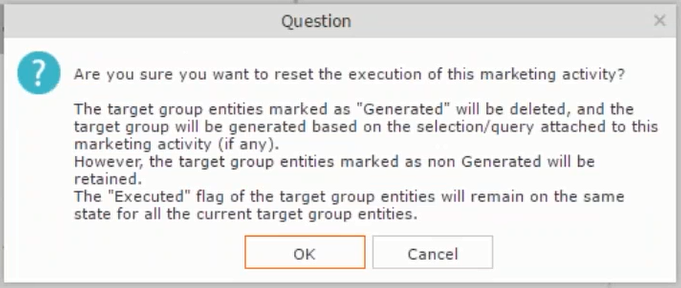
execution. A confirmation window displays.
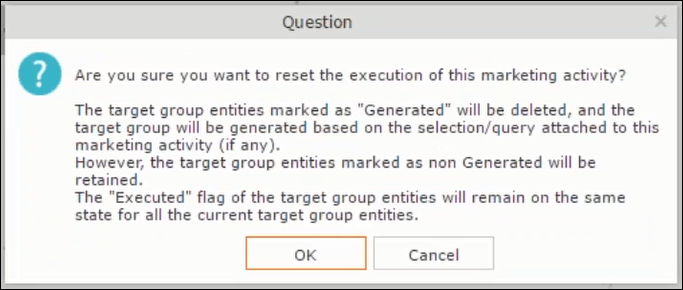
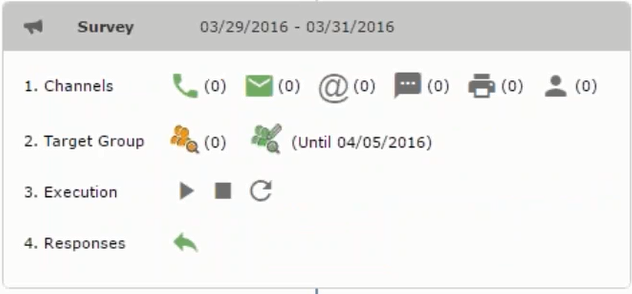
- Click OK. The target group is reset and the
target group is regenerated. The edit target group until date is reset.
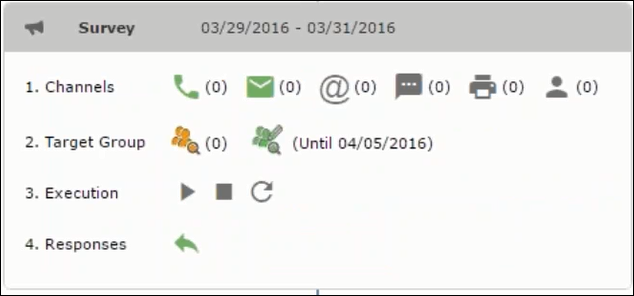
Notice that the Target group button is yellow and once the target group generation is completed, the execution button is active and ready for execution. The colors of the target group icon and execute button are in green.
Notifying Reps about a marketing activity
To notify reps, perform the following:
- From the context menu of a marketing activity container, select
Notify Rep.
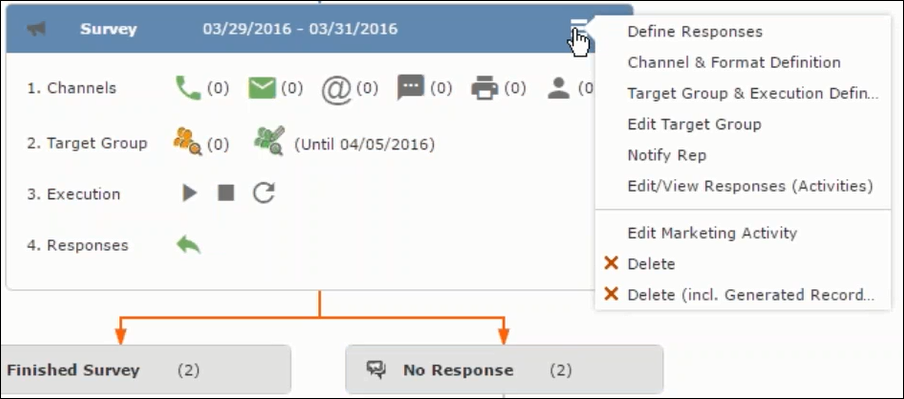
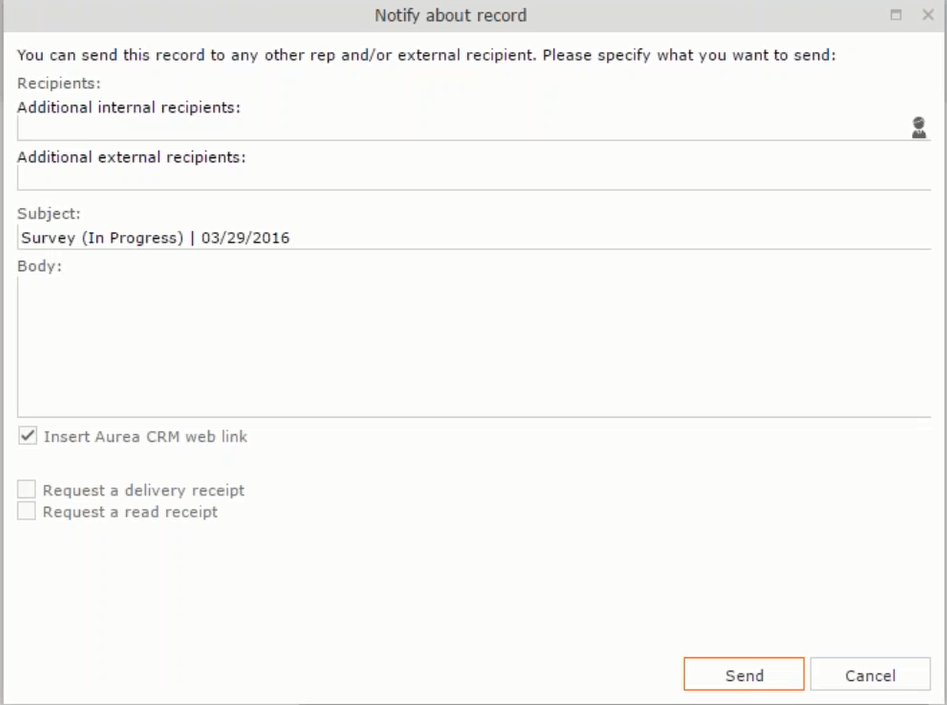
- The Notify about record opens.
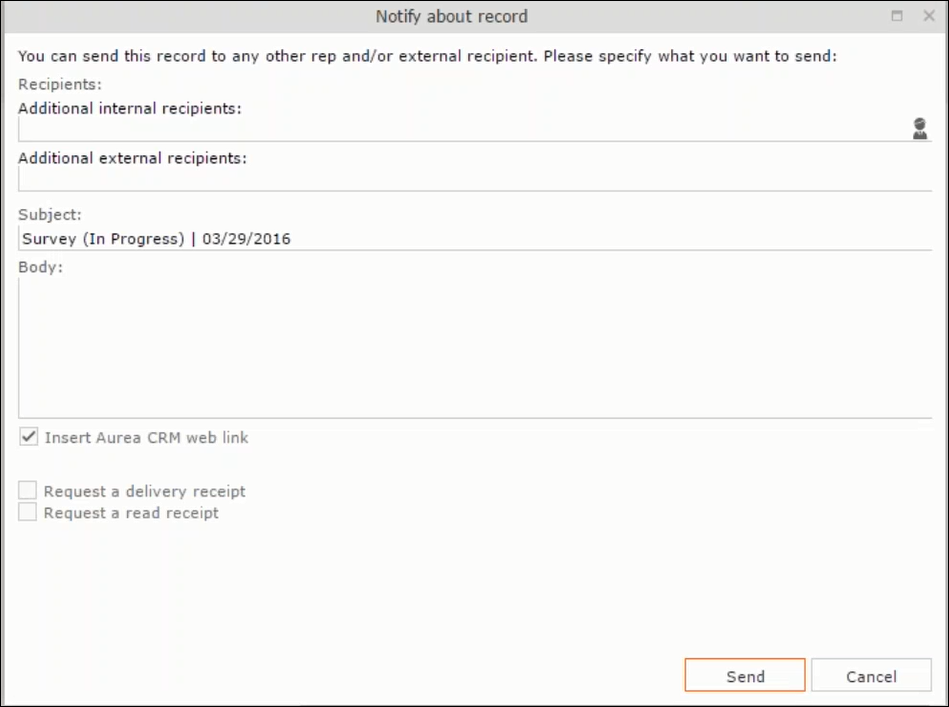
Enter the following information:
- Recipients – Add the internal and external recipients (reps) who receive the notification.
- Subject – Edit the subject of the notification email in this text field. You can also use the automatically generated subject.
- Body – Enter the notification content in the Body field.
- Insert Aurea CRM web link – Select this checkbox if you want to add the company URL in the notification.
- Request a delivery receipt – Select this checkbox if you want a receipt of delivery.
- Request a read receipt – Select this checkbox if you want to know if the notification was read by the recipient.
- Click Send to send the notification to the selected reps.
Editing a Marketing Activity
- Open the required campaign in the campaign designer.
- From the context menu of a marketing activity container, select
Edit Marketing Activity.

- The marketing activity window opens.

- Click Edit to start editing the marketing activity.

- Make the required changes and click Save.