Working Area
The working area's contents depend on the current function and the data you are working with.
For example, it may display a calendar, a search mask with the list of results or a mask allowing you to edit records.
You can display data in the working area in a number of ways, for example:
- Using the search, where you can use search criteria to define which records are displayed.
- Using your favorites, see Favourites.
- From a query's results list, see Queries. Queries.
- From your history of recently accessed records or search results, see History.
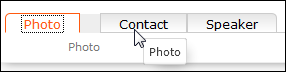
Buttons
Buttons are available in Aurea CRM web:
- Buttons are displayed in the working area between the header and the record:

- Some buttons, e.g. Save and Cancel,
are only displayed following certain actions:
- Your administrator can group buttons together, for example:

Click on
 (Further Options) to select
from the available options. The last option selected is displayed to the left of
the arrow button.
(Further Options) to select
from the available options. The last option selected is displayed to the left of
the arrow button.Your administrator can define that instead of the last used option, the first entry in the group is displayed.
- Your administrator can define triggers and assign them to buttons. Click on the button to execute the trigger.
Depending on your configuration, buttons and icons can be displayed with or without accompanying text.
Navigation Bar
The following navigation bars are available:
- For records:

To switch between records:
- Click on
 (Next) to switch to the next
record.
(Next) to switch to the next
record. - Click on
 (Previous) to
switch to the previous record.
(Previous) to
switch to the previous record. - Click on
 (Show/Hide) to display the
records in a drop-down list. Select the desired record from the drop-down list.
(Show/Hide) to display the
records in a drop-down list. Select the desired record from the drop-down list.
This navigation bar is only available when opening a record from a results list (not when opening the record in a new tab).
- Click on
- In result lists:

- Click on
 (Previous) to switch to the
previous page of results.
(Previous) to switch to the
previous page of results. - Click on
 (Next) to switch to the next
page of results.
(Next) to switch to the next
page of results. - Click on
 (First) to switch
to the first page of results.
(First) to switch
to the first page of results. - Click on
 (Last) to switch to the last
page of the loaded results.
(Last) to switch to the last
page of the loaded results.
The number of records displayed in the results list is determined by the following user settings (see Handling Tab):
-
Records per page: Determines the number of records
displayed per page of search results.
Example:

20 records are displayed per page.
-
Records per query step: Determines the number of records
initially loaded from the server. If the list contains more records, additional
records are loaded incrementally as you navigate in the list. Each batch of
records transferred from the server corresponds to a query step.
Example:

50 records are returned by the server in each query step. The + icon indicates that additional results are available but have not been loaded yet.
Your administrator can override your settings for all or for individual lists.
- Click on
Breadcrumbs
The breadcrumb trail is located to the top of the screen, and provides you with an overview of your current position.
Click on a parent record in the breadcrumb trail to switch to that record.
Search Area
The search area allows you to search for records using search criteria. For further details, see Searching.
Ghost Text
For some fields, so-called ghost test has been defined to help you input data. This text is displayed in light gray in input fields and provides additional information on what you can enter in text fields.
Example:

Find as You Type
If find as you type function is available for link fields (fields where you can select
data from other info areas using  (Select)), all hits that contain the
characters you have entered are immediately displayed in a drop-down list. The more
characters you enter, the shorter the list becomes. Click on the desired entry to enter
it in the field.
(Select)), all hits that contain the
characters you have entered are immediately displayed in a drop-down list. The more
characters you enter, the shorter the list becomes. Click on the desired entry to enter
it in the field.
Views
There are various views available in Aurea CRM web:
-
Tab View
Tab view displays the information stored in a record. In addition, child records are displayed under Related Data, see Related Data.
Use the tab view to view all relevant information relating to a record at a glance. You can edit the data and access all related information quickly.
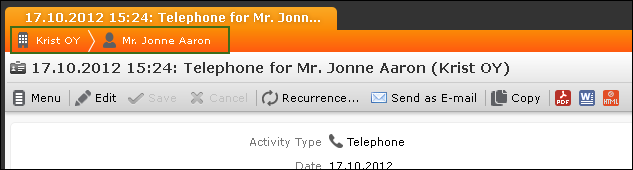
The following screenshot displays the tab view for an activity:
The record is displayed in the upper area. You can edit the data.
The mask includes a "fixed" mask area containing the most important information, which is always visible. Below this area are several tabs or groups containing various fields.
The lower portion of the mask contains links to related records. Click on a link to switch to the record.
- The Participants option is available in some info areas.
- All parent records are displayed under Parent Data.
- Click on Related Data to access child records. This allows you to quickly view all activities for a person, for example.
Changing the Order of Tabs: In tab view, the most important information is displayed in the upper area of the screen, additional information is displayed in the tabs below.
Example:
You can change each tab's position by dragging it to the desired position. The gray marking indicates where the tab is placed when you release the mouse button:
You can also drag a tab to the upper area to display the contents of the tab there:
 Note: You can also change the order of the tabs/groups tin the Related Data area in the same way.
Restoring the Default Layout: Select Reset Layout from the context menu to restore the layout if you have changed it.
-
Tree View
The tree view is only available in certain areas, and provides a hierarchical overview of related data. The tree view can depict multi-tiered hierarchies and you can edit child records. You can use the tree view to display all relevant information concerning a record in a single view and to access related information.
The tree view can depict a multi-tier hierarchy. Example - you can view all the offers stored for a person, and in turn all of the items in these offers.
A separate context menu is available for each info area displayed in the tree view. Use the menu to add new records, or display the records in a list. The appropriate context menu is also available for linked records displayed in the tree view.
Note: All child info areas are displayed in the parent records tree view. For example all records added for a company are displayed in the tree view for companies.To display the tree view:
- Switch to the desired record and select Tree View from the
context menu. The record is displayed in the tree view. Drag the separator between
the tree view and details view to change the width of the tree view.
The tree view displays related records in a tree structure. The details of the selected record in the tree are displayed to the right. The breadcrumb trail is also displayed. For further details, see Breadcrumbs.
Example: Tree view for a company: - The selected record is highlighted in the tree view. and you can edit the record in
the details area, see Editing Records in Tab View.

By default, data is displayed in view mode. To edit the data in a record, click on
 (Edit) or double-click in the working area.
Depending on your configuration either the tab or the tree view is displayed after double-clicking on an item in a list.
- Switch to the desired record and select Tree View from the
context menu. The record is displayed in the tree view. Drag the separator between
the tree view and details view to change the width of the tree view.
-
Quick View
The
 (Quick View) button is available in most areas. Click on
this button to display an overview of the record's key data without closing the
current record.
(Quick View) button is available in most areas. Click on
this button to display an overview of the record's key data without closing the
current record.You can open multiple quick views one after another. For example, if you open person entered in a ticket in the quick view, you can then long click on the link to the company in the quick view of the person.
To display the quick view:
- Either click on (Quick View) in a list or
click on a link in a list or on a tab and keep pressing the mouse button ("long
click"). The quick view is opened.

The record's details are displayed in the center (and cannot be edited).
- If you want to edit the data displayed in the quick view, use the context menu (displayed on the left) to open the records in tab or tree view, for example. You can also add new child records using the menu
- Click on
 and
and  to hide or show the right and
left areas.
to hide or show the right and
left areas.
The breadcrumb trail is also available in the quick view:
- Click on
 in the breadcrumb trail to select an info area to
display all records added for the current record in that info area. The child
records are displayed.
in the breadcrumb trail to select an info area to
display all records added for the current record in that info area. The child
records are displayed. - Click on a record in the breadcrumb trail to display that record's details in the quick view.


- Either click on
-
Map View
Your administrator can define that locations are displayed on a map, e.g. companies or the address of a property.
Example:
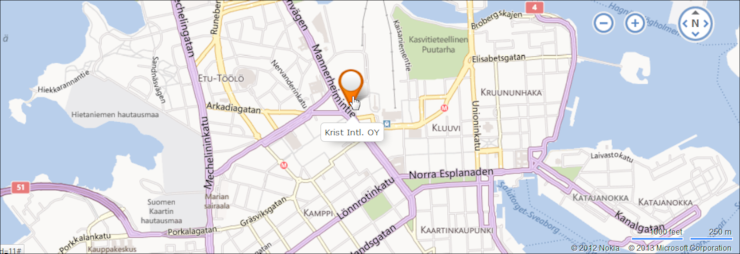
If fields are available that contain geographic coordinates, this data is used to display the location even if the coordinates differ from the address. If no geographic coordinates are available, the address data entered in the database is used to determine the location.
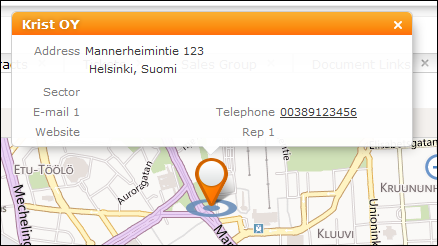
Click on the orange marker to display details concerning the address:
The map view for activities or calendar entries displays records at the location of the person or company the activity was added for.
If a meeting room is added to an activity as a participant, the location of the meeting room is displayed.
Lists
You can edit records directly in the results list, export the data, or display a record's important details in the Mini-Details.
The following functions are available in lists; move the mouse cursor over the record to display the icons:
-
(Quick View): Displays the quick view, see Quick View.
-
 (Show Menu): Displays the record's context menu, see Context Menu.
 -
 (Display Details): Displays the record's details, see
below.
(Display Details): Displays the record's details, see
below.
-
Result Lists
The following screenshot shows the results of a search:
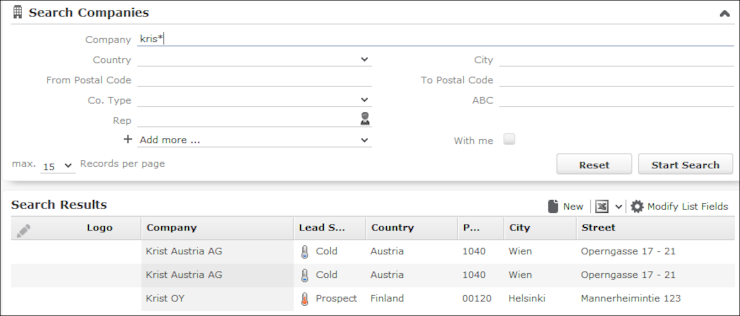
If the list contains a large number of columns, the text in the column headers and cells may be shortened with "..." displayed at the end of the text. Move the mouse cursor over the cell to display a tooltip containing the contents of the cell.
Your administrator can determine that the first row in a list is automatically selected.
You can edit records in the results list as well in lists displayed under Related Data, see Editing Records in List View.
Switch between pages of results using the arrows above and below the results list (
),
see Navigation Bar.If configured, related data is displayed for the selected record below the results list (e.g. all activities added for a person). Related data is only displayed in those areas where it makes sense to access child info areas, see Related Data.
Double-click on a row to carry out the default action defined by your administrator; in most cases the record is displayed in tab view.
Your administrator can determine that numeric values (e.g. order values) are totaled if all search results fit on the first page.
-
Displaying Details
You can display an overview of the most important details stored in a record displayed in a list:
- Click on (Show Details) to the left
of the desired record to display the details.

- Click on
 (Hide Details) next to the
desired record to hide the details of that record.
(Hide Details) next to the
desired record to hide the details of that record.
- Click on
-
Color Codes and Icons in Lists
Your administrator can determine that entries in the list are displayed in different colors or with specific icons to indicate the status of records. Icons can be included in fields alongside text, or text entries can be replaced by corresponding icons.
Tickets are sorted by the time they were added, but recognizing which tickets have a high priority is not necessarily easy at first glance. Entries with a high priority can be indicated using an appropriate icon or displaying the with a specific background color (e.g. red).
Examples: By default, Aurea CRM web displays an exclamation mark in the Subject column for tickets with a "high" priority.

-
Total Lines
In some areas, such as analyses and orders, sum totals can be calculated and displayed. For example, if an analysis analyzes the offers in a business area, the sum total of the value of all offers can be displayed.
Your administrator is responsible for defining whether the total line is displayed.
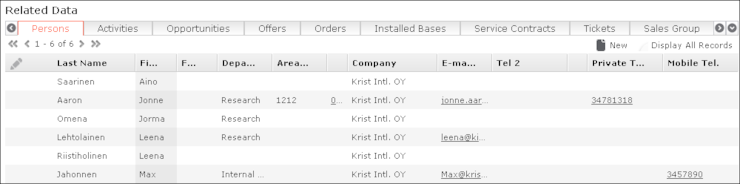
Related Data
The Related Data area displays child data beneath the detailed view of a record.
You can edit data in sub-lists, see Editing Records in List View.
To switch between tabs:
- Using the mouse: Click on the desired tab.
- Using the keyboard: Press Alt+0 to activate the sub-list area. Then press Alt+Number
to switch to the desired tab. Example: In the following screenshot, the
Offers tab is the third tab. Use Alt+3 to switch to this
tab.Note: Your administrator can define alternative keyboard shortcuts.
Filter Masks
Filter masks are dynamic masks that can differ depending on the data in a record.
Filter masks can be used to differentiate between different types of records (e.g. private and corporate customers), or display different contents depending on the situation (e.g. different fields for telephone calls and letters in the Activity info area).
Live Tiles
Your administrator can define that the results of queries can be displayed in a live tile, e.g. on your start page. By default, the start page includes a query applied to ongoing opportunities in the current quarter:

The live tile consists of two elements:
- The header displays the number of records (e.g. the opportunities in
the current quarter). Click on the number of hits (
 ) or to open the query's search results.
This button is only displayed when your mouse cursor is placed over the header.
) or to open the query's search results.
This button is only displayed when your mouse cursor is placed over the header. - The records returned by the query are listed on after another in the area below the
header. By default, each record is displayed for a few seconds.
- Move your mouse over the record to stop the display from
switching between records. Navigation buttons (
 and
and  ) are
displayed to the left and right of the record. Click on these buttons to switch
between records.
) are
displayed to the left and right of the record. Click on these buttons to switch
between records.Once you move the mouse cursor away from the live tile, the live tile begins automatically switching between records again.
- Click on (Show Menu) to open the
record's context menu.
- Double-click on the record to open it in tab view.
Your administrator can determine that the lower section is not displayed.
- Move your mouse over the record to stop the display from
switching between records. Navigation buttons (
Your administrator can define if the live tile is displayed when no hits are returned by the query.
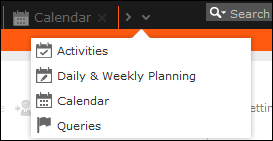
Displaying Records in Multiple Tabs
Data in Aurea CRM is displayed in tabs. Depending on the info area and the action you are performing, data is either opened in a new tab or replaces the content in the current tab.
A new tab is opened if:
- You click on a buttons such as Timeline when displaying a company.
- You add add new child record in the Related Data area (e.g. add a portfolio for a company).
- You hold down Ctrl while selecting a option in the navigation bar or a record’s context menu.
Exception: If the calendar is already open, opening the calendar with Ctrl+Click displays the currently opened calendar.
Click on another tab to display its contents.
If you open more tabs than can be displayed on the screen at once (the
number depends on your resolution), use the  (Previous) and
 (Next) buttons to scroll. Click on
 ![]() (Show all tabs) to display a list of all open tabs:
(Show all tabs) to display a list of all open tabs:
Select an entry from the list to switch to that tab. Click on  (Close to close a tab).
Refreshing the Work Area
The working area is not always refreshed automatically after applying certain changes, e.g. in the list view, tree view or maps. The process arrows in certain guided processes are also not always automatically refreshed.
Select ![]() > Refresh Working Area to refresh current view.
> Refresh Working Area to refresh current view.
Changing the Order of Elements on the Start Pages and in Related Data
You can configure the layout of areas on the screen.
To change the layout:
- Click on
 and choose an option:
-
 (one column): Areas are displayed beneath one another
spanning the entire width.
(one column): Areas are displayed beneath one another
spanning the entire width. -
 (two columns): Areas are split over two columns.
Example:- (tabbed): Displays the areas in separate tabs.
-
 (Select Items): Click on this icon to display a
list of all available areas. Enable the check box next to the areas you wish
to display. Click on Reset to revert to the default
settings.
(Select Items): Click on this icon to display a
list of all available areas. Enable the check box next to the areas you wish
to display. Click on Reset to revert to the default
settings.Your administrator can define that certain areas cannot be hidden or that certain areas are not active by default.
-
To change the order of areas:
- Click on an area and drag it to the desired position while holding the mouse button.
- Release the mouse button.