Sidebar
The sidebar is displayed on the left of the screen and a varity of functions can be executed from here.
Use the sidebar to access data in the various info areas, execute functions and processes, define settings, configure your favorites, view system messages etc.
Aurea CRM Menu
The following options are available in the Aurea CRM menu:

- Start Page: Switches to Aurea CRM web's start page.
- Refresh Working Area: Refreshes the current screen.
- Log Out: Closes Aurea CRM web. For security reasons, always exit Aurea CRM web using this option.
- User Guide: Opens the user manual.
- About Aurea CRM: Displays information such as the version number etc.
- Affiliation View: This option is available if your administrator has granted access to the affiliation view. For more information on the affiliation view, refer to your product-specific manual.
Navigation
Navigation menu icons are displayed in the sidebar below the Aurea CRM menu.
Each menu is accessible by clicking on its icon (e.g.  for the Accounts
menu). Click on the icon and select the desired option:
for the Accounts
menu). Click on the icon and select the desired option:

History
Use the History section to quickly access the records and pages you have recently viewed.
Your administrator defines which entries are displayed in the history:
- Only the records you have accessed, e.g. companies, persons etc.
- Only the functions you have accessed, e.g. search pages, start page, tree view etc.
- Both (default setting)
The history is displayed in the left frame or in the application menu, depending on your configuration. For further details, see Layout Tab.
To access an entry in your history:
- Click on
 (History).
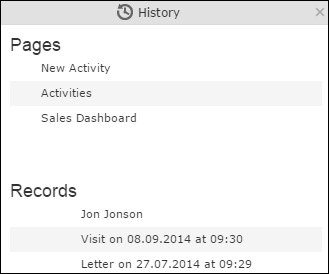
Your history is divided into two sections:
- The most recently accessed areas are listed at the top.
- The most recently accessed records are listed at the bottom.
- You can also navigate in the history.
Favorites
You can add the records you require most frequently to your favorites. Your administrator determines which types of records (i.e. which info areas) you can add to your favorites.
Quick links are also displayed in Customizing Quick Links.
Displaying your Favorites
To view your favorites list:
- Click on
 (Favorites). Your favorites are displayed. The top section
displays your quick links. Your favorites are displayed below the quick links,
grouped by info area.
(Favorites). Your favorites are displayed. The top section
displays your quick links. Your favorites are displayed below the quick links,
grouped by info area.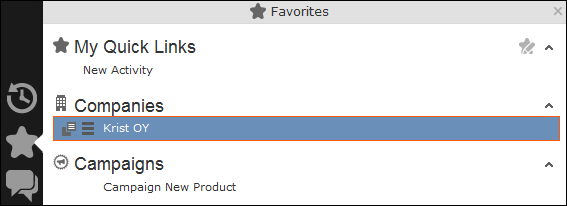
- You can access the context menu (
 ) and quick view (
 ) for all
entries in the list. Double-click on a record to open it in the default view.
) for all
entries in the list. Double-click on a record to open it in the default view. - If you have added records to your list of favorites, you can also access these
records from the corresponding menu entry (e.g. you can access your favorite
companies from the Companies menu):

Adding Records to your Favorites
To add a record to your favorites:
- Switch to the desired record, see Searching.
- Select Add to Favorites from the record's context menu. A message is displayed, confirming that the record has been added to your favorites.
Removing Records from your Favorites
To remove a record from your favorites:
- Either open your favorites or Switch to the desired record
- Select Remove from Favorites from the record's context menu. The selected record is removed from your favorites.
Quick Links
You can add the areas you use regularly to your quick links.
Customizing Quick Links
If you have not yet defined any quick links, the Quick Links area is not displayed.
To add quick links:
- Click on (Favorites).
- Click on Click here to add your favorite
pages if you have not yet defined any quick links. Otherwise click on
 (Modify Quick Links) in the header. The My Quick
Links dialog is displayed.
(Modify Quick Links) in the header. The My Quick
Links dialog is displayed. 
- Click on the
 icon under All actions
next to one of the sections. All available menu options are displayed.
icon under All actions
next to one of the sections. All available menu options are displayed. - Select an entry and click on Add to Quick Links. The entry is displayed under My Quick Links.
- Use the Up and Down buttons to determine the desired position of the entry.
- To delete an entry, select it and click on Delete. Use the Delete All button to delete all entries in the list.
- Click on Save to accept your settings. Click on Reset to revert to the default settings.
Inbox
Your inbox contains various types of messages that inform you of specific events. Some messages are displayed for a defined period of time before being closed automatically.
To display your inbox:
- Click on
 (Inbox). Your inbox is opened.
The following tabs are displayed: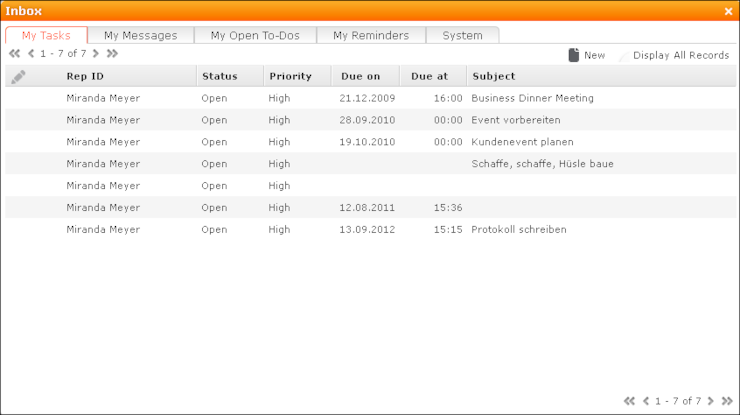
- My Tasks: Tasks that have been assigned to you are listed here. You can also add new tasks.
-
My Messages: Messages you have received are listed
here.
You receive messages to inform you that a background query has been completed or that mass updates have been performed on the server, for example.
-
My Open To-Dos: Your open To-Dos are listed
here.
To-Dos can be displayed for due activities, tasks, absences and marketing activities.
-
My Reminders: Your reminders are displayed
here.
Reminders can be defined for activities, tasks and absences and are displayed at the scheduled time in this tab.
-
System: System messages, such as error messages, are
listed here. If you have received a new system message, the inbox icon is
displayed with an exclamation mark (
 ).
).
- Switch to the desired tab.
- If not all tabs are displayed, click on
 (Scroll tabs right). Alternatively, click on
  and select
the desired entry from the list.
and select
the desired entry from the list.