Managing Reps
Learn to manage Reps.
You can add new reps or edit existing reps’ data, e.g. to define their signature or assign access rights.
New Reps Process
A process is available to guide you through the steps required to add a new rep. Once a phase has been completed, the system automatically proceeds to the next phase.
To add a rep:
- Select Settings (
 ) > Maintenance > Reps.
 - Click on Start Search in the search mask.
- Click on
 (New Rep) to add a new record and start the process.
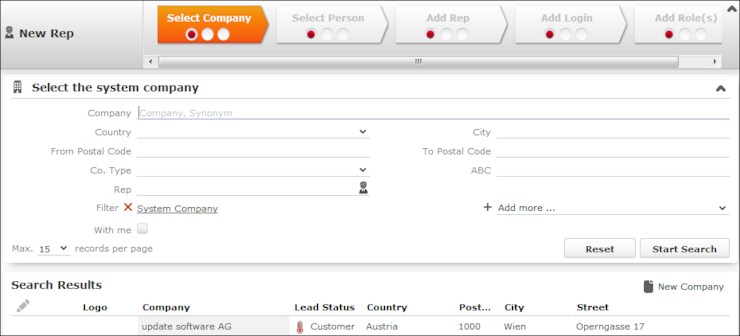
- Select the rep’s company or add a new one in the first phase.
By default, only companies flagged as system companies are displayed in the search results.
You can however remove the System Company filter and link the rep to another company.
- Select the person corresponding to the rep in the Select
Person phase.
A rep must be linked to a person. The search only lists those persons who have not been assigned a login.
- The Add Rep phase is used to add the rep record. Data available in the person record selected in the previous step is entered automatically. You can also assign an organizational group and determines the rep’s superior and deputy.
- The Add Login phase allows you to assign a login name and
password (mandatory) as well as module access rights.
The following are entered automatically:
- The Name is generated from the first four letters of
both the first and last names of the selected person. This name needs to be
unique.Note: Login names can include letters, umlauts, 'ß' and '#', but no other special characters are allowed.
- The following module access rights are assigned automatically: web, groupware connector and Communication.
- The Name is generated from the first four letters of
both the first and last names of the selected person. This name needs to be
unique.
- You can assign one or more roles to the rep in the Add Role(s) phase. Select the desired roles and click on Assign Selected Roles to assign the roles to the rep.
- After completing the final phase, the rep record is displayed.
Verify the data in the tab view.
Adding Reps, Rep Groups and Resources Manually
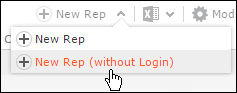
You can add a new rep without starting the new rep process.
To add a rep without a login:
- Select Settings () > Maintenance > Reps.
- Click on Start Search in the search mask.
- Click on
(New Rep (without Login)).
Enter data such as the name, form of address etc. Reps can be set as Inactive, and you can determine whether the end customer is invoiced for the user using the Billable field. You can also determine that a rep should be set to inactive from a specific date onwards (Deactivated from field).
- To add a group or resource instead of a rep, select the desired entry from the Type drop-down list.
- You can enter additional information on the following tabs:
- Settings: Settings such as the language, tenant, superior and deputy.
- Rights : The rep’s organizational group, station number and station/group and rep access rights etc.
- Connector settings: Allows you enable the connector settings and define which data to synchronize.
- Contact Data: The rep’s contact data.
- Signature: The rep’s signature, entered in e-mails sent by the rep.
- Working Hours: The rep’s work hours.
- Offline: Settings for Aurea CRM web offline.
Central Login Configuration
Use the Central Login Configuration area to manage logins for offline stations centrally.
To define a central login:
- Switch to the desired rep.
- Switch to the Central Login Configuration tab under Related Data.
- Click on
(New).
- Define the following:
- Enter the users login name, alias, station number etc. under Overview.
- Define which Aurea CRM modules the rep can access under Module Access Rights.
- Define the password under Password Settings tab, as well as how often the password needs to be changed etc.
- Define whether the rep can log on to the system multiple times and whether system locks are ignored under Lock.
Assigning Rep Roles
To assign a role to a rep:
- Switch to the desired rep.
- Switch to the Rep Role tab under Related Data.
- Click on
(New).
- Click on
 (Select) next to the Login role
field to select the role. You can determine the following:
(Select) next to the Login role
field to select the role. You can determine the following:- Whether the role is Active (i.e. can be selected when logging in)
- Whether the role has Read only access
- Whether the role is the rep’s Default role. The default role is selected automatically when logging on.
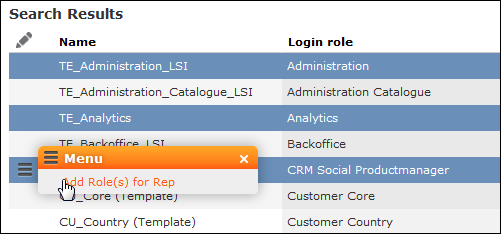
Assigning Multiple Rep Roles
You can assign multiple roles to a rep.
To assign multiple roles:
- Switch to the desired rep.
- Switch to the Rep Role tab under Related Data.
- Click
(Add Multiple Roles).
- You can enter a name and login role to restrict the search results.
- Select the desired entries (Ctrl+Click).
- Select Add Role(s) for Rep from the context menu.
Defining Skills
You can skills for each rep. When assigning tickets to reps, for example, you can take into account the skills of your reps.
To assign skills:
- Switch to the desired rep.
- Switch to the Skills tab under Related Data.
- Click on
(New).
- Define the skill:
You can enter the following information:
- Product/Product Group, e.g. for service technicians qualified to handle certain types of machinery.
- Language, e.g. for international corporations.
- Sector, e.g. for reps with detailed knowledge of a particular industry.
- Problem/Problem Group, e.g. if a rep is experienced in solving particular problems.
Assigning Additional Tenants
You can assign multiple tenants to reps that require access to the data of more than one tenant.
To assign an additional tenant:
- Switch to the desired rep.
- Switch to the Rep Add. Tenant tab under Related Data.
- Click on
(New) to assign additional tenants.
Assigning Groups
You can assign reps to groups. To do so:
- Switch to the desired rep.
- Switch to the Group Allocation tab under Related Data.
- Click on
(New).
- Select your group. You can also define a time period for the group membership.