Step
Steps are the building units of each phase or process.
A process step is one part in a sequence of steps that define a Process.
Each process or process phase consists of one or more process steps. Steps are displayed in the work frame of the current tab.
A process step contains the actual action to be performed:
- a user interface representation, e.g. "Show from xy"
- a background operation, e.g. "Execute workflow z"
- a dispatching operation, e.g. "if x do A, else do B"
A process step is not linked to a process and can therefore be reused in multiple processes. For further details, see Examples.
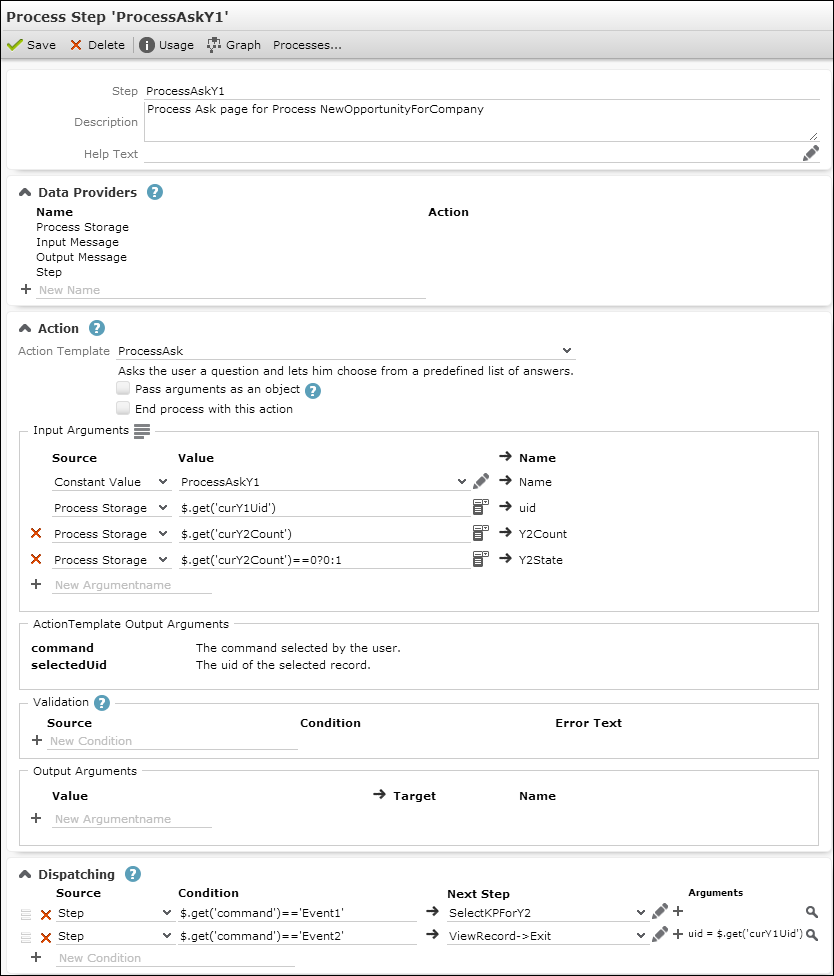
A step's configuration consists of the following settings:
- Name: The name of the step.
- Description (optional): Add an internal description (only visible in CRM.Designer).
- Help Text (optional): Add a description of what happens in this step. The Help Text is displayed as a tool-tip below the phase help. If the process does not contain phases, the Help Text is not displayed.
-
Data Providers: Used to access values used by the step. For
further details, see Data Providers. All internal data
providers are available.
You can add custom external data providers, to get e.g. the result of a query or values from a record. For further details, see External Data Providers.
-
Action: The action to be executed by this step. For further
details, see Action.
Use the action template
$nopto define an invisible "dispatching step". For further details, see $nop. The purpose of a dispatching step is to determine which step is to be executed next. For further details, see Dispatching. - Input Arguments: The input arguments for the selected action. For further details, see Action.
- Validation: Define conditions that must be met to complete the step and call Dispatching. For further details, see Validation. Multiple conditions are combined using AND. You can define an Error Text to be displayed in Aurea CRM.Web if validation fails.
-
Output Arguments: Output arguments defined in the action are
displayed read-only (argument name plus description) in the Action Template
Output Arguments section.
You can define additional output arguments in the Output Arguments section, e.g. to update the process storage. Target data providers: same as for Input Arguments.

-
Dispatching: Defines what happens after the step is completed,
i.e. the next step. For further details, see Dispatching. The step associated
with the first condition that evaluates to true is executed.
If no dispatching conditions are defined or if none of the defined dispatching conditions evaluates to true, the process ends with this step.
Defining Steps
You can define new process steps
- on the Step page
- directly in the dispatching area of an existing step

To create a new step directly in the dispatching area:
- Click
 (New Step). Enter Name and Template.
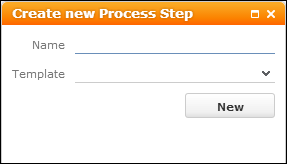
- Click New. Or close the popup to cancel step creation.
- Click
 (Edit step arguments) to view and edit the input arguments for the next step.
- Enter an argument name and click (Add) or click
 to display
all available default arguments.
to display
all available default arguments. - For the arguments you want to pass from the current step (
$out) to the next step ($in) select "Step" as Source. For example, to pass the selecteduidfrom the current step aslinkfor the next step.In the action definition of the next step you can get these values by simply selecting "Input Message" as source and "as is" as value. For further details, see Action.
Note: The next step's input arguments are not automatically retrieved from the previous step. If you do not select "Input Message" and "as is", the action template's defaults (source = Constant Value) is used, e.g.selectionMode = multifor aSearchaction. - Enter the desired Value: You can toggle between text input
(
 ) and a
drop-down list of available values (
) and a
drop-down list of available values ( ).
). - Click Apply.
- Save the step definition.
- Click
(Go to step) to further define the next step (data
providers, action definition, dispatching). For steps that do not exist in the
database (listed with "not defined yet"), the Edit icon is grayed out.