Automatic Selections
You can automatically update frequently used selections using automatic selections.
- Select Info > Autom. Selection from
the menu.
All the selections are displayed.

- To update a selection automatically at certain regular intervals, enable the
appropriate cell in the Autom. column and enter the frequency
with which the selections should be generated in the Frequ.
(days) column. Leave the Frequ. (days) column
empty to update a selection every time the automatic selection is started.
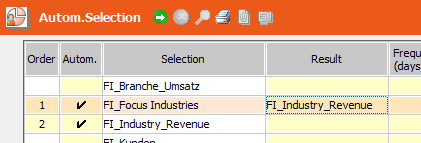
The Order column displays the order in which automatic selections are processed by the system. It is defined by the order in which you enable the Autom. cell for selections.
- If the Extend option is enabled for a selection, specify the target selection in the Result column. Records are added to this selection.
- Use the Triggers column to select which triggers should be initiated by the result of the selection, see Triggers in the CRM.core Administrator Guide. The trigger(s) are executed for each record in the selection.
- Use the Send to column to determine that the result of the selection should be sent to other reps.
- Click
 (Execute).
Aurea.CRM checks which of the marked selections are to be carried out on the basis of the frequency entered as well as the date and time of the last update. Aurea.CRM then generates all the selections that need to be updated in order.
The date, time, duration and status (OK or Error) of the last selection process are displayed in the Date/Time/Duration (min.)/Status columns.
Your administrator can choose to log the execution of automatic selections, see Configuration Info Area (General Settings category, Log automatic selections option) in the CRM.core Administrator Guide.
Combining Automatic Selections
To combine selections using automatic selections:
- Enable these options for the first selection: Base: Entire Database and Result: Replace.
- Define the second selection:
- To create a union of two selections, define the second selection with the
following options:
Base: Entire Database and Result: Extend
-
To create an intersection of two selections, define the second selection with the following options:
Base: Selection and Result: Replace
- To create a union of two selections, define the second selection with the
following options:
- Enter the second selection as the result of the first selection in the
Autom.Selection level. Do not enter a result for the
second selection.
 Note: You can combine more than two selections with one another by entering the subsequent selection as the result of a selection.
 - Click on (Execute).
The result of the first selection is written to the second selection.
Union: The first selection initially only contains the result of the first selection. The system searches the entire database for records that meet the second condition, and adds them to the selection.
Intersection: The second selection initially contains the result of the first selection. The system then searches for those records in the selection that also meet the second condition. This result overwrites the original contents of the selection.