Defining Print Formats
Use a print format to determine which data you wish to print and in what form.
To define a print format:
- Select Extras > Define Print Format
from the menu.
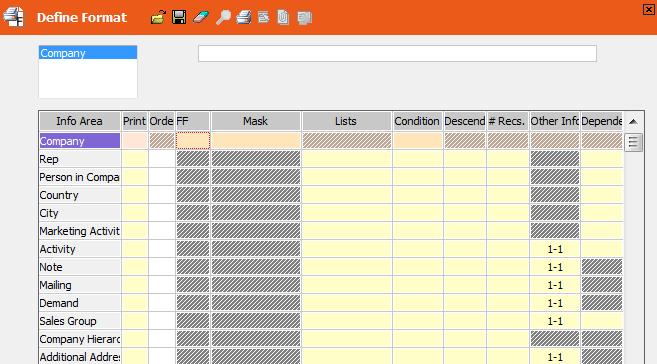
In the Info Area column, the currently selected info area is marked with a bar. All the related info areas are listed below it.
- Select the info areas you wish to print in the Print column.The order in which the info areas are sent to the printer is displayed in the Order column. If the info area contains dependent data, the info area is printed in mask form. The dependent data are printed below in list form.
- The following options are also available from the corresponding columns:
- FF: Specifies after which record a page break should be inserted.
- Mask and Lists: Click in the Lists or Mask cells to select a predefined mask or list format for the printout. All masks and lists defined for the corresponding info area are available. If you do not select a format, the current mask or list used by the info area is used by default.
- Condition: Only data that satisfies the conditions defined here is printed. In addition, the conditions defined under Data > Define Conditions for the current level are applied, see Conditions.
- Descend.: When activated, the records in this info area are printed in descending order.
- # Recs.: Use this column to limit the number of related records printed (e.g. only one person per company). All related records are printed by default.
-
Other Info: Use this option if relationships between info
areas are not clearly defined. Clicking the cell toggles between two states:
1-1: Only company-related complementary information is printed.
1-N: All complementary information is printed (including any person-related data)
-
Dependent: Click in the Dependent cell of an info area to display all info areas dependent on that info area. Click in the Print cell of the dependent info area to print records from the dependent info area as well.
To return to the corresponding parent level, click on another info area in the small window above the table. If an info area has no children, the cell in the Dependent column is shaded.
- Click
 (Save).
 - Enter a meaningful name for the format and click OK.
You can save, load and deny access to formats to specific users, as well as distribute them, see Saving, Loading and Deleting Formats.