Importing Translated Texts
Learn how to import translated texts.
To import translated texts:
- Start TranslationTool.exe.
- Select Import translated texts.
- Select the desired database type: MS SQL or ORACLE.
- Click Next.
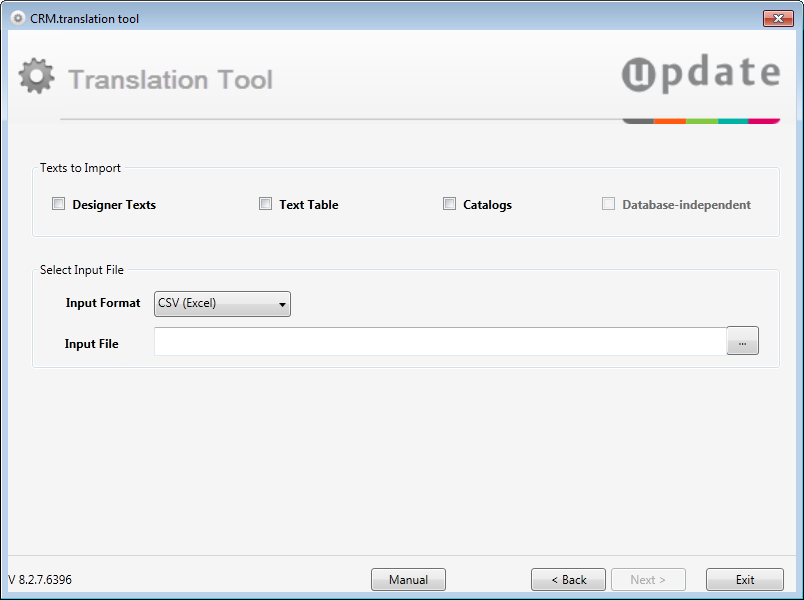
- Select the texts you want to import by activating the corresponding check boxes:
- Designer Texts: Imports texts into the CRM.designer database, see Texts and Languages in the CRM.designer Administrator Guide.
- Text Table: Imports texts into the Text info area (04), see Text Info Area.
-
Catalogs: Imports variable catalog values, see Catalogs.
If you import catalog values, make sure an up-to-date mm_catno.txt file is present in the .. \system\db directory of the target station, see mmba.exe Parameters (
--writedbstrparameter). Otherwise no Catalog Maintenance (KW) records are created when importing translated catalog values. In that case you need to distribute the new catalog values via a data stock download. For more information, see Communicating Catalogs in the Aurea CRM win Administrator Guide.
- Activate the Database-independent check box if you are importing
texts from another database.Note: This option must be enabled for files that were exported using the Database-independent option. Otherwise the file cannot be imported.
- Select the Input Format: CSV (Excel) or XML (Passolo).
- Enter the path and file name of the translation in the Input File field or browse to the location.
- Click Next.

- Enter the Connection String(s) for the Aurea CRM and/or
CRM.designer database(s) using the following syntax:
- for MS SQL databases: Server=[name];Database=[name];UID=[login];PWD=[password]
- for Oracle databases: Data Source=[name];user id=[login];password=[password]
- Enter the Table Prefix for the Aurea CRM database if applicable.
- Click Check Connection(s).
- Check Save settings to save the connection settings for later use.
- Click Next.
The Import Summary is displayed.
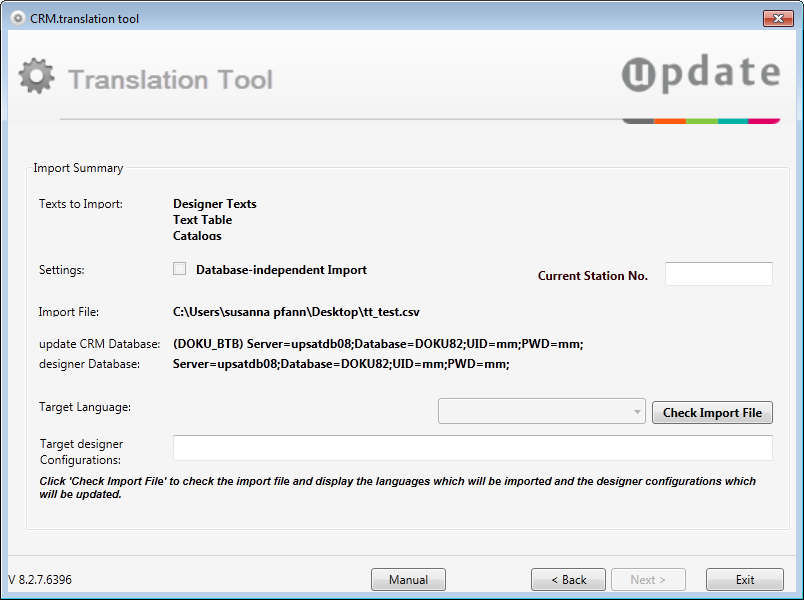
- Enter the number of the target station in the Current Station No. field.
- Click Check Import File to verify your settings.
The Target Language and affected CRM.designer configurations are displayed.
If the target language or a CRM.designer configuration is not found in the target database, the file cannot be imported. (UPDATE* configurations are ignored on import.)
When importing catalog values, the catalog base language of the import file must match the catalog base language in the database. Otherwise the file cannot be imported.
- Click Next.
- Click Start Import.
The texts are imported to database according to the specified settings. For information on match-up rules, see Match-up.
CRM.designer texts flagged as "Sealed" are not updated on import.
Existing texts are overwritten without checking for changes since the last export. If a translation exists in the database but not in the import file, the translation is not deleted by the import process.
The import process is logged in LogFile.txt. Texts that could not be imported are listed here.
Note: The changes to the database are not logged in detail. No History (H0) records are written. - Click Close to exit the application, or click Back to import another file.
- Text table only: To apply the changes (translations) to the formats, select Write language from the context menu in the Text info area, see Propagating Changes.