Using Utility Accounts Tab
The Utility Accounts tab contains details of the utility or service accounts linked to the Customer and allows you to perform various premise-based tasks.
To search for a specific utility account:
- In the Utility Accounts (ESI / LDC) tab, enter your search criteria using the
following fields:
- ESI ID: ESI ID is also called Premise Number. It is associated with the
premise where the Customer is using the commodity(Gas/Electricity). This menu contains
a list of all ESI ID's associated to a multi premise Customers account. In case of a
single premise Customer account, the list has only one ESI ID. Note: ESI ID Transfer is a function using which a Customer's ESI ID is changed. This happens in the following cases:
- Wrong ESI ID is linked to the Customer during enrollment.
- Customer changes address and moves to a new location keeping the same Supplier.
To use EDI ID transfer functionality, do the following:- Go to Administration Menu > Operations > ESI ID Transfer.
- On ESI-ID TRANSFER page, enter From Customer No and To Customer No and click Get Customers.
- Check Transfer on the list of ESI IDs that needs on From Customer table and click Transfer. The transferred ESI IDs appears on To Customer table.
- ESI ID Fragment: This field allows you to enter part of an ESI ID number. For example, if you are looking for 123456789123456789, you can enter "123" or "678".
- Address Fragment: This field allows you to enter part of the service address of an ESI ID. For example, if you are looking for 112 maple Hill Farm Rd., you can enter "112" or "Maple".
- Status: This menu allows you to select the status of the utility account you
are looking for.
Active= Currently on flow.Inactive= Not on flow.All= All utility accounts.
- Type: This field is used primarily for apartment complexes and allows you to select between apartment units and common areas.
- Unit #: This field allows you to specify the unit number of an apartment.
- ESI ID: ESI ID is also called Premise Number. It is associated with the
premise where the Customer is using the commodity(Gas/Electricity). This menu contains
a list of all ESI ID's associated to a multi premise Customers account. In case of a
single premise Customer account, the list has only one ESI ID.
- Click
 to view the results.Note: Some of these fields may not appear as per your system configuration.
From the Utility Accounts tab, you can also perform the following operations related to each utility account:
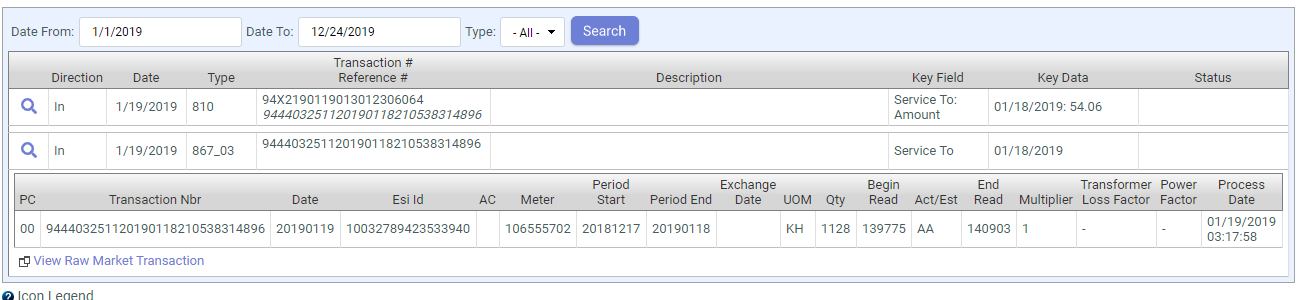
View Transaction History
Use the ![]() icon to view your utility
account transactions history in the grid below. For details on transactions, see Transactions.
icon to view your utility
account transactions history in the grid below. For details on transactions, see Transactions.
![]()
If required, you can filter transactions based on a specific date range and type.
The grid displays details like Direction (sent or received),
Date, Type, Transaction # or
Reference #, Description and Status of
each transaction. For detailed information on a particular transaction, use  .
.
![]()
While viewing the detailed information of a particular transaction, you can also click the View Raw Market Transaction link to view its related raw market data.
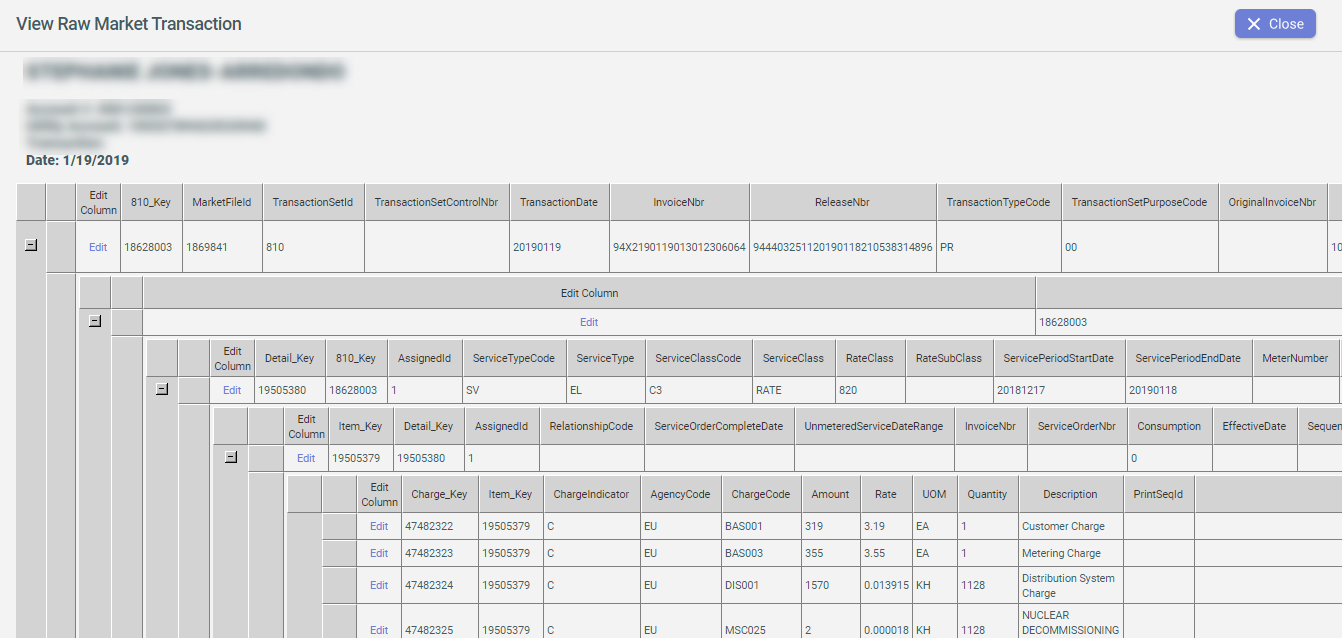
In case the user must review the details of a transaction, the Transaction History panel gives users the ability to view raw market data.
To view Raw Market Transaction Data:
- Open the Transaction History Panel.
- Click the View Market Data icon to view transaction details. The market data contained in this
row only returns data that is commonly requested when viewing this specific transaction
type.
- If the market data retrieved in step 2 is not sufficient, click the View Raw Market Transaction link to view the raw market data.
- Clicking on the View Raw Market Transaction link opens a new window which shows
actual raw transaction information received by the CIS system from the Utility. Each
transaction is identified by a unique key. Click
 at the top right corner of
the window to close this page.
at the top right corner of
the window to close this page. 
Create Market Transaction
Use ![]() to initiate a
new Customer enrollment, service order, termination, historical usage request, move-in, and
switch. There may be other market transactions available for different Utility/Market. Refer
to the Create Transaction for additional information on creating market transactions.
to initiate a
new Customer enrollment, service order, termination, historical usage request, move-in, and
switch. There may be other market transactions available for different Utility/Market. Refer
to the Create Transaction for additional information on creating market transactions.
![]()
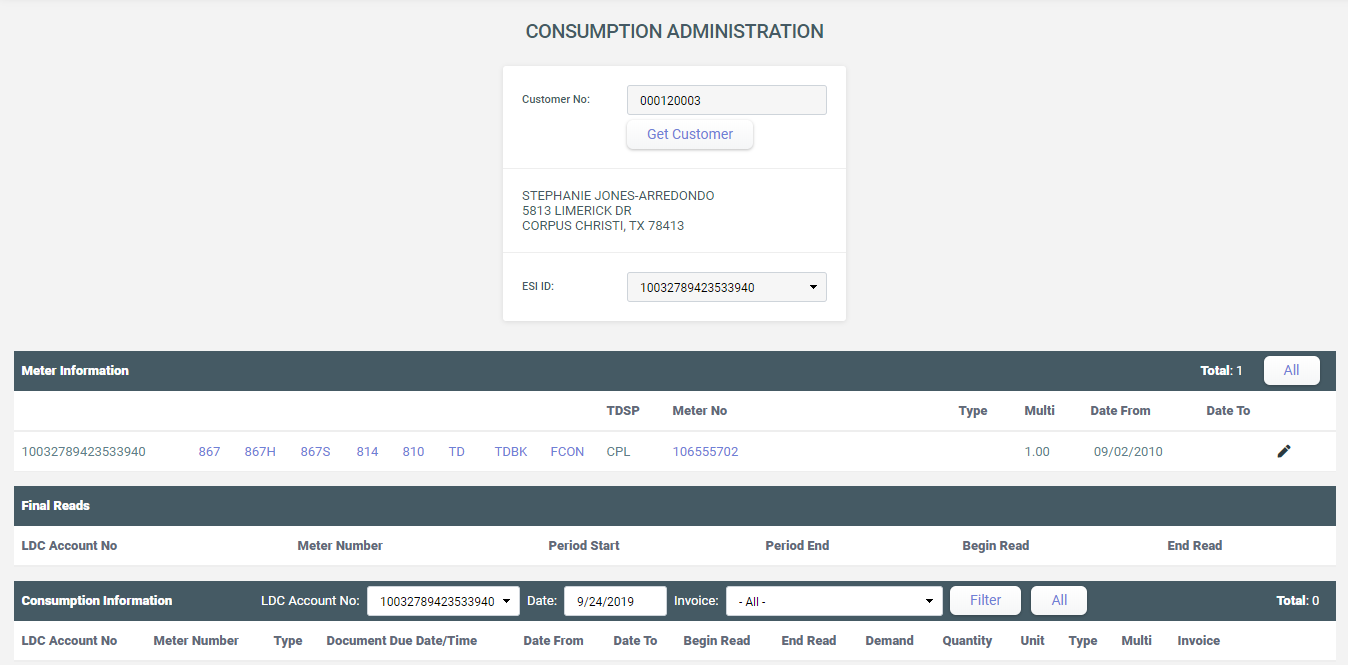
View Consumption
Use  to view
the meter information, final reads, and consumption information for a specific Customer and
premise. You can edit existing consumption by clicking E and add consumption by
clicking A.
to view
the meter information, final reads, and consumption information for a specific Customer and
premise. You can edit existing consumption by clicking E and add consumption by
clicking A.
From the Meter Information you can find the following:
- The TDSP name.
- List of meters for the account and the meter exchange date, if any.
- Process date of a consumption on a meter.
- Transaction number for each consumption.
- Begin and End read and the quantity of commodity consumed.
From the Consumption Information you can find the following:
- The unbilled consumptions (one having no invoiceid in Invoice column).
- The Documet Due Date.
- The Invoice for a particular period.
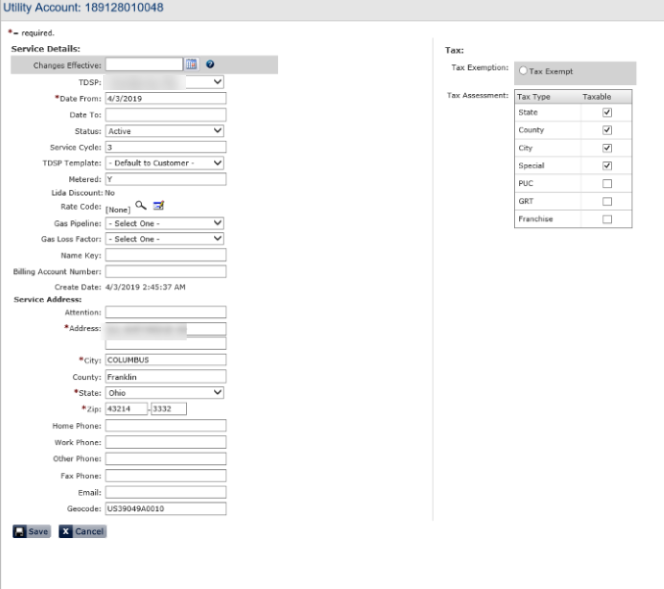
Edit Premise Information
Use  to edit the
Service Details, Service Address and Tax.
to edit the
Service Details, Service Address and Tax.
-
Service Details
Fields Description Changes Effective Set the date from which the change is effective. TDSP Set the desired TDSP Date From and Date To Set the start and end date. Status Select the desired status. Service Cycle Set the service cycle. TDSP Template Select the desired TDSP Template. Metered Set wheather Metered or Not. Lida Discount Choose yes or no. Rate Code Set rate code. Gas Pipeline Select desired gas pipeline. Gas Loss Factor Select gas loss factory. Name Key Set name key. Interval Usage Type select desired interval usage type. Billing Account Number Set billing account number. On Switch Hold Choose yes or no. Is TOU? Choose yes or no. Create Date This is prepopulated. -
Service Address
Fields Description Attention Enter name of the customer/addressee. Address details Enter Address, city, country, state, zip. Communication details Enter phone number, fax and e-mail. Geocode Enter Geocode. -
Tax – determines which taxes are assessed. For details, see Taxes.
Fields Description Tax Exemption Choose None or Tax Exempt. Tax Assessment Set tax assessment.