Print Module
The Print module allows you to generate and print lists. You can print fields from multiple info areas and even program modules.
Start the Print module using the  icon or select
Window > Modules > Print
from the menu.
icon or select
Window > Modules > Print
from the menu.

Printing a list
To print a list:
- Click on Load (
 ) and select a print format.
 - Select File > Print from the menu. The standard Windows Print dialog box appears.
- Select the desired settings.
- Click on Print to start the printout.
Defining a Print Format
To define a print format:
- Enter the list header in the Header field.
- Select Define Format from the context menu or
Data > Define Format from the
menu.
The Define Print Format is displayed.

- Use the drop-down list at the top left to select the info area(s).
All fields available in the selected info area are displayed below.
- Use the arrow buttons or double-click to add and remove fields from the list of
Fields to Print. Add fields in the order you wish to print
them. Note: Double-click a field in the Fields to Print list box to delete it. You can change the order of the info areas later. The field order can be edited in the preview .
- Enter the format details, see Formatting the Printout.
- Click OK.
The table now displays the info areas that you have selected fields from.
The following information is displayed:- Pos.: The order of the info area, as specified in the Define Print Format dialog box using the Order button. You can edit these values in the table.
- Info Area: Name of the info area in the print format.
- Cond. Active: Click on the cell to open the Define Search Conditions dialog box, where you can define conditions for this info area. You can also define conditions by selecting Data > Define Conditions from the menu. You can disable conditions by clicking in the corresponding cell or selecting Data > Define Conditions from the menu. The Cond. Active cell is automatically enabled if a selection is chosen that contains a condition applied to the info area.
- Separator: Generates a dividing line at the end of a record.
- FF: Generates a page break after the info areas of your choice.
- Subtotal: If your info area also includes numerical fields, you can generate a subtotal at the end of each info area.
- No. Printed: Number of records printed for this info area.
You can disable conditions by clicking in the corresponding cell or selecting Data > Define Conditions from the menu.
The Cond. Active cell is automatically enabled if a selection is chosen that contains a condition applied to the info area.
- The following options are also available:
- Format: After you have saved or loaded the settings, the name of the print format you want to print appears in the Format field.
- Header: Specify the list header in the Header field.
-
Selection: Enable the Selection
check box to choose a selection, see Selections.
The selection is loaded and the name of the selection is displayed in the Sel. Name field.
The Cond. Active cell is enabled for the corresponding info area(s) to indicate that conditions are active.
The Selection info area appears in the first row of the print table (Pos. 0). You can then define conditions for the selection:
Define the following condition to filter out records added to the selection manually: condition "Manual <> empty" (delete the existing entry, i.e. no entry as a comparison value).
Define the following condition to filter out records in the selection that have been marked: condition "Marked <> empty" (delete the existing entry, i.e. no entry as a comparison value).
-
Property Selections (BTB only): Enable this check box to choose a property selection.
-
Sel. Name: Name of the current selection file. Double-click on this field to load a selection. You can disable a loaded selection by disabling the Selection check box. o Descending: Enable this check box to sort data in descending order.
-
Sort By: You can determine the criteria used to sort the printout.
Double-click in the Sort By field to call up the available sort fields.
The sort fields in the info area placed at Pos. 0 are displayed. The order of the info areas is defined using the Order button in the Define Print Format dialog box. The order can also be altered by directly editing the Pos. field.
-
All: Determines whether the company/person should only be printed if at least one record satisfies the condition.
Example: In the Activity info area, you define the condition "Marketing Activity = Offer". If the All check box is enabled, all persons or companies with at least one activity record containing the field "Marketing Activity = Offer" are printed.
If the check box is disabled, all persons or companies are printed, regardless of whether they have any activity records containing the field "Marketing Activity = Offer".
- Click on
 (Save) to save the print format.
Changing the Info Area Order
If you have selected fields from multiple info areas, you need to determine which info area to sort fields by, i.e. you need to determine an order for the selected info areas.
- Click the Order button to open the Info Area
Order dialog box.
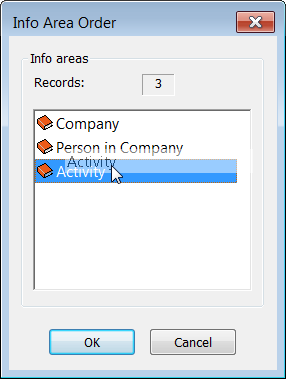
- Use the mouse to drag the info areas to determine the order.
If, for example, the Activity info area is now in first position, you can sort the list using the criteria from that info area (e.g. Type, Starts on, etc.).
The order of the info areas also affects the access to the data to be printed.
Example:
- Person in Company condition: Position = "managing director"
Info area order: Company; Person in Company
All companies are printed, but only those persons that satisfy the condition (top-down approach).
- Person in Company condition: Position = "managing director"
Info area order: Person in Company; Company
Only those companies containing a person who satisfies the condition are printed (bottom-up approach).
You can edit the info area order after closing the dialog box by changing the value in the Pos. (position) field in the print table.
Formatting the Printout
The right half of the Define Print Format dialog box contains a series of check boxes:
- Format: Select the orientation of the printout.
- Page Margin (cm): This is used to specify the distance between the list and the margins, in cm.
-
Lines: Enter the number of lines used to print the fields and
contents of a record.
- Frame around row: Each row is printed with a frame.
- Frame around list: The complete list is printed with a frame.
- No field border: Fields are printed without a border.
- Suppress empty lines: Blank lines resulting from missing records are not printed.
- Field Font: The font attributes for the lines are defined here.
-
Headers:
- Print: Enables or disables the printout of the header (Aurea.CRM win program field designation).
- Framed fields: The header fields are printed with a frame.
- Gray shading: The header is printed with a gray background.
- Font button: The font attributes can be defined by pressing this button.
-
Totals:
- Print: If numerical fields have been integrated in the list, a final total is printed at the end of the list.
- Framed fields: The totals fields are printed with a frame.
- Gray shading: The totals fields are printed with a gray background.
- Subtotal on each page: A subtotal is printed at the end of each page.
- Font button: Click on this button to define the font attributes for totals.
- Width (cm): Enter the width of the currently active field.
- Field Properties: Opens the Field Properties dialog box, see below.
- Order: Opens the Info Area Order dialog box, see Changing the Info Area Order above.
- Adjust Fields: Places all the fields in the preview next to one another and deletes any spaces between them.
- Delete: Deletes all the fields from the Fields to Print list box.
Preview
Once you have selected the fields they are visible in the current order in the preview. You can edit the fields in the preview:

- Drag a field to reposition it.
- Drag an edge or corner to resize a field. The current field width is indicated in the Width (cm) field, and can be edited there as well.
- Double-click on a field to change the Field Properties, see below.
- Right-click on a field to delete it from the list.
Field Properties
You can specify how each field should appear in the list.
- Click on the Field Properties button or double-click the
corresponding field in the preview to open the Field
Properties dialog box.

The dialog box displays the name and number of the Info area, the Field number and the Field text.
- Select the desired options.
- Click on OK.
The following options are available:
- Alignment: Determines whether the field contents are aligned to the left, the right or centered.
-
Display: Determines the graphical attributes of the
field.
- Background: Fields are shaded
- Border: Fields are separated with a border
- Variable height: The height of a row adapts to the field contents
- Sub-totals: Subtotals are output for numerical fields.
- Font: Click on the Font button to determine the font type and size for the field.