Defining an Analysis
Learn how to define an analysis.
To define an analysis:
- Start the Analysis module, see Starting Modules.
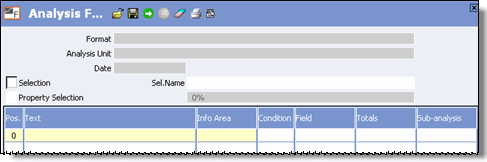
- Enable the Selection or Property Selection (BTB only) check boxes to restrict the analysis to a predefined selection. Double-click in the Sel.Name field to choose a selection.
- Click in the Info Area cell in the first row of the table and
select the info area you wish to analyze (e.g. Company) and click
on OK.Note: To remove an info area from the analysis, click in the Info Area column and disable the check box next to the info area. The info area is removed from the table.
- Click in the Text column and edit the text if you wish to change the header used in tables and charts (e.g. "Company Revenue").
- To restrict the analysis to records that meet specific conditions, click in the Condition column and define the condition, see Conditions in the User Manual.
- Click in the Field column and select the field to be used as the analysis unit, and click OK.
- Define the analysis unit, see Defining the Analysis Unit.
- Click in the Totals column to calculate sum totals for each
analysis unit. Select the desired field (e.g. "Revenue").

- Click in the Sub-analysis cell If you wish to add another analysis unit (e.g. to analyze revenue per country per sector), see Creating a Sub-analysis.
- If you wish to analyze a further info area, define additional lines in the analysis
format.Note: Edit the value in the Pos. column to change the order of the info areas. The order of the info areas in the table corresponds to their order in the analysis.
- Click on
 (Save), see Saving, Loading and Deleting Formats in the
User Manual.
(Save), see Saving, Loading and Deleting Formats in the
User Manual.
Note: Load an existing format with  (Load). Click
  (Delete) to clear
the mask.
(Delete) to clear
the mask.
(Load). Click (Delete) to clear
the mask.