Defining Marketing Activities
Learn to define marketing activities.
To define a marketing activity:
- Select
 (Marketing) > New Marketing
Activity.
(Marketing) > New Marketing
Activity.You can also add a marketing activity to a campaign (in the tree view or on the Marketing Activities tab).
- The following options are available:
- Empty Marketing Activity: Creates a new marketing activity.
- Use Template: Copies the data from an existing marketing activity >> Adding and Editing Templates. You then need to edit the data in the new marketing activity.
Note: You can only use marketing activities whose Status is "Template" as a template. - Enter a name in the Marketing Activity field.
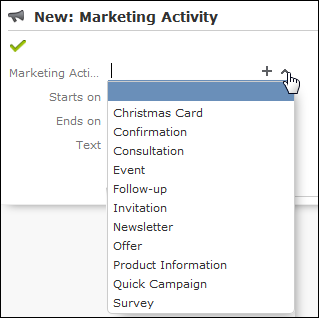
- Enter the start and ed date in the Start on and Ends on fields.
- Save.
- Enter the following data:
- Responses, see Responses.
- Reps, see Reps.
- Details on how the activity is executed, see Defining How the Activity is Executed.
Responses
You can enter the possible response to a marketing activity, which allows you to:
- Define follow-up activities, for example, to send an offer to those respondents who react positively to the first telephone contact.
- Review responses and count the number of responses of each type in order to determine the success of the marketing activity.
To define the follow-up response and assign points to a response:
- Define two marketing activities. The second marketing activity should be dependent on a specific response being given to the first one.
- Switch to the Responses tab in the new marketing activity and
click on
 (New).
 - Enter the Response (e.g. "Yes, send me an offer").
- Select the second marketing activity in the Follow-up Marketing
Activity field.
If this response is received, the respondent is automatically assign to the follow-up marketing activity’s target group.
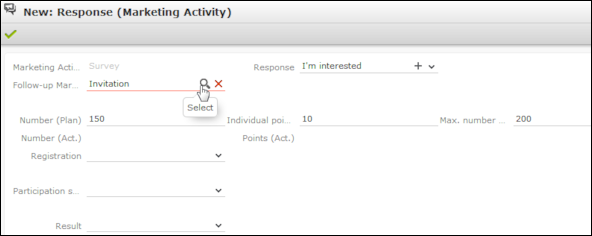
- Enter the number of points assigned to this response in the Individual points field and enter the expected number of responses in the Number (Plan) field. The target and actual points can then be compared in the statistics, see Monitoring Results.
- Click Save.
Reps
Add the reps who are responsible for handling the campaign in addition to the rep responsible for the campaign itself:
- Click on
 (New) on the Reps tab in the
marketing activity.
 - Enter the desired rep in the Rep field.
- Determine the rep's task(s):
- Telephone: Indicates whether the rep is responsible for making or answering phone calls within the scope of this marketing activity.
- E-mail: Indicates whether the rep is responsible for processing incoming e-mails within the scope of the marketing activity.
- Target Group: Indicates whether the rep is responsible for verifying and editing a portion of the target group. The rep receives a To-Do once the target group has been generated, see Editing Target Groups.
Note: The Telephone and E-mail fields have no function in the default configuration. - Click Save.
Defining How the Activity is Executed
The Execution (Marketing Activity) info area is used to store all the important information needed to execute the marketing activity:
- Target group
- Schedule
- Data entered in activities, mailings and marketing objectives
- File formats and other information on mailings, e-mails, SMS and faxes.
To enter the details of how a marketing activity is executed:
- Select Create / Edit Execution from the marketing activity’s context menu.
- Use the Base field to determine the basis for the target group. The target group can be determined using a global query or private query, see Queries.
- Select a predefined query in the Target group definition
field.Note: Leave this field empty for follow-up activities. The target groups for follow-up activities are generated automatically based on responses to previous marketing activities.
- Select a Marketing Activity Format or select Create / Edit Format from the context menu to add a new one.
- Select an option in the Execution Type field.
The following options execute the marketing activity a single time:
- One-off: Create target group based on query: When generating the records, the selection or query is updated and the used to determine the target group.
- One-off: Create target group based on response / new entry: The target group is generated automatically based on responses to the previous marketing activity or by editing the target group manually.
The following options execute the marketing activity a repeatedly (in the interval defined in the Repeated: Frequency and Repeated: Frequency (Unit) fields on the Repeated tab):
-
Repeated: Create target group based on selection / query every time
new: The existing target group is deleted each time the activity
is executed. The query is updated, and the results are used to create the new
target group.Note: If a target group record is marked as inactive (the Inactive field is enabled), the record remains inactive if the record is still in the selection when the query is executed again.
- Repeated: Create target group based on responses:The target group is generated automatically based on responses to the previous marketing activity or by editing the target group manually.
- Repeated: Send in packets: The target group is generated from the query the first time the activity is executed. Each time the marketing activity is executed, records are generated for members of the target group that have not yet been contacted. The Max. Package Size on the Repeated tab determines the maximum number of records in the target group that are processed each iteration. The marketing activity continues to be executed until all recipients in the target group have been contacted. Typically used for mailings that for reasons of cost or logistics cannot be handled in one go.
- Repeated: Extend target group based on selection / query results: The query is executed each time the activity is executed. The existing target group records are retained. Only those recipients returned by the selection/query and not included in the target group are added to the target group. The marketing activity is executed for these recently added records. Typically used for mailings to new customers, e.g. to contact all accounts that have had their status set to "Customer" since the last time the activity was executed.
- Use the Milestones tab to define the dates for executing the
activity:
- Start on, Start at: Determine when the marketing activity is executed and the target group generated.
- Create target group: Enable this check box to use the query to generate the target group.
- Editing target group from/until: Defines the time period in which the target group can be edited
- Execute activity on/at: Determines when the records relating to the marketing activity are generated
- Response possible until: The date until which the responses received are taken into account
- Enter the rep assigned to CRM.server in the Executing user field. (Ask your administrator for this information.) This ensures that CRM.server processes the execution automatically.
- Define additional options in the following tabs:
- Letter, E-Mail, Fax, SMS: Information on the contents of the information that is sent, e.g. the e-mail’s text; settings for surveys sent out in e-mails.
- Activities: Details on the generated activities and information on surveys
- Mailings: Details on the generated mailings
-
Marketing Objectives: Details on the generated marketing
objectivesNote: You cannot generate mail merges in Microsoft Word in a server environment. Once the marketing activity has been executed, you can download the control file and perform the mail merge locally. The control file can be found on the Letter, E-Mail, Fax and SMS tabs. If you enable the Save letters option on the Letter tab, the customer data in the control file can be linked to the sent text after the letters have been sent. This allows you to reconstruct the letter that was sent, see Mail Merges.
- Repeated: Time period and frequency for repeated marketing activities; package size for marketing activities that are carried out in packages
- Save the record.
Defining the Marketing Activity Format
You can define further details in the marketing activity format:
To define a marketing activity format:
- Click on Create / Edit Format in the execution record’s header.
- Determine how to contact your target group under Preferred
Channel:
- Fixed: The channel used for all recipients (phone, letter, e-mail, SMS, fax).
- Variable: The channel entered as the Preferred Channel for the person is used (assuming that the necessary information is also present, e.g. an e-mail address).
- If activities, mailings and/or marketing objectives should be generated within the
scope of the marketing activity, enable the corresponding options under
Generate (work order = marketing objective). Activities are
added as appointments for the telemarketing reps or account managers. Marketing
objectives contain tasks to be executed within the scope of regular customer
appointments. Mailing records provide a log of mailings, the responses and the
results of a letter or e-mail.
- I you have selected a fixed channel or not specified a channel, select the appropriate type (e.g. Activity for the phone channel).
- If you have chosen variable channels, select all the applicable options. The first option that is selected in the order mailing, activity, work order is taken into account (when using the phone channel, only activity or work order).
- Use the tabs in the lower portion of the screen to determine further settings for
all channels apart from "Phone":
- Transfer Fields: Select the predefined transfer fields, see Planning and Preparing Marketing Activities. These fields are transferred to the mail merge document or control file when generating the activity.
- Company & Person and Company: Select the label (for printed labels and greetings in letters, faxes, SMS and e-mails) to use if no label is entered for the company or person: The label selected in the Company & Person field is used for person-specific letters and the label selected in Company is used for company-specific letters.
-
Additional Address: The additional address selected here
is used. If no additional address is defined for a recipient, the normal
address is used.
E-mail mailings are sent only to those recipients for which an e-mail address has been entered. The e-mail fields are used in the following order:
For persons:
1. Business E-Mail
2. Private E-mail
3. If an address type has been selected in the Additional Address field, the first additional address found for the person is used.
4. The e-mail address of the person's company (determined as described below).
For accounts:
1. If an address type is selected in the Additional Address field and an address of the same type exists for the company in the Additional Address info area, the e-mail address entered there is used.
2. E-mail
3. E-mail 2
If none of the fields contains an e-mail address, no e-mail is sent to this account or person.
- Ignore assigned labels: Replaces the label formats defined for accounts and/or persons by a uniform label format.
- Language Transformation: All catalog values are transferred to Microsoft Word in the language entered for the person.
- Format: The control file’s format:
- Variable field length/Fixed field length: Determines whether records are output with separators or using a fixed field length.
- Assign numbers: Records are numbered sequentially.
- Separator: Select the characters used as separators in the control file: Specify the separator between each Record and Field, and the Field border (at the start and end of a field).
- Save the record and click on
 (Back). The
marketing activity format is transferred to the Marketing Activity
Format field in the execution record.
Surveys in Mass E-mails
Surveys can be integrated in e-mails. Recipients receive an e-mail containing a link to an HTML page where they can answer the questions. The answers are stored in Aurea CRM’s database for the corresponding person.
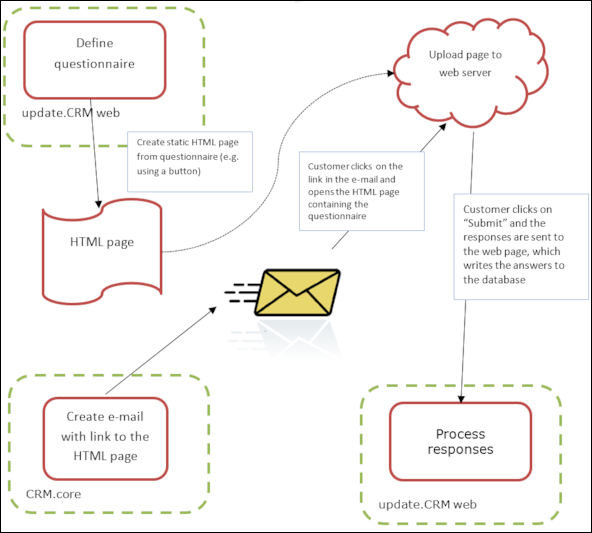
To generate e-mails with an integrated questionnaire:
- Define a questionnaire, see Defining Questionnaires.
The questionnaire can include questions with multiple and text-based answers. The following is not supported:
- Skipping questions that depend on the answer to a previous question
- Default answers using data in the database
- Mandatory questions
- Automatically adding records based on answers
- Executing triggers
- Generate an HTML page based on the questionnaire:
- Select
 (Administration) >
SDK (this requires administrator privileges).
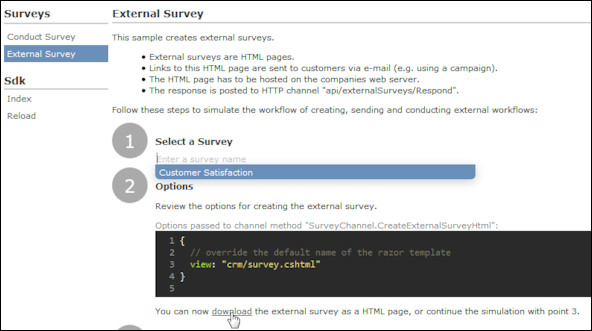
 - Select Surveys > External Survey.
- Enter the first letter of the name of the questionnaire under step 1 (Select a Survey) and select the desired questionnaire from the list.
- Click on the download link in step 2
(Options).
- You can change the content by either editing the HTML file or by editing the
Razor template (
web\data\surveys\crm\survey.cshtml) used to generate the HTML file. For more information, see the article External Survey’s Architecture at https://support.aurea.com. - Upload the HTML page to the web server so that it is accessible from the link in the e-mail sent to recipients.
- Select
- Define a transfer fields format containing the fields in the Person and Person in Company info areas you want to use in the e-mail.
- Create the e-mail using person data as in the example below:
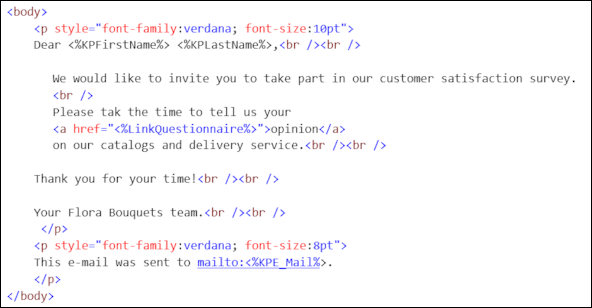
The placeholders beginning with "KP" reference the transfer fields in the Person in Company (KP) info area.
The <%LinkQuestionnaire%> placeholder generates a link to the questionnaire.
- Add a marketing activity.
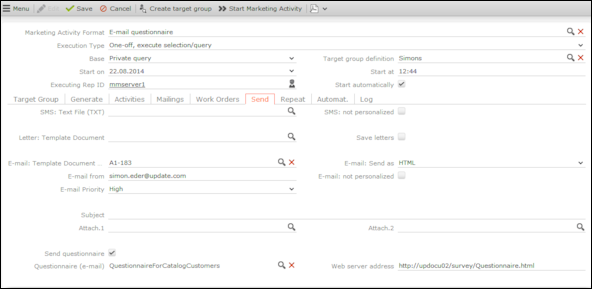
- Add an execution record for the marketing activity and enter data in the following
fields:
- Marketing Activity Format, Execution Type, Base, Target group definition, see Defining How the Activity is Executed.
- Subject: The e-mail’s subject
- E-mail: Template Document: E-mail template for unpersonalized e-mails
- Template Document (TXT): E-mail template for personalized e-mails
- E-mail: Send as: Select "HTML" to ensure that the link to the questionnaire is displayed correctly.
- E-mail from: The e-mail address used as the sender of the e-mail
- E-mail: not personalized: Enable this option to determine that no personal information should be included in the e-mail.
- Send questionnaire: Enable this option.
- Questionnaire (e-mail): Choose the questionnaire you prepared earlier.
- Web server address: Enter the full URL of the HTML file, e.g. http://my.company.com/Questionnaire/CustomerSatisfaction.html.
- Switch to the marketing activity format (see Defining the Marketing Activity Format).
- Select E-mail and Activity in the Preferred Channel section.
- Enter the transfer field’s format on the E-mail tab.
- Execute the activity, see Executing Marketing Activities.