Arranging Elements on a Form
Here you can learn how to arrange elements on a form.
The Preview area displays the current form.
To edit the form:
- Use drag&drop to add elements from the Tool Box to the form.
When dragging the element over the form, all valid locations for the elements are displayed in light blue. The border of the current target panel is highlighted in orange. The location where the element would be positioned when releasing it, is displayed in orange.

- Select an element of the form (in the Tree View) to display its controls:
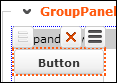
- Click
 (Drag&Drop) to move the element to another
position.
(Drag&Drop) to move the element to another
position. - Click
 (Delete) to remove the element from the form.
 - Click
 (Context Menu) to display the elements context menu,
containing the actions Cut and
Copy.
(Context Menu) to display the elements context menu,
containing the actions Cut and
Copy.
If a widget has been cut or copied, any empty container area you select in the form displays a
 (Paste) button, allowing you to paste the copied/cut
element at that position.
(Paste) button, allowing you to paste the copied/cut
element at that position.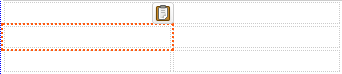
To create containers to paste elements to, you need to add child panel widgets to your form. For Example -
Block ElementorRowandColumn - Click
- Define all necessary settings for the widgets on your form. For more details, see Property Grid.