Quick Add
Learn about the quick add functions and how to use them.
Adding Order Items
To add order items:
- Add an order record or switch to an existing one.Note: You must enter at least one delivery date to be able to add order items.
- Edit the order's data if required.
- Switch to the Order Items tab.
The available items are listed.

Items where you have already entered data are highlighted with a blue bar on the left.
The details view in the landscape mode can display the total sum of the orders placed and the number of items ordered. This enables you to keep track of your total number of orders and their net value. This has to be configured by your administrator. See the screenshots below:


- Tap on
 to add items to the order. The number below the icon indicates
the packaging unit.
to add items to the order. The number below the icon indicates
the packaging unit.The number of ordered items and their value are displayed in each row and the sum totals of the order are displayed at the bottom of the screen.
If price lists, bundles, special offers etc. were assigned, items are priced automatically, including in offline mode.
Note: Data is saved automatically when switching to the next item. - Tap on Close to return to the order. Tap on Cancel to discard all your changes.
Displaying Item Details
You can display more information on each item.
To enter data in this details view:
- Switch to the quick add.
- Tap on the desired item to display more details on the item:

- Use the numeric keypad to enter values. Tap on an item in the list on the right to
switch to that item.
The numeric keypad offers the following options:
- Use the number keys to enter data in the currently selected field.Note: If you enter a quantity that does not comply with a defined packaging unit (e. g. packaging unit is 10, you enter 27), the given quantity is autocorrected.
- Tap on +1 or -1 to increase or decrease the amount by one.
- Tap on OK to switch to the next field or on
 to
return to the previous field.
to
return to the previous field. - Tap on
 to switch to next or on
  previous item in the list or Next
Item to switch to next or previous item in the list.
previous item in the list or Next
Item to switch to next or previous item in the list.
- Use the number keys to enter data in the currently selected field.
Special Filters
Predefined filters are displayed in the quick add's header and allow you to restrict the listed items.
For example, the following predefined filters are available in the POS Monitoring info area:
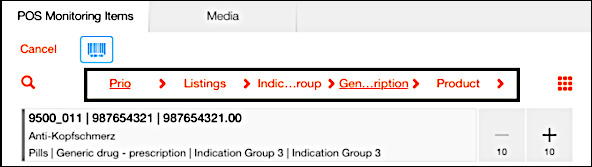
Tap on a filter to select the filter criteria.

You can combine multiple filters. The currently active filters are underlined in orange and the name of the currently selected criterion is displayed as the name.
Only items that meet all the selected criteria are listed.
Barcode Scanner
You can also use a barcode scanner (that can be adapted to your needs) to enter data.
Tap on  to enable the barcode scanner function.
Overview
You can restrict the display to only those rows where you have entered data (i.e. the items ordered by a customer):
- Tap on Overview in the upper right corner.
Only those items where data has been entered are displayed:

- Tap on All Items if you want to add more items.
- Tap on Close if you have finished adding items.
Removing or Duplicating Order Items from the Overview
Depending on your version, you can remove or duplicate single items from the overview:
- Switch to the desired order and then to the quick add's overview.
- Swipe the row containing the desired item from the right to the left (stay within the
boundaries of the item).
The Delete and Duplicate buttons are displayed:

- You can:
- Tap on Delete to remove the line.
- Tap on Duplicate to duplicate the item. You need to enter the desired quantity for the new record.
Order Preview
You can generate an order preview containing all relevant data such as the billing and delivery addresses, order number, date, ordered items, quantities, value etc.
To display the preview:
- Switch the desired order.
- Tap on the Preview tab.

The preview with the order's and order item's data is displayed.
Confirmation
Your administrator can define that, for example, a client must sign an order and then the order can be sent by e-mail to the responsible person for further processing.
The following example shows how this feature was implemented in the LSI industry solution:
- Switch to the desired quick add overview.

- Tap on
 (Complete).
 - A PDF file is created.
- You can:
- Tap on
 (Confirm [Info Area]) to display the
Signature dialog box allowing the customer to sign e.g. the
order.
(Confirm [Info Area]) to display the
Signature dialog box allowing the customer to sign e.g. the
order. - Tap on
 (Send by E-mail) to send the file e.
g. to your back office staff for processing.Note: Your administrator can define that the e-mail address of the account/person is automatically entered as the recipient. Your administrator can also define that the e-mail button is only displayed if certain conditions are met. For example, your organization may require orders to be approved, in which case the order can only be sent by e-mail once it has been approved.
(Send by E-mail) to send the file e.
g. to your back office staff for processing.Note: Your administrator can define that the e-mail address of the account/person is automatically entered as the recipient. Your administrator can also define that the e-mail button is only displayed if certain conditions are met. For example, your organization may require orders to be approved, in which case the order can only be sent by e-mail once it has been approved. - Tap on
 (Print) to print the file.
 - Tap on Close to return to the order.Note: Depending on your configuration only the Close option may be available.
- Tap on