Introduction to the interface
The Aurea List Manager homepage is the first page you see after you log in. The homepage displays the most recent information about the list you are logged into and provides shortcuts to frequently performed tasks.
Aurea List Manager generates the reporting statistics on the homepage once per day, or according to the frequency set by the server administrator.

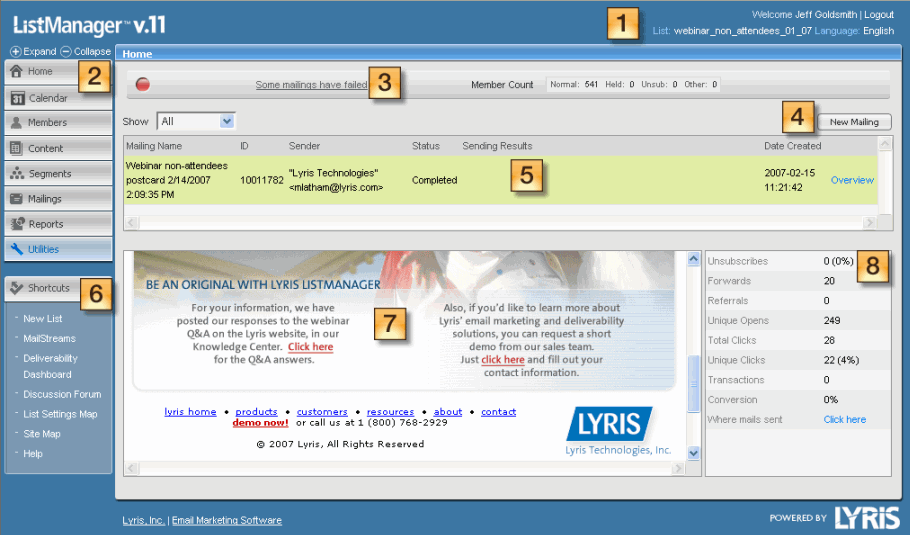
The Aurea List Manager UI
The table below describes the different Aurea List Manager UI elements as annotated in the image above:
| Annotation | Label | Description |
|---|---|---|

|
Login information |
This shows you your current list, the current language you are using, and your login name. If you are running a Aurea List Manager cluster and you are a server administrator, the node name appears as well. Note You can click the list name to change your list, click the current language to switch to another language, or click your name to log in as another user. |

|
Navigation bar tabs |
You can navigate between the major areas of Aurea List Manager by clicking on one of the Navigation bar tabs.
Select the Home tab to return to the homepage.
Select the Calendar tab to view, schedule, and edit your events and mailings.
Use the Members tab to add, import, find, edit, and delete members. For more information about members, see Members.
Use the Content tab to create, view, copy, and delete content. For more information about content, see Content.
Use the Segments tab to create, view, copy, and delete segments. For more information about segments, see Using segments.
Use the Mailings tab to create, view, copy, test, schedule, approve or delete mailings. For more information about mailings, see Working with mailings.
Use the Reports tab to view reports for a mailing, for example, the progress and how successful the mailing is. In addition, you can view clickthrough statistics and information about your membership. For more information about reports, see Using reports.
Use the Utilities tab to manage your list settings and members, as well as see the mail that's coming from and to your server, set up autoresponders, manage the server, and create documents to be sent automatically when people confirm or subscribe. For more information about utilities, see Using Utilities. |

|
Mailing Status |
|

|
New Mailing |
Click this button to create a mailing |

|
Recent Mailings |
This area displays the recent mailings and deliverability status for the current list. To display mailings from a different time period (for example, last week or last month) or a particular campaign, click Show, and then choose from the list.
The title of the mailing displayed.
A unique identification number assigned to that specific mailing.
The name that appears in the message
The status of this mailing. The possible statuses are:
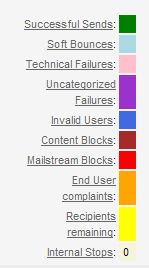
Sending Results Each mailing has a colored gauge that lets you know its deliverability status. The colors represent the percent of the mailing in each of the major statuses:
Overview command: Click the Overview command for a mailing to go to the Mailing Overview page for that mailing. |

|
Shortcuts |
This bar displays links to commonly performed tasks. The links available here vary according to your administrative permissions. For example, the link to create a new list only appears for site and server administrators. |

|
Mailing Preview |
Displays a preview of the mailing selected in Recent Mailings area. |

|
Mailing Statistics |
Shows all trends that indicate whether the percentage or number expressed increased or decreased since the last mailing.
The number of forwards recorded for this mailing. A forward is a message that has been opened on computers
with different IP addresses. Forwards tracking requires that you have
The number of referrals recorded for this mailing. Referral tracking requires that you have
Opens the |
