Item Master
Learn how to store promotional material with all necessary information (item number, price etc.) with the Item Master info area.
You can also define item structures, see Item Structure.

For more information on the individual fields in the Item Master info area, refer to the online field help.
To add a new item:
- Select
 (Sales) > Item Master. Start the
search. Click on
  (New).
 - Enter data such as the Item No., Item name etc.
- Save the record.
You can add descriptions in various languages and documents in the Item Master Text info area, see Item Master Text.
The inventory management functions access the information in the item master, see Inventory Management.
Item Master Text
Use the Item Master Text info area to enter item descriptions in multiple languages. To add an item master text:

- Switch to the desired item.
- Click on
 (New) on the Item Master Text tab
under Related Data.
 - Select the Language.
- Enter a Description.
To do so, your administrator needs to define an N-N link
((Idx=1),?->(AT)Item Master Text: (Idx=1)Language) and define
a reference field to the item master text. In info areas that access the item master
text (e.g. Installed Base), your administrator then needs to
define an N-N link ((Idx=0 Item No..,? -> (AT)Item Master Text: (Idx=1)
Item No.,Language) and a new field containing the reference to the item
master text, see CRM.core Administrator Guide. This field can then also
be used as a filter.
Item Structure
You can define item structures in Aurea CRM in order to depict products in your product catalog, components in a product consisting of multiple items or a basic product and its additional components (e.g. a bicycle composed of a frame, breaks, tires, saddle etc. or a games console package including two controllers and a game).
Defining item structures provides you with quick access to items and related items in the item structure, and allows you to restrict and group items, e.g. in the quick add area, see Item Structure in the Quick Add Area.
Items are defined in the Item Master info area and are linked to form a structure in the Item Structure info area. Whenever you add an item structure record, Aurea CRM automatically updates the item structure.
Item structures are defined by adding item structure records and entering the Structure type and the parent item in the field. A single item structure consists of all items linked to one another (directly or indirectly) using the same structure type. The top level of the hierarchy (the root) has no parent node. The item structure is thus defined from bottom to top. Any number of items can have the same parent item. Only items without children (leaves) may be present in the item structure more than once to ensure that the item structure is unique. Ensure you do not define any cyclical structures.
To add an item structure:
- Switch to the desired item in the Item Master info area.
- Switch to the Item Structure tab and click on
 (New).
 - Select the parent item.
- Select the Structure type.
- Save.
The item structure is added or updated automatically.
The item structure itself is formed based on the station and serial numbers of item structure records. The keys (station number and serial number) of item structure records higher up in the hierarchy and of the current item structure record are automatically entered in the PB_1_StaNo/SerNo - PB_10_StaNo/SerNo fields. These fields depict the path from the current item structure record to the root item structure record. The root item structure’s key is always entered in the PB_1_StaNo/SerNo fields and the Generated check box is enabled automatically in the root item structure record (this record is generated automatically). The item structure can consist of up to 10 levels.
Example:
Six item, A1-A6 are present in the system. The Structure type "Structure 1" is used to depict the item structure. The following image illustrates the item structure.
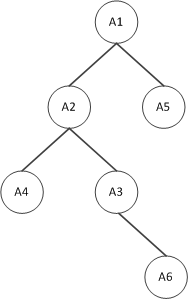
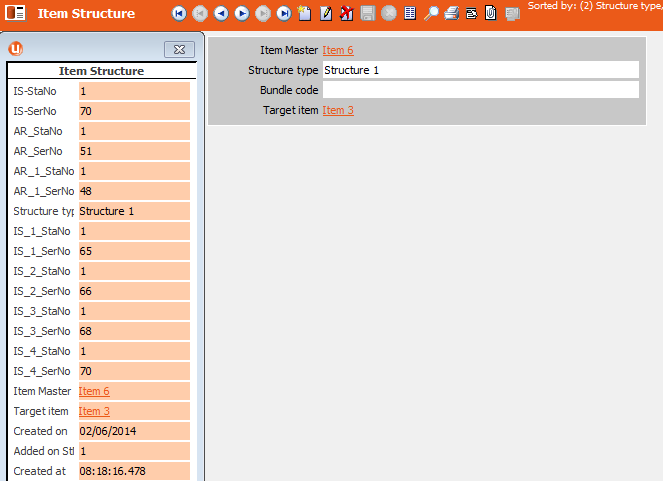
Item 6 (A6) is represented by the following item structure record, which stores the full path to item 1 (A1, the root item). IS_4_StaNo/SerNo contain the station number and serial number of the current record (A6), IS_3_StaNo/SerNo contain the key of the item structure record added for item 3 (A3) etc.
Whenever you delete an item structure record or an item, Aurea CRM automatically updates the item structure. If you delete a node (item or item structure record) that has child nodes, the child nodes immediately below the deleted records become the root nodes of new item structures.
If you make changes to the item structure records themselves, you can update the item structure.
To update the item structure automatically:
- Aurea CRM win: Select Item Structure from the context menu in the Item Master info area. Select Generate Relationship Hierarchy from the context menu in the Item Structure info area.
- Aurea CRM web: Use a CRM.server To-Do (type 20), see To-Do Types in the CRM.core Administrator Guide.
Item Structure Links
Aurea CRM offers indirect links between items in the Item Master info area (via the Item Structure info area) that can be used to defined queries applied to the item structure, for example.
Links 950-980 and 30000-36000 are available by default and apply to all item structure records (irrespective of the structure type), see Link IDs in the CRM.core Administrator Guide.
- 30000: Returns the entire item structure
- 32000: Returns all parent items
- 34000: Returns all child items
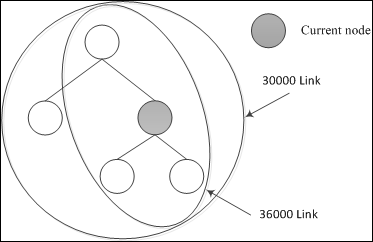
- 36000: Returns all parent and child items both higher up and lower down in the hierarchy
The following image outlines the difference between links 30000 and 36000.
Example:
Six item, A1-A6 are present in the system. The Structure type "Structure 1" is used to depict the item structure. "Sport" is entered as item 2’s Business Area. The following image illustrates the item structure.

Define a query that returns all items whose business area is "Sport" as well as all items linked to these items via the item structure (Structure type "Structure 1").
Link 34000 returns items 2, 3, 4 and 6.
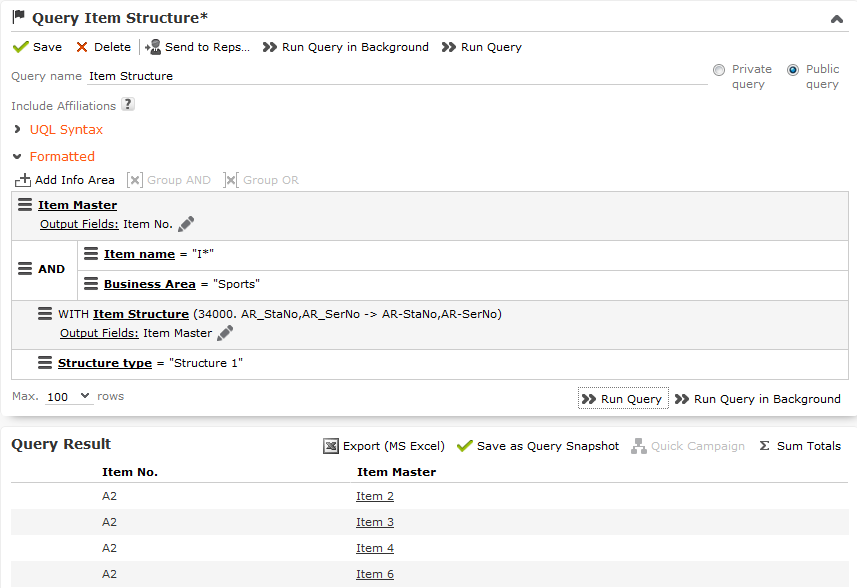
Link 32000 returns items 1 and 2; link 30000 returns all items and link 36000 returns items 1,2, 3, 4 and 6.
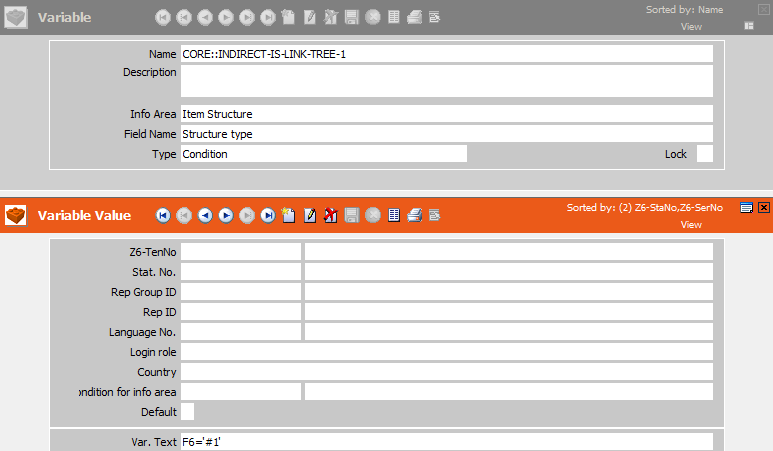
You can define variables of the Type "Condition" to define additional links using your own condition. You can define up to 10 different conditions for item structures using the 30000-130000 links. These links are numbered in intervals of 10,000 and are named according to the structure type (e.g. "Structure 1").
You can define the following 10 variables:
CORE::INDIRECT-IS-LINK-TREE-0 (this variable further restricts the
default links 30000-36000).
CORE::INDIRECT-IS-LINK-TREE-1
...
CORE::INDIRECT-IS-LINK-TREE-9
Example:
Define the variable CORE::INDIRECT-IS-LINK-TREE-1 in the
Rights module in Aurea CRM win. Select the Item
Structure info area in the Info Area field, the
Structure type field in the Field Name
field and "Condition" in the Type field. Add a variable value for
the variable and enter the comparison field and desired structure type in the
Var. Text field, e.g. "F6=’Structure 1’".
If you define conditional access rights for items in the Rights module in Aurea CRM win and apply conditions to the Item Master info area, you can select the default indirect links and the links that only apply to the structure type used to define the item structure in the Index Relationship column. This allows you to define that a rep can access items assigned to a specific business area, as well as all related items in the item structure, for example.

For more information on variables, see Variables and Conditions Applied via Indirect Links in the CRM.core Administrator Guide.
Item Structure in the Quick Add Area
Your administrator can integrate a tree displaying the hierarchical item structure in the generic quick add area for items (e.g. for offer items). You can then select items directly from within the tree. All child items in the item structure are displayed in the quick add area. The selected item can also be displayed, if configured accordingly.
For information on the configuration, refer to HierarchicalSerialEntry in the Aurea CRM web Administrator Guide.
If you open the quick add area, the tree view is displayed on the left, and the quick add area on the right displays all items, including those not in the item structure, see Quick Add. All items continue to be listed in the quick add area until an item is selected from the tree.
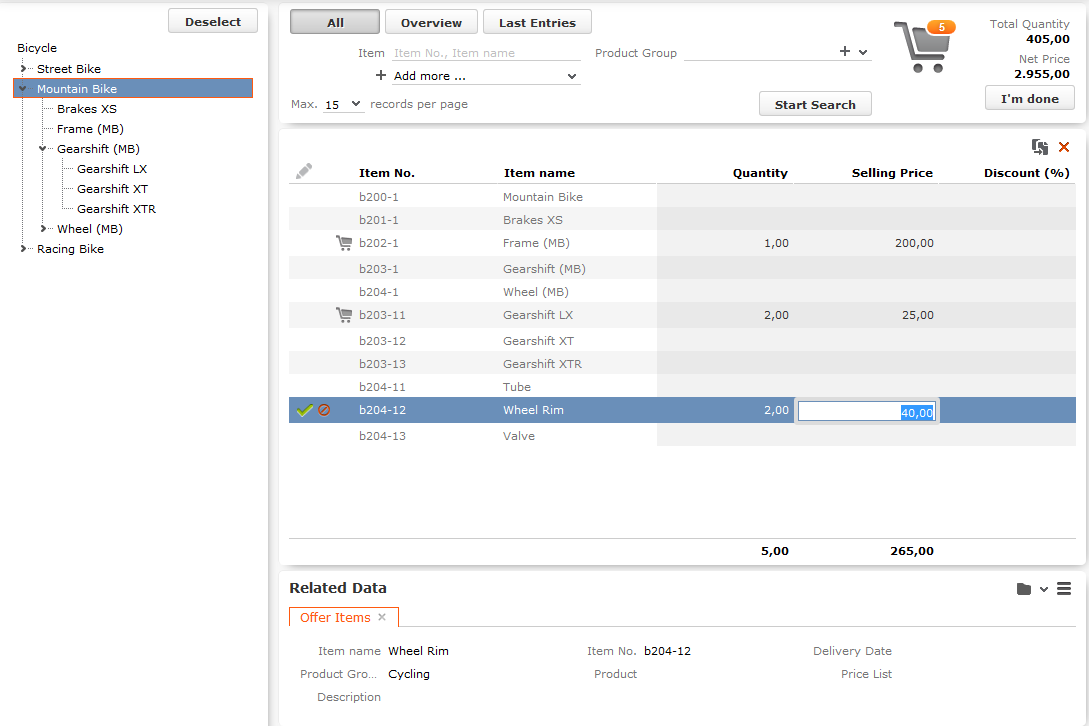
- Click on
 or
or  in the tree to show/hide items (nodes).
 - Click on an item in the tree to display only those items below the selected item in
the tree in the quick add area.Note: By default, the selected item is not displayed in the quick add area on the right. Your administrator can however determine that the selected item (node) is displayed (as in the mountain bike example).By default, the tree only displays structure nodes (e.g. "Gearshift (MB)") and not individual items (e.g. "Gearshift LX"). Your administrator can however determine that items are also displayed in the tree, as in the example. Your administrator can define the order in which items are sorted in the tree (e.g. in ascending or descending alphabetical order).
- Search criteria and filters (e.g. All) are applied to the
selected item and child items displayed in the list.
For example, enter all or a portion of an item’s number in the Item field to restrict the display to only those items with a matching number. For example, if you select the Mountain Bike node in the tree and enter "*04*", only items c204-1, c204-11, c204-12 and c204-13 are displayed in the list.
Note: Click on the Overview filter button to remove the current selection from the tree and display those items in your shopping cart. Clicking on the Last Entries filter button also removes the current selection from the tree. If the Overview or Last Entries filters are enabled and you click on an item in the tree, the All filter is automatically applied. - Click on Deselect to clear the selection in the item tree. Filters and search criteria apply to the display of all items in the quick add area, irrespective of whether they are in the item structure or not.
- Drag the separator between the tree and quick add area to change the width of the tree.