Customer Service
Learn how to handle customer service tasks.
You can depict the activities of your customer service department in Aurea CRM web, e.g:
- Handling tickets (inquiries, complaints, bug reports)
- Assign tasks to service employees while taking into account their availability and qualifications
- Add offers and orders to tickets
- Transfer information from service contracts to offers and orders
You can add child records to tickets and service contracts such as participants, appointments, tasks, offers, orders etc.
Tickets
You can store information on issues a customer has in tickets, including the cause, solution, appointments etc. Further important information can be linked to the ticket, e.g. the product concerned, the end customer, further participants etc.
Adding Tickets
To add a new ticket in the default version of Aurea CRM web:
- Select
 (Products & Service) > New
Ticket. The mask used to add new tickets is displayed.
(Products & Service) > New
Ticket. The mask used to add new tickets is displayed. - Click on
 (Select) next
to the End Customer Company and End Customer
Person fields to select the affected company and person. These fields
use the find as you type function.Note: You need to select an end customer (company or person) in order to save the ticket.
(Select) next
to the End Customer Company and End Customer
Person fields to select the affected company and person. These fields
use the find as you type function.Note: You need to select an end customer (company or person) in order to save the ticket. - Click on
(Select) next to the Contact Company
and Contact Person fields to select the company or person that
is your contact partner if this is not the same as the end customer.
- Enter the number of the ticket in the No. field and select the Priority.
- Enter a Subject for the ticket.
- Select the Status, Service Level and Type.
- Click on
(Select) to the right of the Link
field to link the ticket to an installed base.
- Select the Problem Group and Problem and/or the Item No. and Item name.
- Enter a description in the Problem Description, Cause and Solution fields.
- Click on
 (Select Rep) next to the
Processed by ID to enter the rep responsible for processing
the ticket. Once a rep has been selected, the Processed by ID
field is filled in automatically. The Created by and
Created on fields are also filled in automatically when
saving the record.
(Select Rep) next to the
Processed by ID to enter the rep responsible for processing
the ticket. Once a rep has been selected, the Processed by ID
field is filled in automatically. The Created by and
Created on fields are also filled in automatically when
saving the record. - Enable the Escalate Tasks check box to determine that the superior of the responsible rep receives a message if the ticket is not processed on time.
- Enter the date the ticket is due for completion in the Due on field.
- Click on (Select) next to the
Predecessor field to determine the ticket’s predecessor if
this ticket is a sub-ticket of an existing ticket. You can display the ticket
hierarchy.
- Save the record.Note: Predefined participant records may be added automatically depending on your configuration.
Adding Sub-tickets
You can add sub-tickets to existing tickets, allowing you to create a ticket hierarchy.
When adding a new ticket, you can determine the ticket’s predecessor (i.e. the parent ticket) in the Predecessor field. You can also add new sub-tickets from existing tickets.
To add a sub-ticket to the current ticket:
- Switch to the ticket you want to add a sub-ticket to.
- You can add the sub-ticket in the following ways:
- Select New > Sub-Ticket from the context menu.
- Switch to the Sub-Tickets tab and click
on
 (New Sub-Ticket).
The mask used to add new tickets is displayed. The Predecessor ticket is entered automatically.
- Enter the ticket’s details.
- Save the record.
You can determine that tickets are escalated if the responsible rep has not dealt with the ticket by the deadline. If you are using Aurea CRM web, CRM.server needs to be running in order to escalate tickets.
To define that a ticket should be escalated if not completed by the deadline:
- Enable the Escalate To-Do check box.
Upon saving the ticket, the date and time entered in the Due on and Due at fields are transferred to the To-Do Until Date and To-Do Until Time fields.
- Enter the rep who should receive the escalation message in the Resp.
Rep field of the ticket.
If the Status of the ticket has not been set to "Closed" by the deadline, this rep receives a message.
If you wish to add several tasks to a ticket and escalate the ticket if at least one task has not been completed on time:
- Add all the necessary tasks to the ticket.Note: Your administrator needs to define that tasks can be added to tickets. In Aurea CRM win, this is defined in the desktop settings, see Link tab in the Aurea CRM win Administrator Guide.
- Assign each task to a rep and enable the Create To-Do check box in the task record.
- Enter the rep to receive an appropriate escalation message in the Resp. Rep field of the ticket.
- Enable the Escalate To-Do and Escalate Tasks check boxes in the ticket. The date and time entered in the Due on and Due at fields in the ticket are transferred to the To-Do Until Date and To-Do Until Time fields. You can edit the date and time.
- Save the ticket.
If not all the tasks have been completed by the date and time specified in the To-Do Until Date and To-Do Until Time fields, the rep entered in the Resp. Rep field receives a message.
Adding Installed Bases
The Installed Base info area allows you to store the products currently used by a customer. Records can be added manually or imported.
To add an installed base:
- Select
(Products & Service) > New Installed
Base.
- Switch to the company you wish to add the installed base for.
- You can also link an installed base to a property or opportunity. To
do so, click on (Select) next to the corresponding
field.
- Enter the details and save.
- Add an installed base item for each product in the installed base (select New > New Installed Base Item from the context menu).
Displaying Hierarchies
You can define hierarchies for tickets, installed bases and tasks. For example, you can divide tasks up into sub-tasks and add sub-tickets to tickets.
You can add these child records in these info areas from the parent record. An installed base may consist of several individual parts that depend on the main entry, e.g. in the case of industrial plants with several production lines. When dealing with customer problems, a further problem may occur for an existing ticket that is solved together with the existing issue.
The child records are linked to the parent record using the Predecessor field.
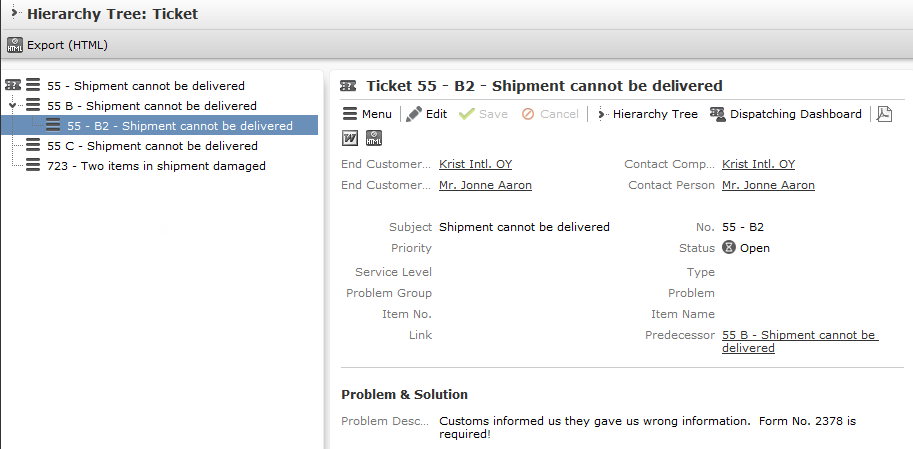
These hierarchies can be displayed in a tree.
Within the tree, you can add further child records for any of the entries using the context menu, or edit existing records.
If more than one customer notifies you of a problem, resulting in more than one ticket for the same problem that are subsequently linked with each other, these related tickets are also displayed in the tree.
To display the hierarchy for a record:
- Switch to the record you wish to display the hierarchy for.
- Click on
 (Hierarchy Tree) in the record’s
header or select Hierarchy Tree from the record’s context
menu.
(Hierarchy Tree) in the record’s
header or select Hierarchy Tree from the record’s context
menu.The hierarchy tree is displayed. The record that you opened the hierarchy tree from is color-coded, and the hierarchy tree displays all records linked to that record in the hierarchy.
- Click on a record in the tree to display the record in the area on the right and to
edit it.
Rep Skills
Rep skills are defined by your administrator. These qualifications can be taken into account when assigning tickets, >> on page 294. You can use the dispatching dashboard to create appointments for reps based on their skills, in order to process tickets.
To search for specific rep skills:
- Select
 (Products & Service) >
Rep Skills. The search mask is displayed.
(Products & Service) >
Rep Skills. The search mask is displayed. - Enter your search criteria and click on Start Search. All reps that possess the qualifications you are searching for are listed.
- Double-click on an entry to display the rep skills.
Dispatching
You can dispatch service duties to reps (e.g. service employees), and take the availability and skills of employees into account while doing so.
To create an appointment for a rep as part of a ticket:
- You can accessing the dispatching function in two ways:
- Select (Products & Service)
> Dispatching Dashboard from the application menu
and select a ticket.
If you wish to limit the tickets listed, click on
 (Show/Hide) to the right
of the header. The search mask is displayed and you can define search
criteria. The tickets listed can also be restricted by your
administrator.
(Show/Hide) to the right
of the header. The search mask is displayed and you can define search
criteria. The tickets listed can also be restricted by your
administrator.Accessing the dispatching dashboard in this way allows a dispatcher to plan appointments for field reps.
- Click on
 (Dispatching Dashboard) from
within a ticket. In this case, only this ticket is listed.
(Dispatching Dashboard) from
within a ticket. In this case, only this ticket is listed.Accessing the dispatching dashboard in this way allows helpdesk members to arrange an appointment with the customer when adding the ticket.
- Select
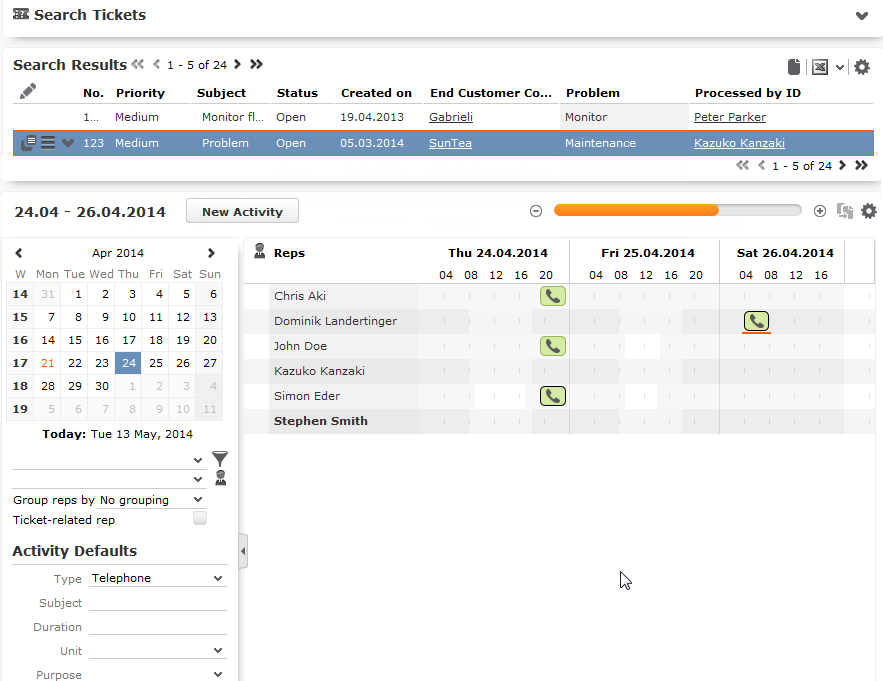
- The resource view is displayed below the tickets.
- In addition to the default functions in the resource view, the following options are
available:
- Select the Skill option under Group reps to group reps by skill in the overview.
- Enable Ticket-Related Reps to display the reps with the
skills required to edit the ticket. When enabled, enable the Combine
Skills & Rep Set option and select a rep group from the
Reps and Rep Sets drop-down list to combine the two
options. In this case, only those reps are listed who are assigned to the
selected group and have the necessary skills.Note: Note: If you disable Ticket-Related Reps again while Combine Skills & Rep Set is active, the reps selected in the Reps and Rep Sets window continue to be displayed.If you select multiple tickets, only those reps who possess the skills necessary to handle the ticket are displayed.Which tickets require which skills is defined in Aurea CRM win (Configuration info area, category: Resources; option: Dispatching).
- You can also display resources required for service tasks, such as special equipment, and schedule a service appointment based on their availability. Resources are displayed beneath the reps and use the same sort order and grouping as reps. The Ticket-Related Reps option also applies to resources; if enabled, only those resources with the skills assigned to the ticket are listed.
- Drag the ticket to a free time slot to create an activity for the corresponding rep. The appointment is automatically linked to the company or person entered in the ticket. The due date and time are displayed using a vertical red line while dragging the ticket. Depending on your configuration, the ticket may be removed from the list of tickets once an activity has been added.
- You can select multiple tickets in the resource view and drag them to a rep. In this case, an activity is added for each ticket.
- If you select a ticket in the list of tickets, all activities linked to this
ticket (or a ticket in the ticket hierarchy) are highlighted. If you select an
activity in the calendar, all other activities linked to the same ticket (or a
ticket in the same hierarchy) are highlighted:
 Note: Administrator Information: Tickets added in Aurea CRM web prior to version 8.2 do not contain the information necessary to display related records within the same hierarchy. You can enter this information automatically using a CRM.server To-Do, see To-Do Types in the CRM.core Administrator Guide.
 - If multiple service employees are involved in processing a
ticket, select the activity, click on
 (Duplicate
Record) in the header to add a copy of the activity and drag the
copy to the desired rep. You can also hold down Ctrl while dragging the
activity to the desired rep to create a copy.
(Duplicate
Record) in the header to add a copy of the activity and drag the
copy to the desired rep. You can also hold down Ctrl while dragging the
activity to the desired rep to create a copy.
New activities are added for the company/person the ticket was added for and are linked to the ticket. The ticket's subject is transferred to the activity. The duration of any activities you add is determined by the Service duration field in the ticket. If you wish to add an activity with a different duration, enter the Duration under Activity Defaults.