Defining CRM.phone Profiles
Learn how to define CRM.phone Profiles.
In order for your users to use CRM.phone, you need to define profiles which can be assigned to individual users, groups or stations in the Rights module. Once CRM.phone has been installed, you can access the CRM.phone settings from the Extras menu in the Rights module.
Saving and Loading Telephone Profiles
To save a telephone profile:
- Define a telephone profile. For further details, see Enabling the Telephone Number Search, CTI Settings, and System Settings.
- Click on
 (Save).
The Save dialog opens.
- Enter a name for the profile.
- Click OK.
- Click on Close.
To load a telephone profile:
- Click on
 (Load)next to the
Profile format field. The
Load dialog box
opens.
(Load)next to the
Profile format field. The
Load dialog box
opens. - Select a profile format from the list.
- Confirm your selection with OK.
Enabling the Telephone Number Search
In order to search for telephone numbers in Aurea.CRM, you need to define certain options in the telephone profile.
To configure the search for telephone numbers:
- Open the Rights module.
- Select Extras > Telephone
Profile from the menu.
The Telephone Profile dialog box opens.
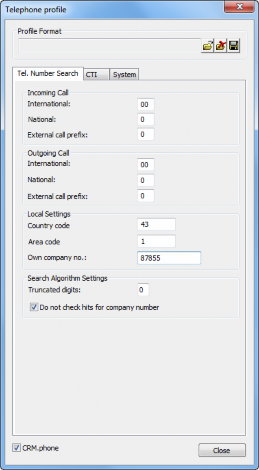
- Enter your company number, national and international prefixes etc. in the Tel. Number Search tab. For a description of the fields in this dialog. For further details, see Basic Settings for CRM.phone.
- You can define that a caller's telephone number is truncated by one digit and searched for again, if the caller's number cannot be found in the database. Use the Truncated digits option to define how often a digit is truncated and the search repeated.
- The telephone number search displays all matching numbers of companies and/or persons. To include matching company records in the search results, ensure that the Do not check hits for company number option is disabled.
- Enable the CRM.phone check box to display the CRM.phone toolbar in Aurea.CRM.
CTI Settings
To configure your basic CTI (Computer Telephony Integration) settings:
- Open the Rights module.
- Select Extras > Telephone
Profile from the menu.
The Telephone Profile dialog box is displayed.
- Switch to the CTI
tab.

- The following settings are defined in the CTI pane:
- Speed Dial: Use the drop-down list to select the number to be dialled using the quick dial function.Various numbers can be stored in the Company and Person info areas, for example the number of the company or mobile phone numbers or persons at the company. These numbers can be selected from here. The first number in this list is dialled when a user clicks on the Speed dial button in Aurea.CRM.
- CRM.phone conditions: You can
determine the conditions that need to be met for CRM.phone
to carry out actions. The conditions are tested in the
order they are entered. The condition associated with a
task (via an action) is executed and any subsequent
conditions are ignored. The order in which the conditions
are defined is therefore important.
Example: You define 3 conditions. The first condition applies to all calls. The second condition filters calls from Germany and the associated action opens a survey tailored to customers in Germany. The third condition filters calls from the US and opens a survey tailored to US customers.
In this case, the first condition (applying to all calls) should not be placed first or second in the list, as it is met by all calls. This condition would be met by all calls and therefore the German and US calls would no longer be filtered.
The conditions added here need to be defined beforehand. For further details, see Defining General Conditions and ACD Conditions.
Click on
 (Load) to select a
predefined event. The dialog box contains all
defined events. Select the desired event from the
list and click on OK.
(Load) to select a
predefined event. The dialog box contains all
defined events. Select the desired event from the
list and click on OK.Click on
 (Delete) to remove a
condition from the list.
(Delete) to remove a
condition from the list. -
Internal call length: Enter the maximum length of numbers used for extensions or abbreviated dialling prefixes.
- Use the Phone Books
section to determine which directories are used by CRM.phone.
Directories are text files and must contain entries in the following
format:
<Name>;<Number>
e.g.:
John Smith;3329392
- Use the Call
information field to specify the format used by
call information in the call history (in Aurea.CRM win and Aurea.CRM
web) and is displayed in the CRM.phone
Actions dialog (in Aurea.CRM
win).
Click on
 (Company Field) to add a
field from the Company info area.
Click on
(Company Field) to add a
field from the Company info area.
Click on  (Person
Field) to add a field from the Person
info area to the call information.
(Person
Field) to add a field from the Person
info area to the call information.Note that you can only select one field at a time; to select multiple fields, repeat the selection process.
You can also enter plain text in this field (e.g. "Company:" followed by the company name):
Restrictions: You cannot use braces ( { and } ) or semicolons in text entries.
- Enable the Always look for call
information option to always search for
call data in the database (irrespective of any conditions and
tasks).Note: This option has no affect in Aurea.CRM web.
- Use the Detailed view
(
CRM.phone
actions) field in
the update.CRM
win Settings pane to specify which
information is included in the detailed call information.
Click on
(Company
Field) to add a field from the Company
info area. Click on (Person Field) to add a
field from the Person info area. The
contents of the field are output in the detailed call
information. You can select multiple fields.
- Suppress automatic workflows in edit mode: Enable this check box to prevent automatic actions from starting when Aurea.CRM is in edit mode.
- Display similar single hits: If the telephone number search does not return an exact match, but only a single similar number that meets the search criteria, this similar number is treated as an exact match.
System Settings
You can configure CRM.phone to your requirements. For example, you can determine the data included in log files and the buttons displayed in Aurea.CRM.
To configure the system settings in the telephone profile:
- Open the Rights module.
- Select Extras > Telephone
Profile from the menu.
The Telephone Profile dialog box is displayed.
- Switch to the System tab.
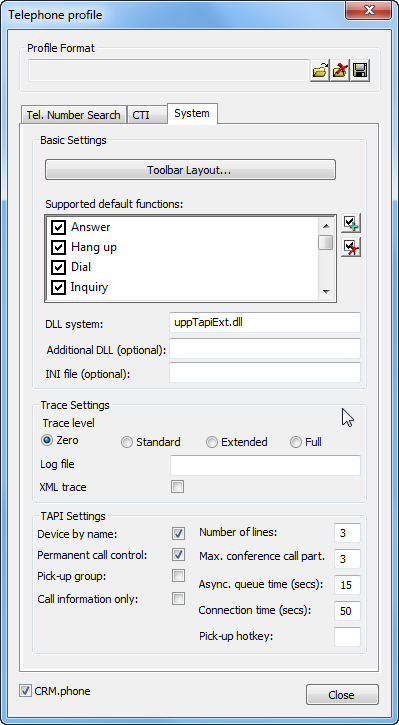
- Define your Basic
Settings:
- Click on Toolbar Layout if you wish to edit the layout of the CRM.phone toolbar in Aurea.CRM win and Aurea.CRM web. For further details, see Configuring the Toolbar Layout.
-
Supported default
functions: Select the functions
supported by your telecommunications system. These
functions are accessible from the CRM.phone toolbar in
Aurea.CRM or the CRM.phone dialog
box.
The Send record information function can only be used if your telephone system supports the TAPI function
lineSetCallData. -
System DLL: The DLL used by the system. The default file is
uppTapiExt.dll. -
Additional DLL (optional): If you have created your own DLL containing your own functions (with the CRM.phone SDK), enter the name of the DLL in this field. The DLL is loaded when CRM.phone is started. If general controls have been defined, you must enter the name of the DLL used to define them here.
-
INI file (optional): Additional settings that only apply to your telephony system can be written to an .ini file. This file must be stored in the system/sys directory. For further details, see Optional ini File.
- Determine the Trace Settings:
-
Trace
level: You can choose from Zero, Standard,
Extended
and Full.
Aurea recommends setting the trace level to Zero, as otherwise large volumes of data are written to the log files, which may impact on the performance of the system. Only enable the other options when troubleshooting.
-
Log file: Enter the name of the log file here. Log files are saved to the file specified here (in each user's directory). Aurea.CRM suggests the file name
uppTrace.log. If the trace level has been set to None, no log file is saved. -
XML trace: Enable this option to save the telephone profile in XML format in the file
uppProfile.xmlin the user's directory.
-
Trace
level: You can choose from Zero, Standard,
Extended
and Full.
- Determine the TAPI Settings:
- Device by name: A TAPI device identified by 3 components: the name, extension and a unique ID.
The TAPI system assigns a unique ID to each TAPI device. CRM.phone uses this ID by default to communicate with the extension. CRM.phone can also communicate with the device using the device name. Enable the Device by name option to communicate with the device using the device's name.
If the TAPI extension is assigned to users that use different workstations, these users need to select the correct extension using the ID each time. If the TAPI extension has the same name on all workstations, use the Device by name option to access the device using the device name and thus prevent having to manually specify the appropriate extension.