Installation WEB – OFFLINE (BS)
Learn about the server and client configuration for Web- offline installation.
This offline installation is in addition to the common installation guide of the web offline product.
Template ISI Web Offline Installation
Server
On the server perform the following:
- Create a new person for the system company (synonym = “system company“)
- Create a new rep (assign pre-created person to rep and ensure that the e-mail field is filled)
- Assign a login role for the rep (e.g. Sales or Service)
- Check if the rep can log in and that the role is assigned
- Assign the “offline” role to the rep
- The station is created automatically (consecutively numbered beginning with station number 100)
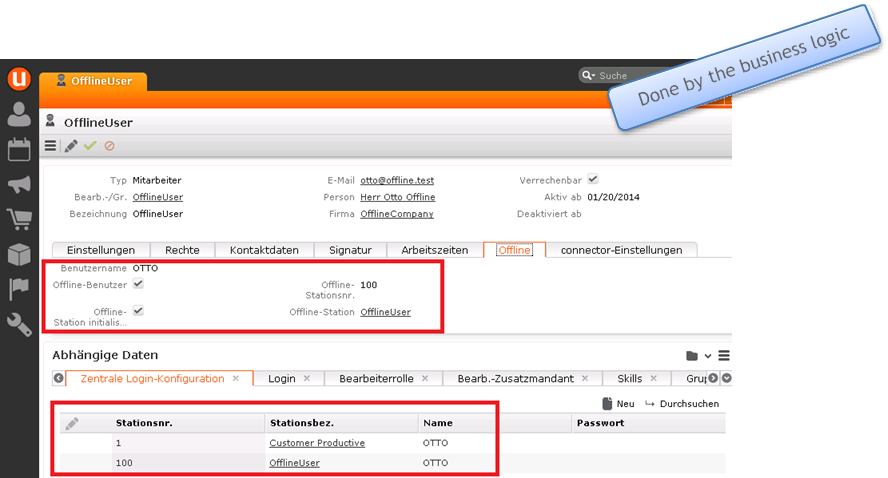
- Central login configuration for the actual and the offline station is created
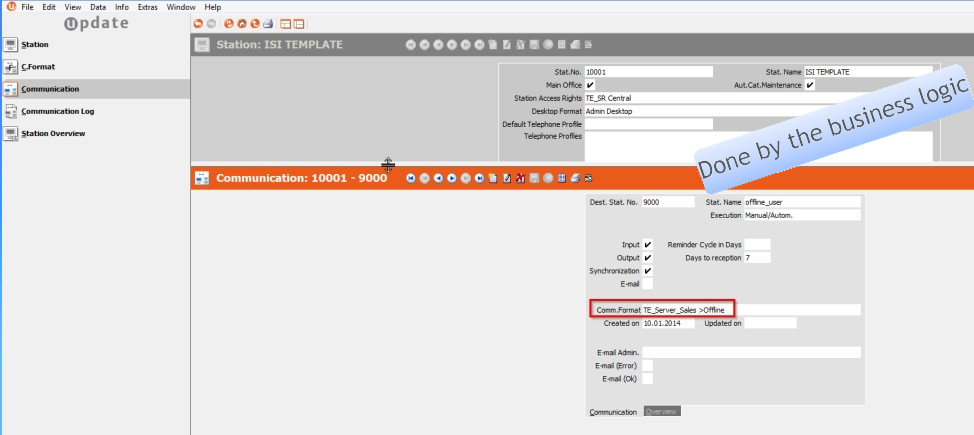
- Communication for the right stations is created
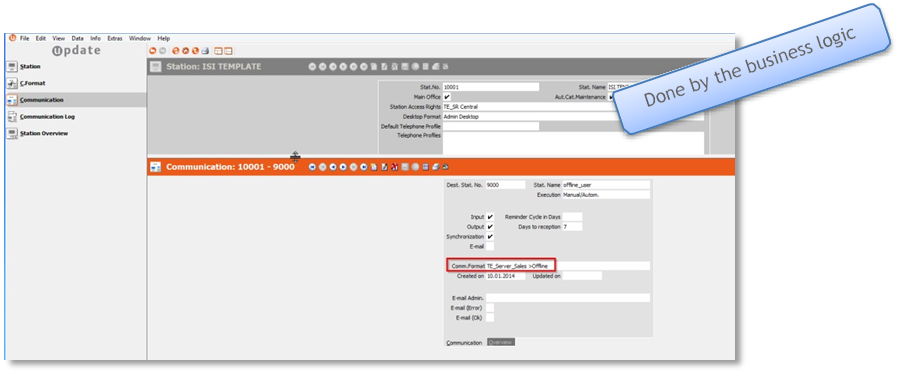
- Several entries to the rep are set (e.g. username, offline user, offline
station initialize,…)
- Exportfortheofflinestation(e.g.
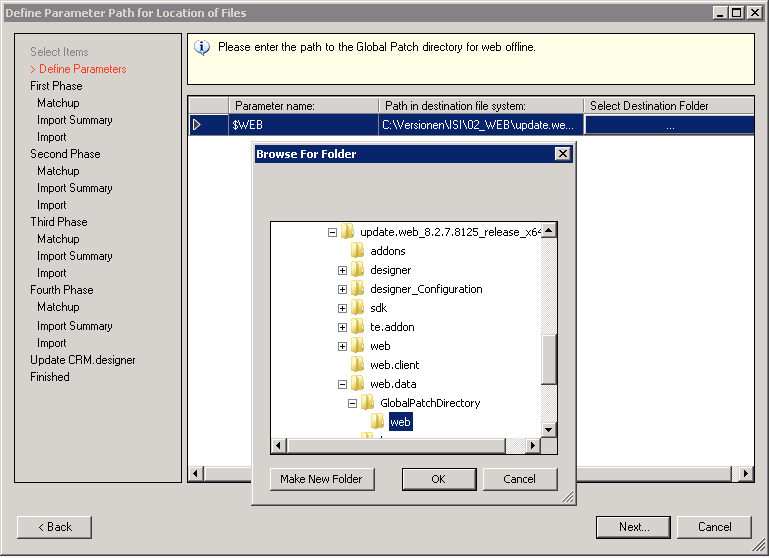
“C:\ProgramFiles\update.CRM\update.CRMwin
                  BTB\system\exe\mmco.exe” –u “SU” –k “out,100,u
”) - A new “GlobalPatchDirectory” directory has to be created in \update.CRM\update.CRM web BTB\web.data\.
- A new “web” directory has to be created in “..\update.CRM\update.CRM web BTB\web.data\ GlobalPatchDirectory\”
- Start cockpit and click on “Import Package from .zip File”
and select the ISI Template package.

- Select the Deploy web offline files checkbox.
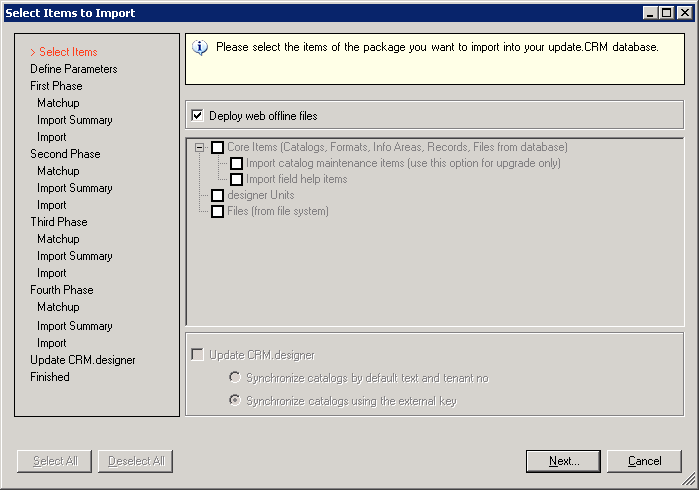
- Select the newly created web folder in the
GlobalPatchDirectory.
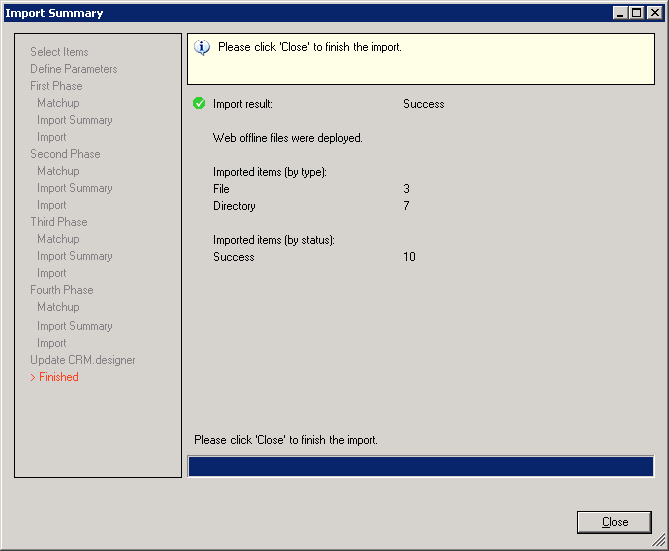
- Click on the Start Writing to Database button.

- When this message pops up you have to click on the Create for
All button.

- Import has finished.
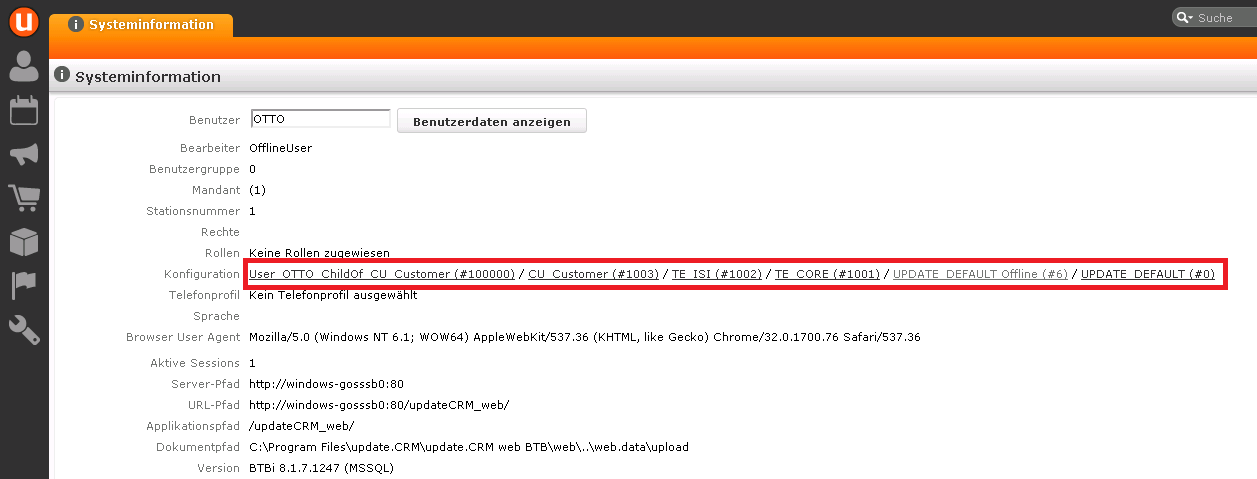
- Copy only the global relevant configurations into the “GlobalPatchDirectory” (Login
as “SU”, go to “Settings” on “System information”, enter your Offline user in the
“user” field and then select the configurations to download them, e.g.
“UPDATE_DEFAULT”, “UPDATE_DEFAULT_OFFLINE”, “TE_CORE”, “TE_ISI”,…).

- Adapt the offline.xml on the server (Please note that all parameters are mentioned in the Product Installation Guide of Web Offline).
Note: The user must have full access to the DatabasePath (Path to the local database
file). Aurea recommends specifying a dedicated target directory for InstallDir and
DatabasePath (e.g. InstallDir=C:\update.CRM) and defining sufficient access rights for
this directory: This ensures that users working with Aurea CRM web offline are able to
create and modify files and folders (write/modify rights).
Note: Ensure that you configure these two web configuration parameters:
- Offline.RootConfigurationToSync
- Offline.IncludeRootConfigurationInSync
Client
- Adapt SilentClient.ini, for
example:
COMUserName=<User> COMUserPassword=<Password> [STATIONCONFIGURATION] StationNumberClient=<100> StationNumberServer=<1> ServerURL=<http://mywebserver/updateCRM_web> ClientURL=http://localhost:7575 - Install web offline (execute setup.exe)
- Patch web offline and launcher to the actual version (actual web offline and launcher packages are available on https://support.aurea.com)
- Start the launcher and initialize
- Afterwards the web offline starts with a error message.
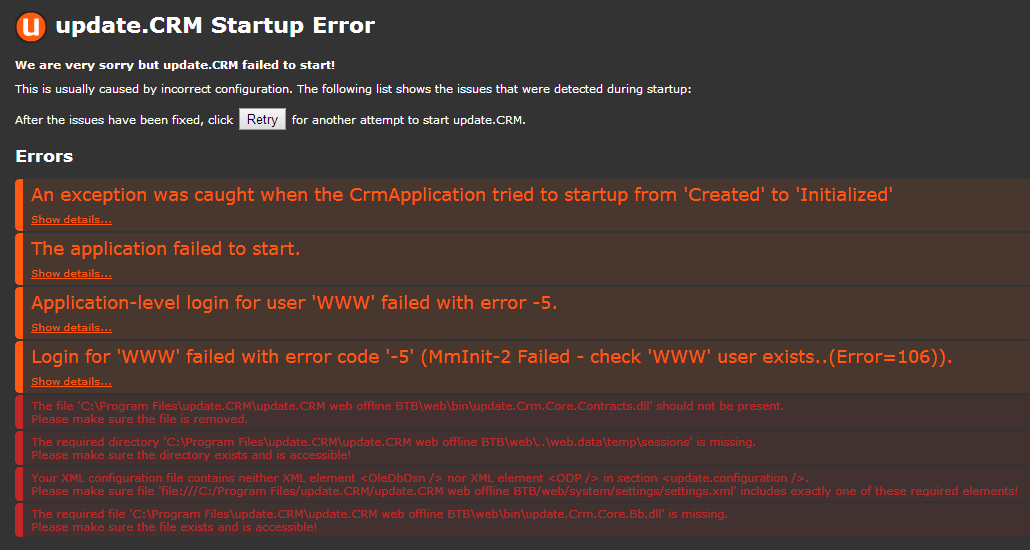
- Afterwards the web offline starts with a error message.
- Please change or adapt the following files
- C:\Program Files\update.CRM\update.CRM web offline BTB\web \web_Example.config
- C:\Program Files\update.CRM\update.CRM web offline BTB\web\system\settings\ users_offline_Example.xml
- C:\Program Files\update.CRM\update.CRM web offline BTB\web\styles\te.base\custom- color_Example.css
- C:\ProgramFiles\update.CRM\update.CRM web offline
BTB\web\system\settings\settings_Example.xml
<update.configuration>
   <!--OleDbDsn>&designerDsn;</OleDbDsn-->
   <ConfigurationFromDB>false</ConfigurationFromDB>
   <XmlStoragePath>C:\Program Files\update.CRM\update.CRM web offline BTB\web\data\offline\configuration</XmlStoragePath>
   <Vertical>&VERTICAL;</Vertical>
</update.configuration>
- Start launcher.
- Start Offline Manager and synchronize.
Template LSI Web Offline Installation
Server
- Create a new person in the system company
- Create a new rep (assign pre created person to rep and ensure that the e-mail field is filled)
- Assign a login role for the rep (e.g. Sales or Service)
- Check if the rep can log in and that the role is assigned
- Assign the “offline” role to the rep and set the “offline-user” flag
- The station is created automatically (consecutively numbered beginning with station number 101)
- Central login configuration for the actual and the offline station is created
- Communication for the right stations is created (Server->Offline and
Offline->Server)
- Several entries to the rep are set (e.g. username, offline-user, offline
station initialize,…)

- Export for the offline station(for example,
C:\ProgramFiles\update.CRM\update.CRMwin OTC\system\exe\mmco.exe” –u
                     “SU” –k “out,100,u
) - A new “GlobalPatchDirectory” directory has to be created in ..\update.CRM\update.CRM web OTC\web.data\.
- A new “web” directory has to be created in ..\update.CRM\update.CRM web OTC\web.data\ GlobalPatchDirectory\.
- Start cockpit and click on “Import Package from .zip File” and select the LSI
Template package
- Click on the “Deploy web offline files” checkbox
- Select the newly created web folder in the GlobalPatchDirectory.
- Click on the “Start Writing to Database” button
- When this message pops up you have to click on the “Create for All” button.
- Import has finished
- Copy only the global relevant configurations into the “GlobalPatchDirectory” (log
in as “SU”, go to “Settings” in “System information”, in the “user” field enter
your Offline user and then select the configurations to download them, e.g.
“UPDATE_DEFAULT”, “UPDATE_DEFAULT_OFFLINE”, “TE_CORE”, “TE_LSI”,…)
- Adapt the “offline.xml” on the server (please note that all parameters are mentioned in the Product Installation Guide of Web Offline).
Note: The user must have full access to the DatabasePath (path to the local database
file). update recommends specifying a dedicated target directory for InstallDir and
DatabasePath (e.g. InstallDir=C:\update.CRM) and defining sufficient access rights
for this directory: This ensures that users working with Aurea CRM web offline are
able to create and modify files and folders (write/modify rights).
Note: Please ensure that you configure these two web config parameters:
- Offline.RootConfigurationToSync
- Offline.IncludeRootConfigurationInSync
Client
- Adapt SilentClient.ini. For
example:
COMUserName=<User>
COMUserPassword=<Password>

[STATIONCONFIGURATION]
StationNumberClient=<100>
StationNumberServer=<1>
ServerURL=<http://mywebserver/updateCRM_web>
ClientURL=http://localhost:7575
- Install web offline (execute setup.exe)
- Patch web offline and launcher to the actual version (actual web offline and launcher package available on support.update.com)
- Start the launcher and initialize
- Afterwards web offline starts with an error message.
- Afterwards web offline starts with an error message.
- Please change or adapt the following files
- C:\Program Files\update.CRM\update.CRM web offline OTC \web \web_Example.config
- C:\Program Files\update.CRM\update.CRM web offline OTC \web\system\settings\ users_offline_Example.xml
- C:\Program Files\update.CRM\update.CRM web offline OTC\web\styles\te.base\custom- color_Example.css
- C:\ProgramFiles\update.CRM\update.CRM web offline
OTC\web\system\settings\settings_Example.xml
<update.configuration>
   <!--OleDbDsn>&designerDsn;</OleDbDsn-->
   <ConfigurationFromDB>false</ConfigurationFromDB>
   <XmlStoragePath>C:\Program Files\update.CRM\update.CRM web offline OTC\web\data\offline\configuration</XmlStoragePath>
   <Vertical>&VERTICAL;</Vertical>
</update.configuration>
- Start launcher.
- Start Offline Manager and synchronize.