Template Upgrade
Learn about the prerequisites for template upgrade and other upgrade information.
Prerequisites (OP)
The template upgrade follows the same steps as the initial import.
Important: Upgrade with an Installed Hotfix (OP)
In case you have installed these hotfix versions:
- TE ISI Release 8.1.2.172 Hotfix
- TE LSI Release 8.1.2.209 Hotfix
You have to delete the following catalog maintenance record (KW) manually in your database.
- LSI: External Key (field.id 22) is: 42958262947270 AND Modification (field.id 3) == empty
- ISI: External Key (field.id 22) is: 42953967931787 AND Modification (field.id 3) == empty
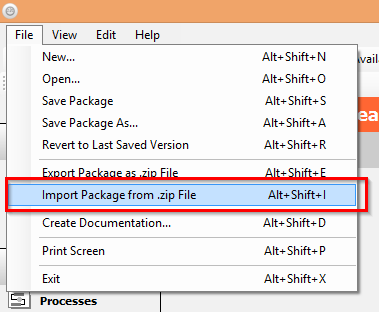
Cockpit Import (OP)
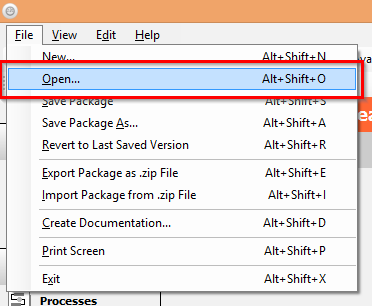
Be sure to open the TE_<vertical>_Release package in cockpit.
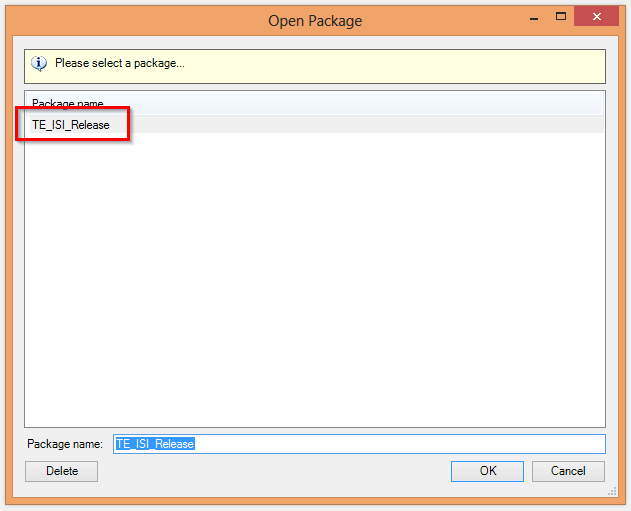
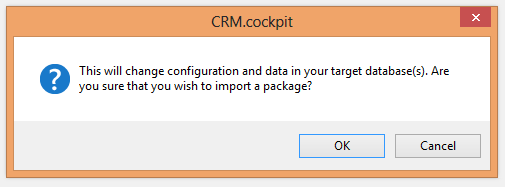
Now select the template package and click OK in the following prompt.
Be sure to check all items in the following screen, and be sure to check ‘Import catalog maintenance items’.
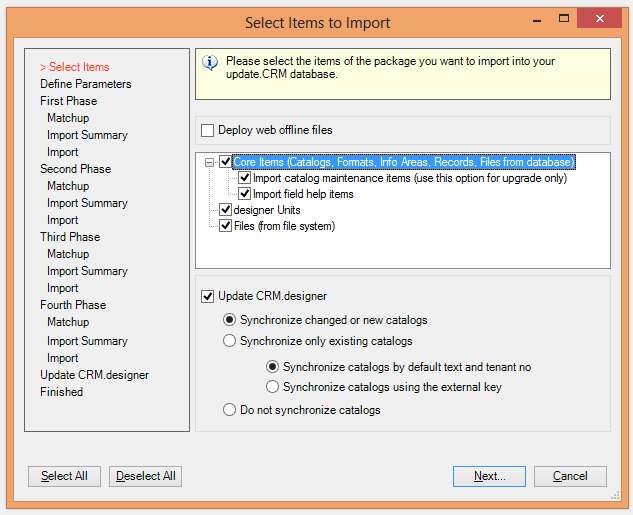
The ‘Update CRM.designer’ option uses the same functionality as the bulkloader. By enabling this option cockpit automatically updates the CRM.designer database with the current datamodel, catalogs, CRM processes (R4) and roles (R2). You can also choose which catalogs you want to synchronize (new or changed catalogs, sync only catalogs which are already in the designer or sync no catalogs). So you can choose if you want cockpit to do it, or manually do it later using CRM.bulkloader.
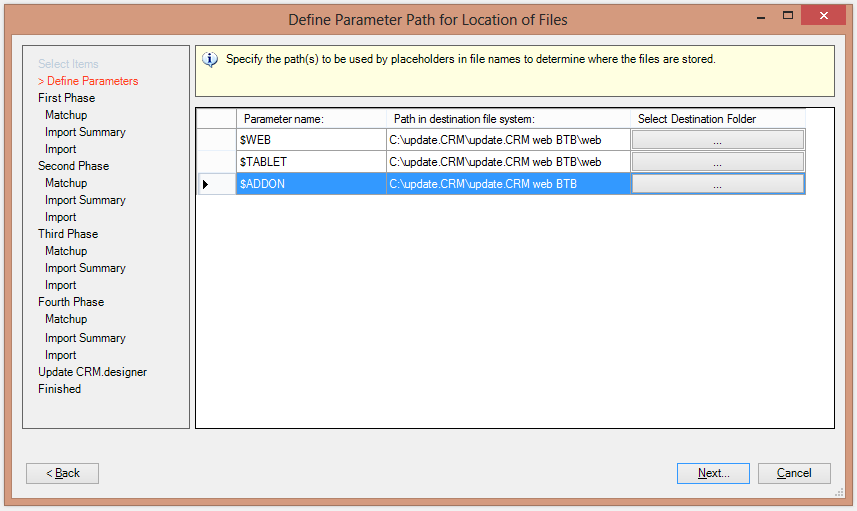
Now you need to select the appropriate destinations for the following parameter paths,
these parameters contain files which are required by the template. The $WEB
parameter is mandatory, however you can omit the $TABLET and
$ADDON parameters, if you do not want to use these products. You can
later import the cockpit package again and only import the missing parameters if you need
these files (make sure to only check the box ‘Files (from file system)’ in the previous
step):
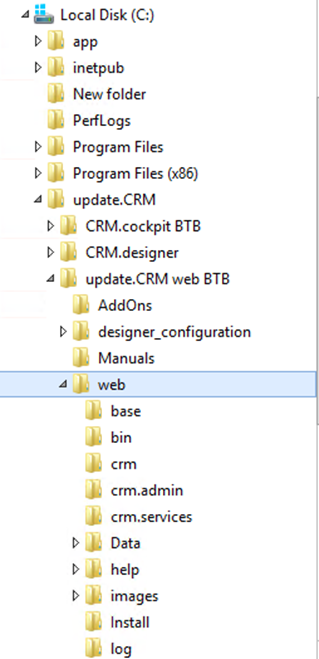
$WEB: This parameter contains all template files which are needed for
Aurea CRM, use the web folder, inside your installation directory, e.g.
C:\update.CRM\update.CRM web BTB\web.
$TABLET: This parameter contains the tablet resources (images) which are
required for CRM.pad. The files is extracted to the standard
tabletResources folder. Select therefore the same folder that is used
for the $WEB parameter.
$ADDON: This parameter contains all settings files which are needed for
several add-on products, such as interface or connector. You can place these wherever you
want, you need to copy and edit these files before you use them with the product. E.g.
select your installation directory, C:\update.CRM\update.CRM web
BTB.
If the button with the three dots is not visible, use the scrollbar at the bottom of the window to scroll to the right or make the window bigger in the bottom right corner. You can also paste your destination path into the second column.
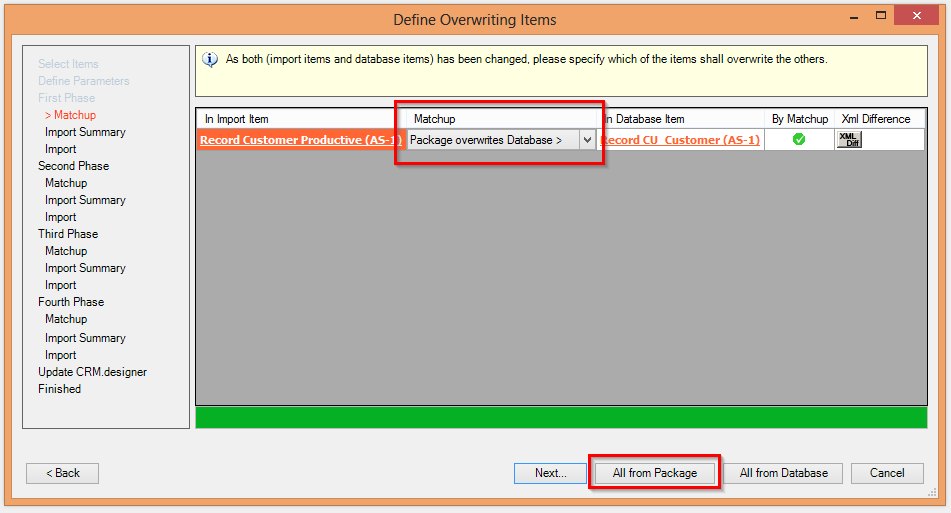
Now the matchup process starts. You should always click on “All from Package” if you are importing a template. Then, click on “Next”. This matchup process could start two more times depending on what you configured previously. Be sure to select “All from Package” every time the matchup is started.
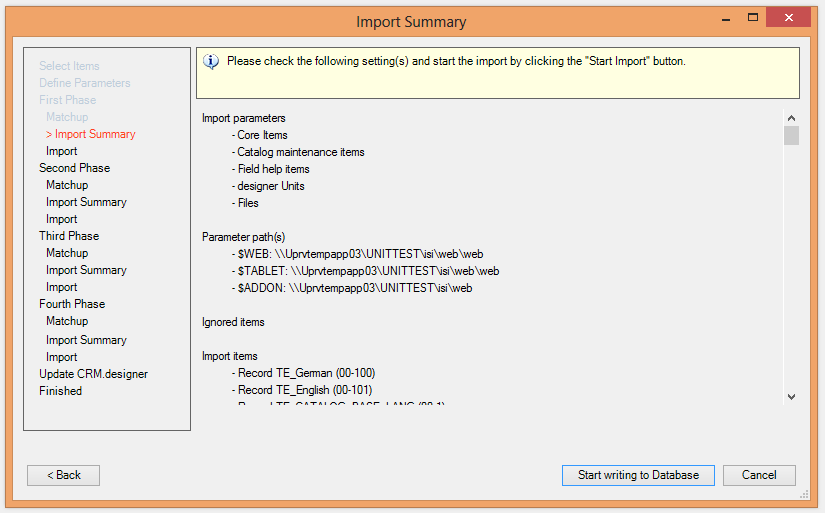
You can now see an import summary. The template is imported after you clicked on “Start writing to Database”.
The matchup process then restarts. Be sure to check “All from Package”! It is also possible that an empty Matchup window is opened and closed after a few seconds without user interaction. This is intentional as the matchup process did not find any items which were altered in this phase.
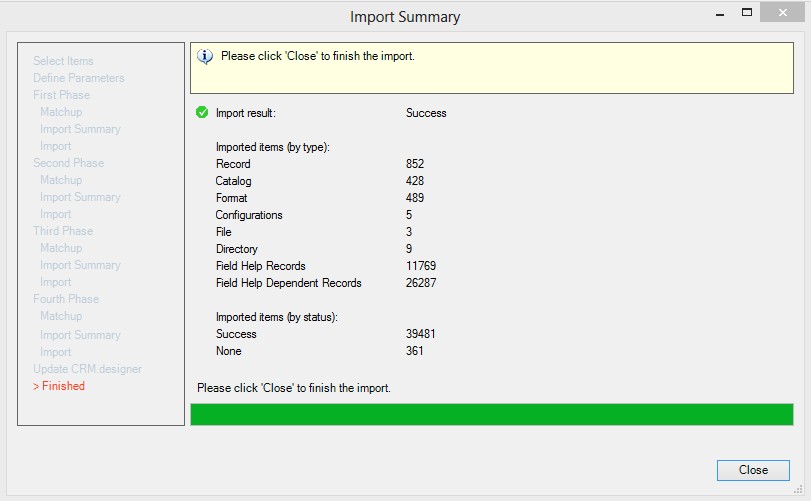
A message should be displayed when the import has finished successfully.
Also, remember to change the web.config and settings.xml.
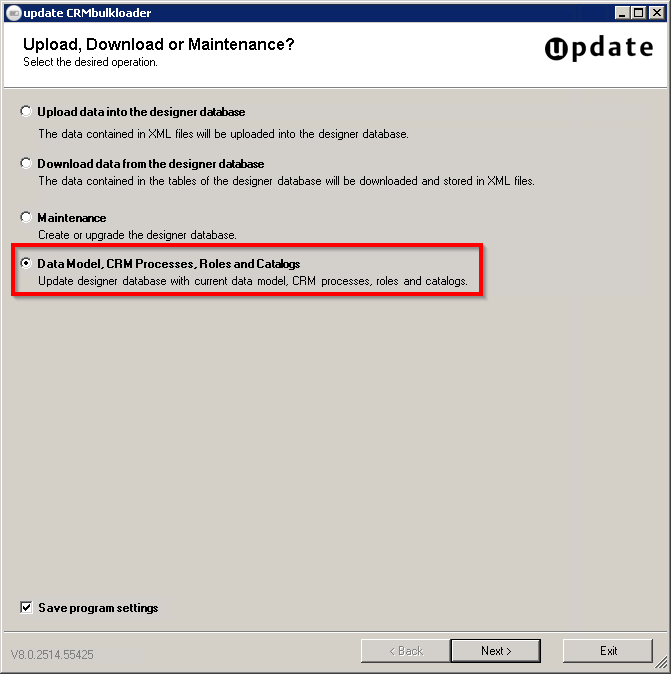
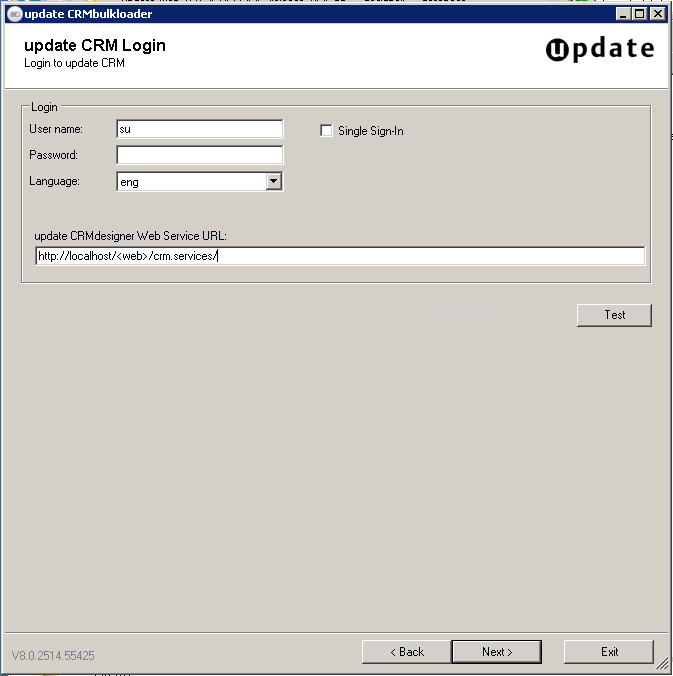
To synchronize the designer and windows database please start the Aurea CRM bulkloader located in …\update crm web\designer\database.
Provide your SU credentials and the address of your web service. In case you are using RAS, provide your RAS login credentials. The language you select here is the language that the fields are displayed in the designer, e.g. if you select “eng” then the fields in designer is displayed in English:
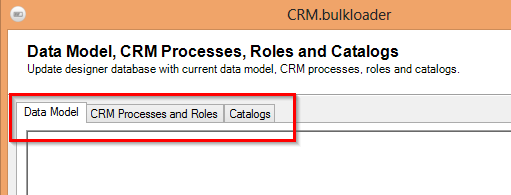
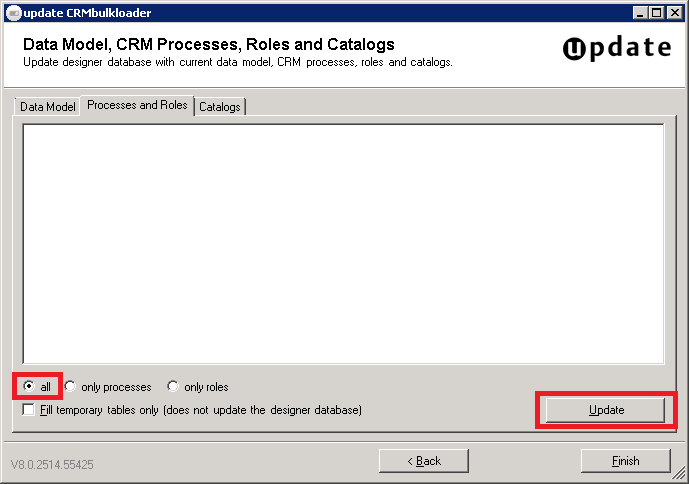
On the first tab, please click on Update Data Model:

On the second tab, please check all and then click Update:
Upgrade information for ISI Version 2 (BS)
- ABC Field FI/OJ/Y1:
- FI:
We are now using the ABC FI/35 field instead of ABC FI/5002, as this is the standard product field. This field is automatically filled by the portfolio. The field is read-only and can only be filled via the portfolio.
Note: The old field is renamed to “-x-“. Please remove the old field from the masks if you copied the template masks to your configuration.
- OJ:
We are now using the ABC OJ/21 field instead of ABC OJ/5022, as this is the standard product field. This field is automatically filled by the portfolio. The field is read-only and can only be filled via the portfolio.
Note: The old field is renamed to “-x-“. Please remove the old field from the masks if you copied the template masks to your configuration.
- Y1:
We are now using the ABC Y1/17 field instead of ABC Y1/5004 as this is the standard product field. This field is automatically filled by the portfolio. The field is read-only and can only be filled via the portfolio.
Note: The old field is renamed to “-x-“. Please remove the old field from the masks if you copied the template masks to your configuration.
- FI:
- PR Status Field:There is a new Status PR/5045 field which is used in the service reports area. This field is read-only and can only be changed using the buttons in the mask. The Status PR/8 and Stage PR/9 fields have been removed and are not relevant for service reports anymore.Attention: Please remove the old field from the masks if you copied the template masks to your configuration.
Upgrade Information for ISI Version 3 (BS)
- Company Type Field – Virtual Info Area (TFI1)
In version 1 and version 2 we used field 167 as company type field. In version 3 we are using field 28 (array field).
Due to the fact that we are using the array functionality now, we created a new field (FI, 5031) which is now used as a separation of the virtual info area (TFI1).
settings.xml v2:

settings.xml v3:

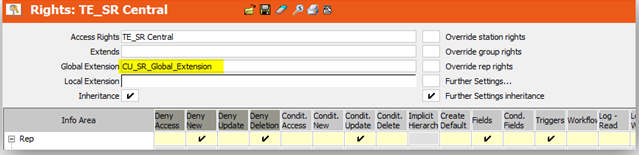
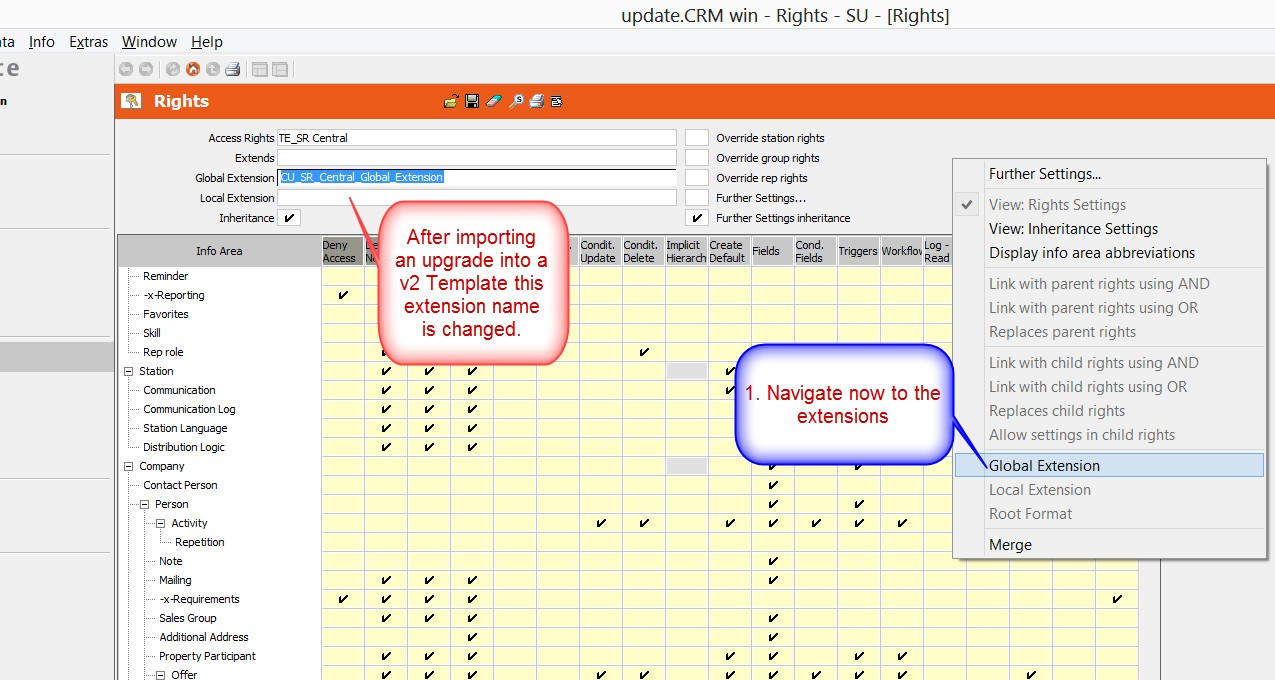
- Global Extension of the Station Right
We’ve changed the name of the global extension of the station right from “CU_SR_Global_Extension” to “CU_SR_Central_Global_Extension” to fit the name of the global extension of update.seven.
- Station right v2:
- Station right v3:
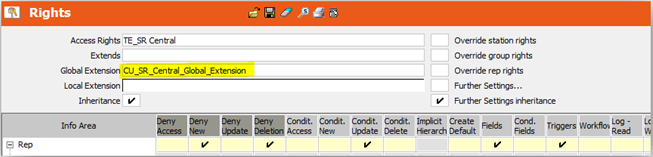
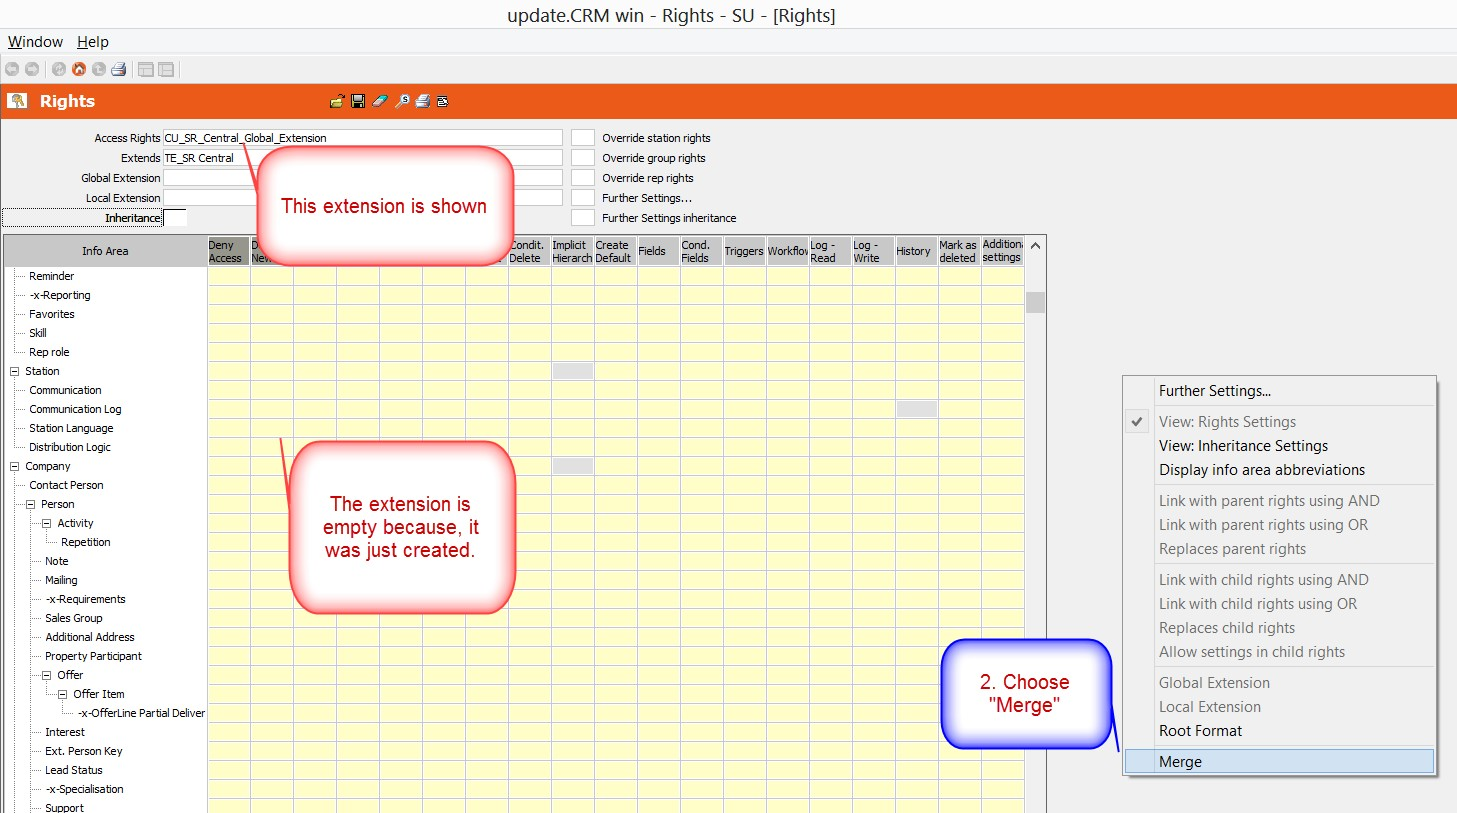
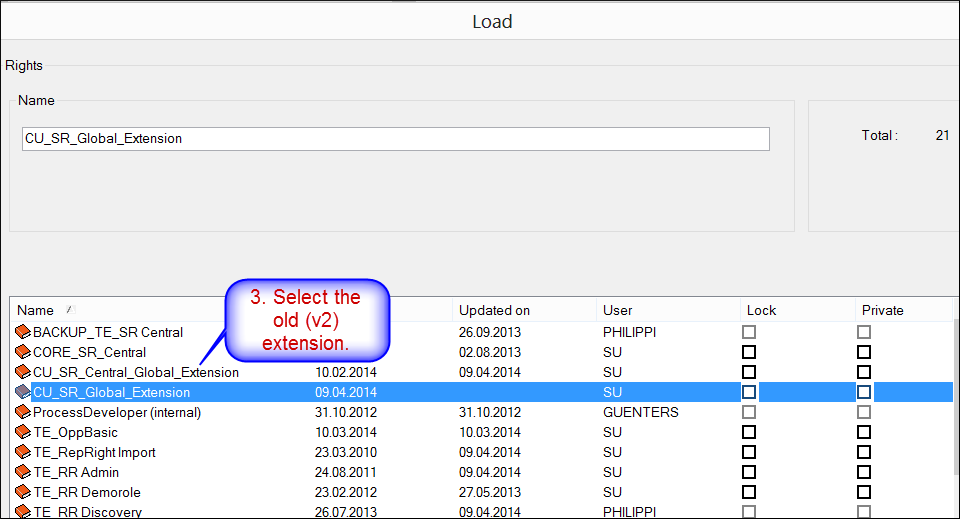
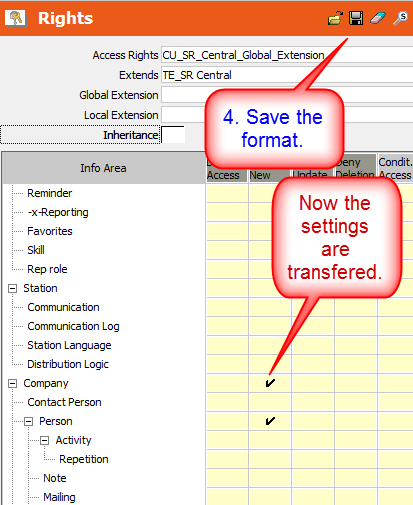
To merge the old (v2) global extension with the new global extension do the following:
- Station right v2:
Upgrade Information for ISI Version 4 (BS)
For a list of changed designer units, see the Appendix chapter Changed Designer Units for ISI Version 4.
- New Relationship Charts
From version 1 - version 3 we used fusion charts to display the relationship charts of companies and persons. In version 4 we are using a feature which comes with the standard product. Therefore, we replaced the old buttons and the old menu action with new ones.
Old item
New item
TE_FI_RelationshipDiagram (button)
TE_FI_RelationshipDiagram_v2 (button)
TE_KP_RelationshipDiagram (button)
TE_KP_RelationshipDiagram_v2 (button)
TE_A_FI_RelationshipDiagram (context menu action)
TE_A_FI_RelationshipDiagram_v2 (context menu action)
The old items still exist, and can be reactivated.
- New Variable Definition
With version 4 we are delivering variable values (which are used for some processes) without a station number (see chapter Aurea CRM win – Variables (Z5/Z6) (BS)).
Note: The Template variables is only updated to not include the station number if you did not change the variable as the upgrade should never change customized settings. - Deactivated Template Processes
We are delivering a lot of CRM processes with the template.
The following processes are deactivated by default in version 4 and higher:
Process Name
Process ID (Tree)
QlikView
1.4.7.400
Scura CLM
1.400.2
GIS (Bing Maps)
1.5.2.5.2
Expenses
1.4.10 | 1.4.10.400
Property Matchup
1.2.401
Lead Management
1.3.6
Social Inbox
1.4.6.3.1
Social Ticket Management
1.1.1.1.19 | 1.1.1.1.20
Social Product (eg. Idea Management)
1.6
Yammer
1.400.3
- New Corporate Currency Fields
With version 4 we are using special currency fields for reports and analyses.
Every report/analysis using the following info areas has been changed: Y1, Y5, PR, AP, AU, UP, OJ, and PO. The following fields have been replaced:
Infoarea
Standard Field
New Corporate Currency Field
Y1
145
5046
Y1
147
5047
Y5
6
5000
Y5
7
5001
PR
13
5046
PR
167
5047
AP
19
5026
AP
112
5027
AU
11
5006
AU
140
5007
UP
17
5001
UP
87
5002
OJ
26
5038
PO
5
5001
PO
2
5003
PO
3
5005
PO
4
5007
Upgrade Information for ISI Version 6 (BS)
An new virtual infoarea has been added to the settings.xml (TPE1 – Private Customer). Please check out the “settings_Example.xml”
Upgrade Information for LSI Version 3 (BS)
- Changes to Catalog 132 “Order status”
We changed TENANT and EXTERNAL KEY for this catalog.
These changes is applied by catalog maintenance while upgrading to version 3 to formats but not to designer-catalogs and add-on programming.
Please check your designer catalogs and add-on programming.
Value in BASE Language
Version 2
Version3
Tenant
External Key
Tenant
External Key
Blocked (BASE)
9050
132-9001-00009
9000
10002_132_9
Cancelled (BASE)
9050
132-9001-00011
9000
10002_132_11
Closed (BASE)
9000
132-9000-00010
9000
10002_132_10
Delivered (BASE)
9050
132-9001-00008
9000
10002_132_8
On Hold (BASE)
9050
132-9001-00003
9000
10002_132_3
Open (BASE)
9000
132-9000-00001
9000
10002_132_1
Partially delivered (BASE)
9050
132-9001-00007
9000
10002_132_7
Pending (BASE)
9050
132-9001-00004
9000
10002_132_4
Pending ext. (BASE)
9050
132-9001-00006
9000
10002_132_6
Review (BASE)
9050
132-9001-00002
9000
10002_132_2
Transferred (BASE)
9050
132-9001-00005
9000
10002_132_5
Version 2 compared to version 3:
- Variable (Z5) “TE_Calls.ConditionCallTypeCreatePOSMonitoringHeader”
Please delete all existing Z6 records for the “TE_Calls.ConditionCallTypeCreatePOSMonitoringHeader” variable.
We have changed the Type of this variable and therefore deleted all related Z6 records. However, deletions are not transported by a template upgrade package so you have to do it manually.
Upgrade Information for LSI Version 4 (BS)
- Relationship Hierarchy - Update Relationship Level (B5)
Since version 4 we are using the new SP2 feature called “Relationship Hierarchy” in the sales rep right “TE_RR Sales – CG”. Therefore, you have to generate relationship records for your existing data. New relationships already creates a so called hierarchy record.
Go to the WIN module >> Relationship Level, and select the “is a department of (BASE)” relationship and right-click “Generate Relationship Hierarchy”. If you want to use a different relationship type in rights you must also generate these types.
- Trigger 'TE_PS_NEW_Create POS Monitoring Header'
We have removed the 'TE_PS_NEW_Create POS Monitoring Header' trigger from the MA info area in the station right.
Now it is possible to create more than one visit per day per rep for an account. From now on the PS record is created in WEB within the call documentation process in the POS monitoring phase. The CRM.pad also takes care of creating the PS record on the client-side.
- New Variable Definition
With version 4 we are delivering variable values (which are used for some processes) without a station number (see chapter Aurea CRM win – Variables (Z5/Z6) (BS)).
Note: The Template variables is updated to not include the station number if you did not change the variable as the upgrade should never change customized settings.
Upgrade Information for LSI Version 5 (BS)
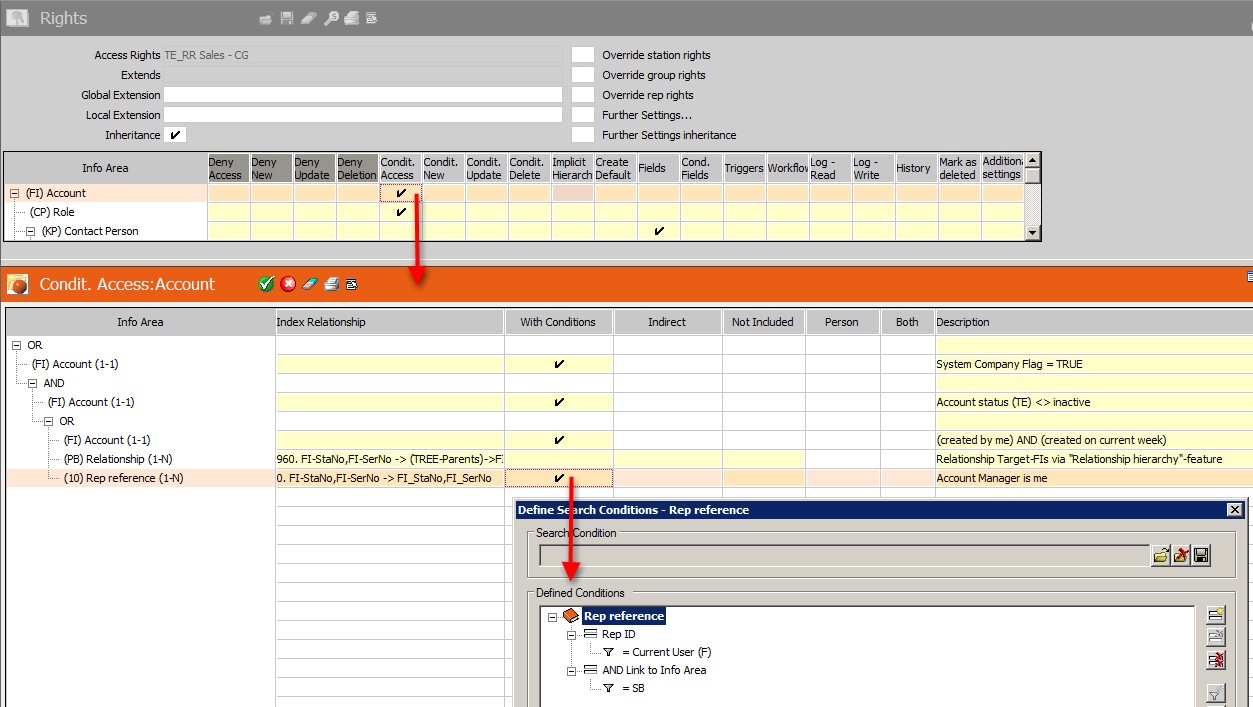
Conditional Access for FI via Rep Reference
With this version we are using a new core product feature “Using Rep References for Rights Definitions (#84936)”. This makes the former template logic for splitting of SB-records redundant.
The index for info area SB has been modified with version 5. The field „Functional Role“ (SB.5008) was removed from the index. This field was used for all split SB-records.

To activate this new feature you have to do the following steps:
- Go to Maintenance >> Data Model >> Account Manager (SB) >> Index and click “Apply Info Area” to apply the changes marked in red. (Cockpit does not apply these changes automatically!)
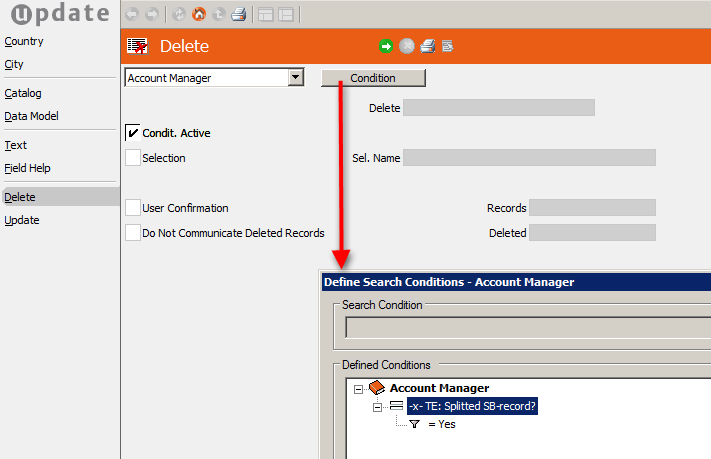
- Delete the existing split SB-records from your database. This is done by means of a
maintenance/deletion run: Delete all SB-records with field “TE: Split SB-record?”
(SB.5009) == “Yes”.
This deletes all records created by the template workflows. The data contained in these records is a duplicate of the SB records created manually or by the standard product logic.
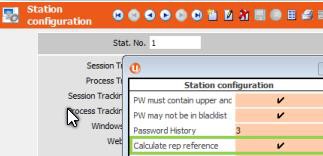
- Activate the “Calculate rep reference” for your customer’s station in the rights module
>> station configuration. Field “Calculate rep reference” must be set to true. Due
to performance it is not recommended to activate this feature on offline stations.
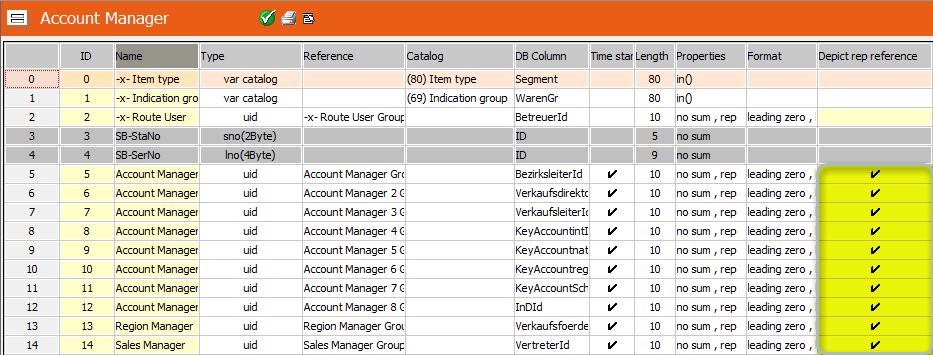
- Check the data model and check column “Depict rep reference” for the uid fields you want
to use as a rep reference. This has been already done for all fields part of the standard
product or template. For fields added in the project you need to do this.
- Check conditional access conditions for your customer rights and change the conditions
to the rep reference info area if necessary. This has been already done for all rights
part of template. For rights added or modified in the project you need to do this.
- Designer: Check your SB masks and lists in your own designer configurations if you have copied them to your configurations or to any user configurations.
- SQL Tool >> Calculate Rep Reference
This setting enables the table “Rep reference” (10). As this table has to be filled you need to carry out the creation of records by starting the SQL tool (mmba.exe -q):
- Select an info area for which rep references are configured.
- Click on Calculate rep reference.
Use the ReCreate Procedure and ReCreate All Procedures buttons to re-create the database triggers.