Editing User Details
Administrators can edit information in a user’s account, create team leaders and assign permissions to control what types of information users can view and edit.
NOTE
Depending on company settings, administrators and team leaders may not be able to change all fields discussed in this section. If you cannot access a field but need to edit it, contact Support.
Editing Imported Data
Even if you import user data into AlertFind, you can change it using the AlertFind web interface. However, changes may be overwritten by the next import if the source data is not also updated. Also, imported user data cannot be changed using AlertFind Web Services / API interface.
Changes made manually in the AlertFind interface to imported fields, groups, and teams are always overwritten with the next import unless that specific field is excluded in the next import.
- If changes are made to user information through the AlertFind interface, the best practice is to ensure that these changes are propagated back to the data source.
- Passwords are the only exception to this rule. When a password is edited or reset in the AlertFind interface, the link with the imported data source is broken. To reset this password in the future, use the Change Password button on the User page.
Changing User Permissions
When a user is granted any specific permission, that user becomes a team leader of the team in which the permissions are granted. See Permissions for information on permissions, teams, and team leaders.
Changing Basic User Information
Information in basic user fields can be set in a number of ways. It can be:
- Imported into the user account.
- Propagated into the user account from the company defaults set in your organization’s company settings.
- Manually created or edited by an administrator with the necessary permissions.
- Manually edited by the user.
Administrators and Team Leaders with the necessary permissions can edit a user’s basic information. See Permissions for additional information. Remember that if you manually edit this information and then these fields are reimported, any manual changes you make will be lost. See Editing Imported Data.
To manually edit a user’s basic information:
- From any list of users, double-click a user name to bring up the User Overview page. See Viewing User Lists for instructions on viewing user lists.
- At the top of the User Overview page, click Edit. The Personal Information, Status, and Preferences sections appear.
- Depending on your permissions, you may be able to edit the following fields:
- Full Name — Enter the user’s full name as it should appear in the system. This field is required.
NOTE
Enter the user’s name in the same naming convention as all the other users in your system, either FirstName LastName or LastName, FirstName. If you switch conventions between imported and manually entered users, it will be difficult for you to effectively sort user lists.
The name you enter here is the name AlertFind speaks in notifications. Therefore, if you use a LastName, FirstName convention, AlertFind speaks the user’s name as “Smith, Joe.”
- Description — Enter a description of this user. This field is optional.
- Primary Email Address — Enter the primary email address for this user. This address is used for all password resets or reminders, even if other email addresses are added to the user’s profile later. This field is required.
- Map Default Email To — For the Primary Email Address entered, choose the type of address. Usually, it is the
Work Emailaddress. - Assign a User Name to the user. One user name is required, more user names can be assigned if needed. Typically, a user’s user name is the same as the primary email address.
- Click the Usernames field name to bring up the Username Editor. Use the Add, Edit, or Delete buttons to perform user name actions.
- To add or edit a user name, first type in the portion of the user’s email address that appears before the
@symbol, such asjohnsmithorjohn_smith. AlertFind user names cannot include spaces, but they can include most special characters, such as underscores (_) or exclamation marks (!). - Then select the domain for this email address using the drop-down list. The domain is the part of the email address that appears after the
@symbol, such ascompanyname.com. - Click OK to submit the user name changes.
- Status — Use the Enabled or Disabled options to change the user status.
- Role — Use the field to set a new role for this new user. For more information about user roles, see Assigning User Roles.
- The User Local Time, Active Notification Profile, and Source fields are set by the system and cannot be changed.
- Hotline Phone Number — Choose the user to use all hotline phone numbers available to your organization, or assign a specific number for this user by choosing from the drop-down list.
NOTE
The language used when a user calls into a Hotline is determined by the language associated with that Hotline phone number. To set another voice/language for a Hotline, assign a different Hotline phone number to the user.- Check Display hotlines in preferred language only to limit the hotlines displayed in this section to those in the user’s preferred language. Uncheck this box to display all available hotlines for your organization.
- Preferred Voice — Accept the default voice and language for your organization, or assign another for this user by choosing one of the options available in the list. The user’s preferred voice determines which language is used for spoken and text-based notifications. By default, the user’s preferred language and Hotline settings are propagated from the default values set in your organization’s company settings. If you have the necessary permissions, you can change users’ preferred language settings.
- Click Save to save the changes.
NOTE:
Like other user account details, these settings can be overwritten by a future import process. See Editing Imported Data for additional details.
Changing a User’s Time Zone, Business Days, and Work Hours
Business days and work hours determine which notification profile is used for a notification. By default, a user’s business days and work hours are propagated from the default values set in your organization’s company settings. Administrators and Team Leaders with the necessary permissions can edit a user’s settings for these fields.
Like other user account details, these settings can be overwritten by a future import process. See Editing Imported Data for additional details.
To change business days or work hours for a user:
- From any list of users, double-click a user name to bring up the User Overview page. See Viewing User Lists for instructions on viewing user lists.
- Click Time and Date Preferences from the list of User Editor options. The Time and Date Preferences page appears.
- Click Edit.
- You can accept the default time zone for your organization or choose another time zone for the user’s location from the Time Zone drop-down list. To reset the time zone to the organization default, click the Use Default button next to the Time Zone field.
- You can accept the default business hours for your organization or configure custom hours for the user. To configure custom hours, use the Business Hours Start and Business Hours End drop-down lists. To reset the user’s business hours to the organization default, click the Use Default button next to the Business Hours Start and Business Hours End drop-down lists.
- You can accept the default weekend days for your organization or configure custom weekend days for the user. To configure weekend days, check each day that is a weekend day for the user. Unchecked days are considered business days, and checked days are considered weekend days. To reset the user’s weekend days to the organization default, click the Use Default button next to the Weekend Days check boxes.
- Click Save to save your changes and return to the User Overview page.
Changing a User’s Password
Users use their passwords to log into AlertFind to access notifications, incidents, or their user accounts. If you have the necessary permissions, you can change a user’s password.
To reset a user’s password:
- From any list of users, double-click a user name to bring up the User Overview page. See Viewing User Lists for instructions on viewing user lists.
- Click Change Password at the top of the User Overview page.
- Enter the new password into the New Password and Confirm Password fields.
- Click Save to save your changes and return to the User Overview page.
Changing a User’s PIN
Users use their PINs to access information in notifications or on the Hotline that requires a PIN. If you have the necessary permissions, you can change a user’s PIN.
To reset a user’s PIN:
- From any list of users, double-click a user name to bring up the User Overview page. See Viewing User Lists for instructions on viewing user lists.
- Click Change PIN at the top of the User Overview page.
- Enter the new password into the New PIN and Confirm PIN fields.
- Click Save to save your changes and return to the User Overview page.
Enter or Change a User’s Location Preference
If Allow map based notifications has been selected in the Default Company Settings table, you can map that user’s location in AlertFind.
To enter or change a user’s location in AlertFind:
- In the left-hand menu bar Administration section, select Users.
- On the Users page, double click the user whose location you want to enter or edit.
- In the User Overview window left-hand menu, select Location Preference. A map is displayed. If the browser requests you to share your location, answering Yes centers the map at your current location.
- In the Search Address text box, enter the user’s address. The location is indicated by an icon on the map. You can grab the location marker icon (click and hold) and move the icon to another location. For instance, if the user’s location is unsearchable in Google maps, enter an address that is close to their location and then grab the icon and move it to the desired location. If you are changing locations, both the new icon and the old icon will be shown until you click Save, which will cause the old icon to disappear. Only one location can be active at a time.
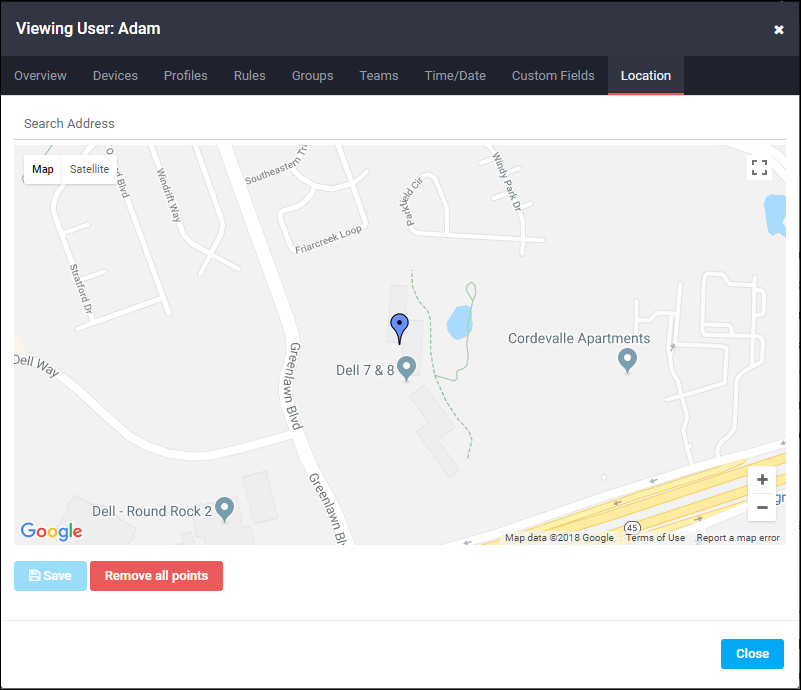
- Click Save to save the location or click Remove all points to clear all location markers.
- Click OK to return to the Users page.