Second process to display associated companies and persons
Learn how to add a second process to display associated companies and persons
The company and person linked with the selected contact record should also be displayed. To do so, you need to define a second process and specify how the first process interacts with the second.
Process definition
- Enter a text and description for the second process in the Processes table (click on the corresponding cell in the empty line). Select New View in the Type cell. Click on the Definition cell to open the Definition dialog box.
- Click the Selectionbutton, and select the Company info area. Company is now listed under the Selection button. Select this entry and enable Edit.
- Add the Person info area as well, and enable New and Edit.
- Define "1. Co.Grp(2)+Co.No.(4)" as the index for the Company info area.
- Enter a Key Length of 6 (2 places for Co.Grp, 4 places for Co.No.).
- Click on the Key Definition button and select the Contact info area. This determines that the key is taken from the Contact info area. Remember that the contact record uses the company group and key to identify the company the contact relates to. You still need to define that the contact is taken from process 1.
- Define "1. Co.Grp(2)+Co.No.(4)+Pe.Grp.(2)+Pe.No.(4)" as the index for the Person info area.
- Enter a Key Length of 6. Click on the Key Definition button and select the Contact info area. This determines that all persons in the company entered in the contact should be displayed.
- Select a mask to be used by mask and listview.
- Ensure that the Integrated option is enabled (the default setting). This determines that both companies and contacts are be displayed on the screen.
- Click on OK to confirm your settings and close the dialog box.
Triggering the second process
You now need to define how the second process is triggered from the first.
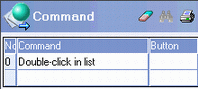
- Click on the Command cell in the first process line. In the Command
table, select "Double-click in list" in the Command cell.
- Click in the Action field.
- Choose "Create Child" in the Action cell and enter 2 in the Process
cell.
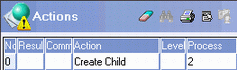
This determines that a double-click on the list in process 1 initiates process 2 as a child of process 1. Selecting a contact in the first process displays the details of the associated company or person in the second process.
- Save the workflow.
Testing process 2
Start the workflow. Double-click on the list in process 1. You should note the following:
- Process 1's display switches to the mask mode (this is the default action defined for a double-click).
- The second process is displayed.
- If you navigate between contact records in process 1, the company/persons displayed in process 2 are updated automatically. However, navigating in process 2 has no effect on process 1.
- Each process is assigned to a level. In order to close a process, close the level. To close the workflow, close the workflow window.
Editing the command
The command defined to open process 2 should be edited as follows:
- A double-click should not cause the display to switch to maskview.
- Process 1 should be locked upon opening process2.
Click in the Action cell in the Command table. Add the following actions to the "Double-click in List" command in process 1:
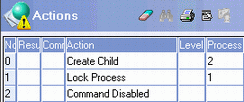
A double-click in process 1 now causes the following actions:
- Child process 2 is started.
- Process 1 is locked and can no longer be edited.
- The default command (switch to mask view on double-click) is suppressed by the "Command Disabled" option.
Unlocking process 1
If you test the workflow in this state, you cannot return to process 1 after exiting process 2. Process 1 remains locked; in order to work with process 1, you need to unlock it once process 2 is closed.
Add the "Close" command to process 2 and associate it with the action to unlock process 1:
Editing the mask and configuring the display
The following changes should be made to process 2:
- Instead of displaying all the persons in a company, only the person entered in the contact selected in process 1 should be displayed.
- The mask used by process 2 should occupy a larger area of the screen.
To do so:
- Edit the definition of process 2:
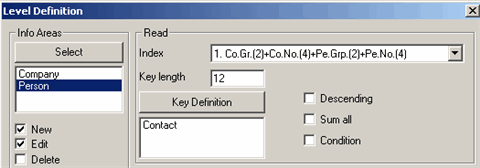
Ensure that you have selected the Person info area from the list of info areas. Select the first index in the list. The key is generated based on the contact selected in process 1, and the key length is 12 (2+4+2+4). This causes the person key to be compared to the contact key over the entire key length, including the places used by the Pe.Grp. and Pe.No. fields. When comparing the first 6 places, only the company keys was compared, and all the persons in the company entered in the contact were displayed.
- Enter the following settings under IntegratedDisplay:

This defines that process 2 should be displayed below process 1, and that 20% of the space available is reserved for process 1.
- Carry out a test run.