Viewing Change Notifications for a Record
You can view the history of change notifications issued for a specific record or watchlist subscribed item.
Similarly you can view the change notifications for all watchlist item subscriptions. This topic describes how to view change notifications issued to all subscribers of a watchlist item.
To view change notifications for a record, perform the following steps:
- Open the record to which you have added the watchlist item.
- Select Menu > Watchlist >
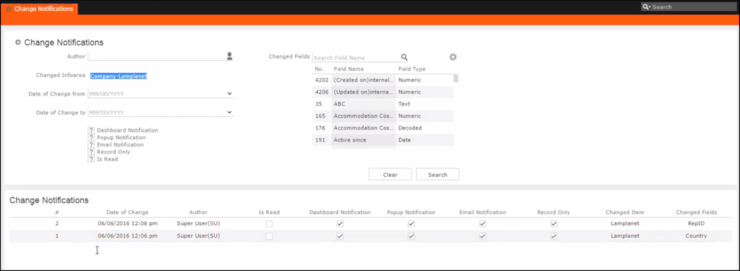
View Change Notifications. The search notification page
displays.
 Note: The Changed Infoarea field is locked to the record for which you are searching for notifications. This field cannot be changed because this function was called from the record’s watchlist menu.
 - To search for specific notifications you can select the filters from the following list:
- Author—Filter the notifications issued to the specified subscriber. Only one person can be selected.
- Changed Infoarea—Not editable. This is restricted to the record you selected.
- Date of Change from—Select the start date from which you want to view notifications issued.
- Date of Change to—Select the end date before which you want to view notifications issued.
-
Changed Fields—Filter the notifications issued for changed
to specific fields. You can select multiple fields from the listed fieldsNote: When you select multiple filters from the above list, the search would select notifications that satisfy all the selected criteria.
- Select the notification type and read status filters from the list of items.
 Note: If multiple filters are selected, then search would select a notification if it satisfies any one of the criteria.
These filters can toggle between the following three states, indicated by the changing icon. You can click on a filter to toggle between the states. The states and their effect on the filter is described below:
-
 —In this state, the filter is
ignored and not included in the search.
 -
 (Blank checkbox)—In this
state, the filter is added as false. This means the notification is selected if
the filter item value is false. For example, for the Is
Read filter, this would mean that a notification is selected if it
is marked as not read.
 -
 (selected checkbox)—In this
state, the filter is added as true. This means the notification is selected if the
filter item value is true. For example, for the Is Read
filter, this would mean that a notification is selected if it is marked as
read.
To select an item perform the following:
- To activate a filter item, click
 . The icon changes to a checkbox(
 ).
). - To set the value of the filter as true, click the checkbox
(
 ). Leave the checkbox
empty (
 ) to set the filter as
false. For example, for the Dashboard Notification filter, setting it to true
(
 ) would mean a
notification is included in the search result, if the dashboard notification type
was configured in the watchlist item generating the notification.
-
- Click Search. The search result is displayed.
- For each item in the search list, you can perform the following tasks:
- Marking the notification item as read.
To mark the item as read:
- Click the Action context menu, and select Mark as
Read. A check mark appears in the Is
Read column for the notification.


- Click the Action context menu, and select Mark as
Read. A check mark appears in the Is
Read column for the notification.
- Viewing the change notification details. To view the details of a change
notification:
- Click the Action context menu, and select
View Change Notification Details.

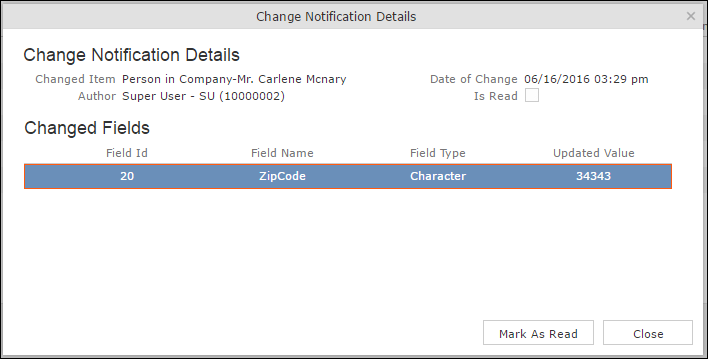
- The Change Notifications Details window displays.

Notice that the changed fields are displayed in the window and you can also mark the notification as read from this window too.
- Click the Action context menu, and select
View Change Notification Details.
- Marking the notification item as read.