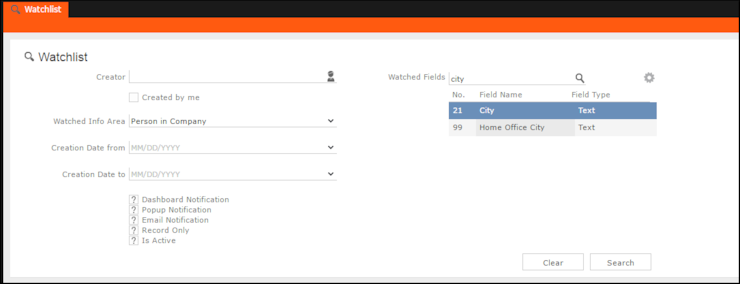
Search watchlist subscriptions
Learn to search the watchlist subscriptions.
To search the watchlist subscriptions, perform the following steps:
- Select Collaboration > Watchlist >
Watchlist Subscriptions. The Watchlist Subscription Search
page displays.

- Select the search filters from the following list:
-
Creator —Filter watchlist subscriptions created by the
specified subscriber. Only one person can be selected. If select the
 filter, the search is
restricted to watchlist items created by you.
 - Watched Info Area—Filter watchlist subscriptions on records from the selected infoarea. The Selected Fields filter is activated and populated with selected fields to be watched when the watch list was created.
-
Selected Fields—Specify the selected fields to be watched
when the watch list was created.Note: The fields populated in this filter depends on the infoarea selected in the Watched Info Area filter. In the example, in the screenshot in step 1, the Watched Info Area is person in company, and the corresponding fields for the infoarea is displayed.
- Date of Change from—Select the start date from which you want to view the subscriptions created.
- Date of Change to—Select the end date before which you want to view the subscriptions created.
-
Creator —Filter watchlist subscriptions created by the
specified subscriber. Only one person can be selected. If select the
- Select the notification type and read status filters of the watchlist subscriptions.
 Note: If multiple filters are selected, then search would select a notification type if it satisfies any one of the criteria.
These filters can toggle between the following three states, indicated by the changing icon. You can click on a filter to toggle between the states. The states and their effect on the filter is described below:
-
 —In this state, the filter is
ignored and not included in the search.
 -
 (Blank checkbox)—In this
state, the filter is added as false. This means the notification is selected if
the filter item value is false. For example, for the Is
Read filter, this would mean that a notification is selected if it
is marked as not read.
 -
 (selected checkbox)—In this
state, the filter is added as true. This means the notification is selected if the
filter item value is true. For example, for the Is Read
filter, this would mean that a notification is selected if it is marked as
read.
To select an item perform the following:
- To activate a filter item, click
 . The icon changes to a checkbox(
 ).
). - To set the value of the filter as true, click the checkbox
(
 ). Leave the checkbox
empty (
 ) to set the filter as
false. For example, for the Dashboard Notification filter, setting it to true
(
 ) would mean a
notification is included in the watchlist item, if the dashboard notification type
was configured in the watchlist item generating the notification.
-
- Click Search. The search result is displayed in the bottom pane.
