Compose Notification
You can use Quick Compose on the Alert Console interface to quickly compose and send Notifications that do not require advanced options. See Create a notification using Quick Compose.
This section discusses the Compose (Advanced) desktop option for creating and sending Notifications. The Notification Editor enables you to compose a Notification with basic information and advanced options including scheduling, escalation override, multiple responses and device retries.
Basic options available for Notifications: (See Compose a basic Notification)
- Choose an optional notification template
- Change the available responses or response limits
- Add recipients
- Set the notification subject
- Include a text message or an audio file
- Attach files
- Set a custom escalation
- Send the notification in additional languages
- Send the notification immediately after composing
Advanced options available for Notifications: (See Add advanced options to a Notification)
- Require recipients to authenticate themselves before receiving the message
- Allow recipients to respond to the notification by calling a Hotline
- Set a priority flag
- Set a maximum number of times a phone call will be retried
- Schedule the notification for later delivery or recurring delivery
- Email results of the notification to yourself or someone else
Compose a basic Notification:
- Ensure the correct team context. See Team Security Context.
- In the left menu bar under Launch Center, click Compose (Advanced). The Notification Editor window appears. The Announcement response template is selected by default.
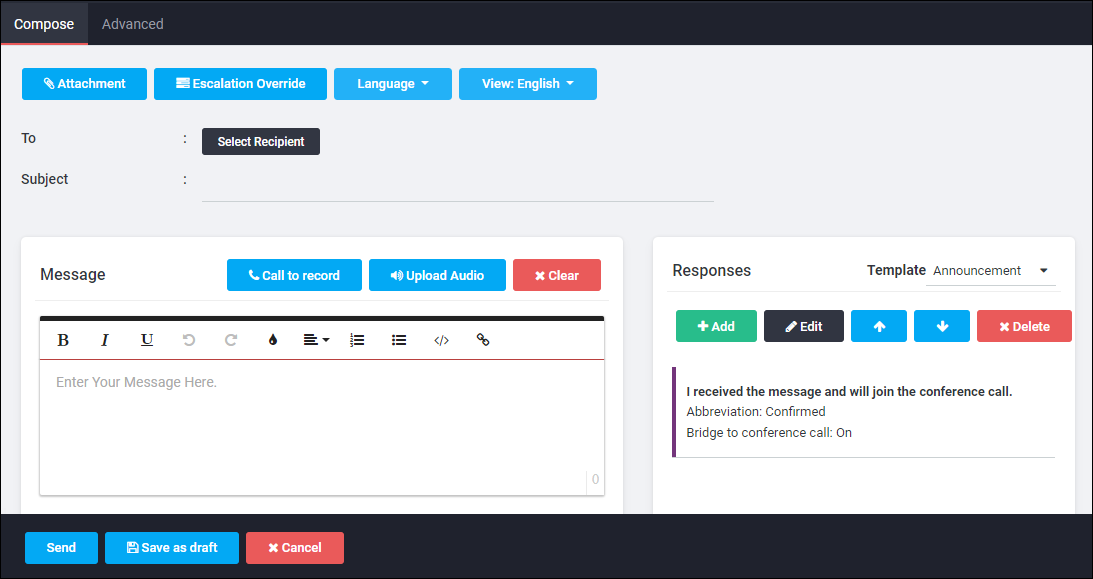
- Select Recipients: To select the users and groups to send this Notification to, click the blue To button. The Recipient Editor window appears.
- Double-click a name to move it to the Recipients section.
- Alternatively, in the Map Selector tab, create a polygon and click Add Polygon(s) button to add it to the Recipients list. All users and Sites located within the polygon(s), and members of the selected team context, will be recipients of the Notification. See Send a notification within a geographical location for more information on using the map-based recipient selection feature.
- (Optional) Select Language: If language packs were purchased by your organization, to send this Notification in other supported languages, click the Language drop-down, click Language Settings and select the languages for this Notification. Click OK to return to the Notification Editor. The following fields will need to be customized for each language selected:
Subject,Message,Responses. To view the Notification as it will appear in another supported language, choose a different language from the View: drop-down list. See Use the Language Settings Editor for additional instructions. - Enter Subject: Type a Subject for the Notification. A subject is required. Notifications cannot be sent without a subject. This field’s value:
- Appears as the subject in email notifications
- Is spoken in phone notifications
- Is displayed on reports and progress pages
- Enter Notification Body: See "Use The Message Pane" for more information. In the Message pane, perform one of the following options:
- Type the text for the Notification message body. This message body is the message that is delivered by text devices (email, fax, and SMS) or spoken by the TTS engine for phone notifications.
- Click Call to record to record a message on the phone
- Click Upload Audio to upload an audio message.
- Edit Response: To use a predefined response template, click Template on the Compose tab. The list of available response templates appears. Select the template to be used. See "Use the Notification Editor" for a list of template types. If you do not want to change the default response template, continue to the next step. Otherwise:
- To create a new response in addition to the default responses, click New. The Response Editor is displayed.
- To edit or add responses or response limits, click the response in the Responses section, then click Edit. The Response Editor is displayed.
- Any changes made to responses apply only for this Notification. See Use the Response Editor for additional details.
- When finished editing responses, click OK to return to the Notification Editor.
- Add attachments: If attachments need to be included with the notification, click Attachment button. When Attachments Editor appears, click Add and browse to the location of the file to attach. See Use the Attachments Editor for additional instructions. When finished adding attachments, click OK to return to the Notification Editor.
- Customize Escalation: To customize the type of devices or the order in which they are contacted, click Escalation Override button. The Escalation Editor displays. See Use the Escalation Editor for additional instructions. When finished editing escalations, click OK to return to the Notification Editor.
- Advanced Options: The Notification should now contain all required information. To add advanced options, follow the instructions under Add advanced options to a Notification.
- Finish Notification: To complete the Notification, do one of the following:
- Click Send to immediately begin sending the Notification.
- Click Save as Draft to save the Notification. It can be edited further, scheduled for delivery at a specific time (or at a recurring time), or sent at a later time. Draft Notifications are located on the Scheduled Notifications page.
- Click Cancel to discard this Notification.
Add advanced options to a Notification:
After completing the basic options for a notification (see Compose a basic Notification), use the Advanced Options tab to add additional options to the notification.
- Click Advanced Options in the Notification Editor.

- To send email results of this notification, click Email Status. The Email Results Editor is displayed.
- Click Email to: and then type the email address(es) of the recipients in the field.
- Enter the number of hours after which the results will be emailed. Must be a whole number 1 or greater.
- Click OK to return to the Notification Editor.
- To set a priority flag for the notification, click the priority drop-down next to Normal and select a value.
Selecting a priority value that is higher than your organization’s other active notifications’ priorities, dynamically changes the delivery rate for all your organization’s active notifications, giving this notification a faster delivery rate compared to lower priority notifications. The default priority is
Normal Priority.

- To make the notification recipients enter a PIN to hear or read the message, click Require PIN. Toggle this button on (darkened) or off (lightened) to enable a PIN for recipients to hear or read the message.
- Choose whether to allow recipients to respond to this notification by calling a Hotline. To enable this option, click Hotline. The Hotline Call Back Editor window displays. Select the type of Hotline callback instructions the recipient receives. Options are:
- Use user default Hotline phone number
- Use all Hotlines
- Do not allow responses through Hotlines
- Click Save to return to the Notification Editor.
- Set the maximum number of times a phone call will be retried for this notification. Click Device Retry. Choose the system default retry setting, or choose a specific number of retries. If this value is set to zero, the call is made once, but not retried. Click OK to return to the Notification Editor.
- Choose to send the notification now, save it to send manually later, send it on a schedule, or create a recurrence pattern for notifications to be sent multiple times.
| Sending option | Description |
|---|---|
| To send the notification now | Click Send. |
| To save this notification to manually send later | Click Save as Draft. Send it later by following the instructions under Manually Send a Notification. |
| To schedule this notification for delivery at a future date or time, or to add a recurrence pattern, click Scheduling. |
|