Activity and Time Management Activities (CRM #11001)
Learn to manage activity and time and plan witsit wit map support.
Activities (MA)
Overview
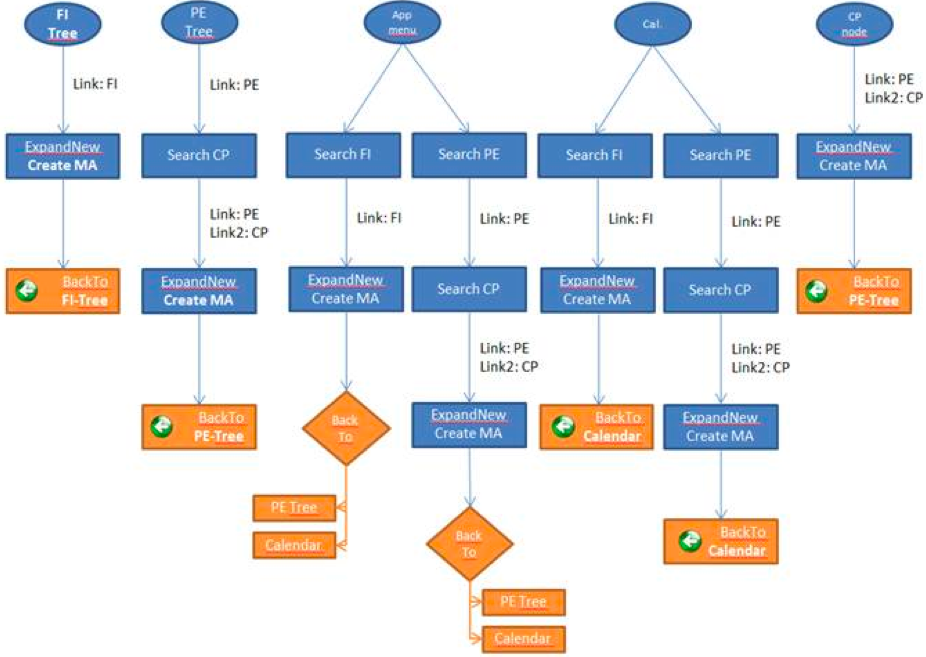
Callable from
FI Tree – MA node
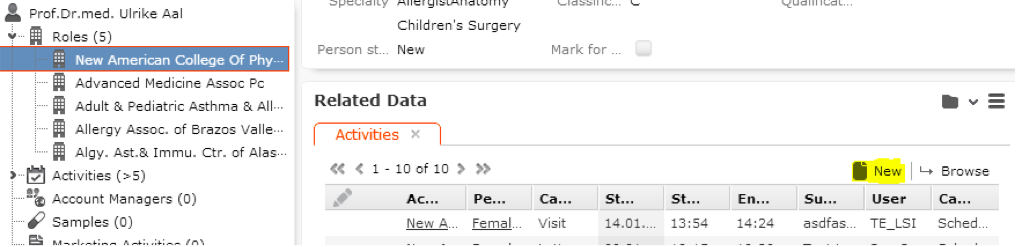
Here we want to achieve that a MA record is added to a parent FI record. The "NewCommand" button is used to open the new page within the tree and set the link to the company.

PE Tree – MA node
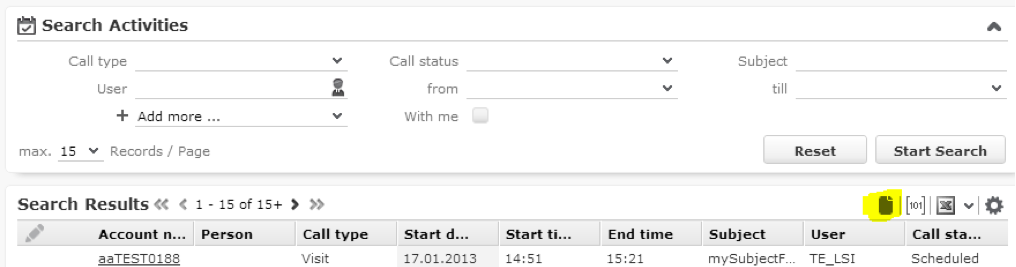
In this case we want to achieve that a MA record is linked to a parent PE record. For this a new “TE_MA_NewFromPETree” button was created. This button opens the MA process in the corresponding process step.

PE Tree – CP node – Related Data MA
Here want to achieve that a MA record is linked to a CP record and a parent PE record. The new “TE_MA_NewFromCPRecord” button was created for this reason. This button opens the MA process in the corresponding process step.
App. Menu – MA Search
Here we want to achieve that a MA record is created with no linked record. You have to walk through the whole MA process where you can choose if you want to create a record for FI or PE.
App. Menu – Calendar View
Here we want to achieve that a MA record is created with no linked record. You have to walk through the whole MA process where you can choose if you want to create a record for FI or PE.
Buttons
• TE_MA_NewFromPETree
Executes the action template.
• TE_MA_NewFromCPRecord
Executes the action template.
• TE_MA_NewFromMASearch
Executes the action template.
Menu actions
Filters
• MA.TE_Accounts
• MA.TE_Complete
• MA.TE_Persons
• MA.TE_Scheduled
Processes
-
New Activity
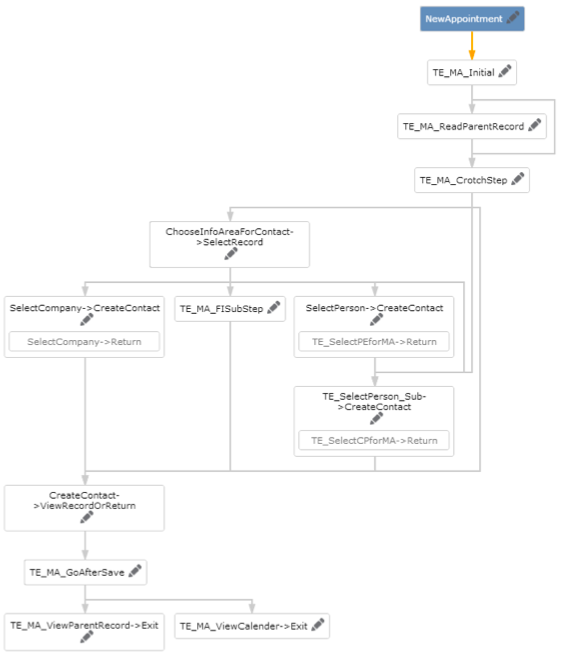
Here you can see the process overview of the new activity process.
-
TE_MA_GoAfterSave Process Ask page
Depending on the variable “ToggleButtonName” one of the 3 conditions can be true and displays the button. This value is set in the steps while choosing the parent record.
Process steps
-
TE_MA_Initial
This step is used as initial step and distinguishes whether a record id is selected or not. If there is a record ( in this case a CP record) then the next step is “TE_MA_ReadParentRecord”,
-
TE_MA_ReadParentRecord
This step is only responsible for obtaining the parent record from a CP record. So this step is only needed if you click on the new button in a related MA info area of CP. A separate data provider was defined which reads the parent record.
With “step.get(“DataProvider.$”).uid you get the uid of the requested parent.
-
TE_MA_CrotchStep
This step is dispatching to the next step depending on the passed entry point value. (See created buttons)
-
TE_MA_GoAfterSave
This step is responsible for handling the button events from the process ask page.
The “ToggleButtonName” value is used in the Process Ask page to differentiate between parent records. (Account, Person or Favourite). Depending on the button event from the Process Ask page the dispatching calls the step for viewing the parent record or the calendar view.
-
TE_MA_ViewParentRecord->Exit
This step is responsible for viewing the parent record of the created activity record. The process ends with this step.
-
TE_MA_ViewCalender->Exit
This step is responsible for viewing the created activity record in calendar view. The process ends with this step.
-
CreateContact->ViewRecordOrReturn
This step creates an activity. Copied to configuration, adds the variable "curRecordUid" which includes the uid from the created activity record in the process storage.
-
SelectCompany->CreateContact
Creates an appointment for a company, copied to configuration, adds the variable "parentUid" which includes the uid from the selected record (parent for the following activity) in the process storage.
The “ToggleButtonName” variable is used in the Process Ask page to differentiate between which button should be displayed!
-
SelectFavorite->CreateContact
Create an appointment for a favorite entry, copied to configuration, adds the variable "parentUid" which includes the uid from the selected record (parent for the following activity) in the process storage.
The “ToggleButtonName” variable is used in the Process Ask page to differentiate between which
button should be displayed!
- SelectPerson->CreateContact
Creates an appointment for a person, copied to configuration, adds the variable "parentUid" which includes the uid from the selected record (parent for the following activity) in the process storage.
The “ToggleButtonName” variable is used in the Process Ask page to differentiate between which button should be displayed!
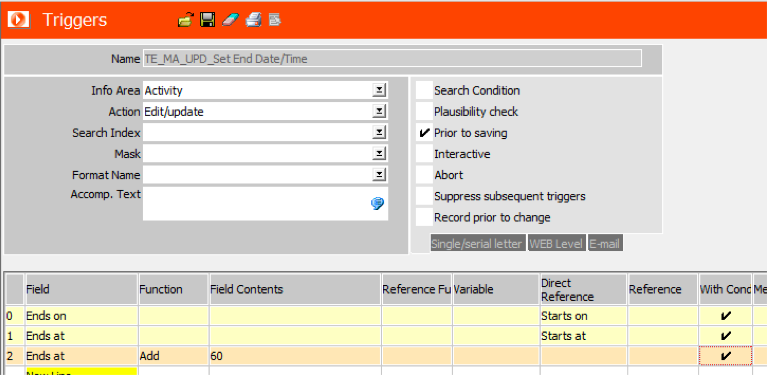
Trigger for “Ends on” and “Ends at” Settings (PVCS # 81887)
The TE_MA_DV_Call default value trigger contained the “Ends on” and “Ends at” fields in earlier versions. This caused problems when new activities were added from the calendar.
We are adding 60 minutes to the “ends at” time. The condition for the “ends on” and “ends at” fields must be empty.
Other Appointments (A3)
Callable from
-
Application menu > Daily business > Other appointment
-
Sales start page
-
Management start page
-
Access via calendar
New A3 records can also be created via the calendar from the context menu opened either from the “New Calendar Entry” header button or when double-clicking in the calendar area.
Buttons
TE_A3_SetStatusAccepted
-
Calls the “TE_A3_UPD_Set status to accepted” trigger
-
Uid = Record
TE_A3_SetStatusDenied
-
Calls the “TE_A3_UPD_Set status to denied” trigger
-
Uid = Record
-
Filters
A3.TE_OtherAppointmentsToApprove
-
Used on the sales management start page
-
Filters all approved or denied other appointments for a user in the next 4 weeks
Queries
TE_A3_MyApprovedOtherAppointments
-
Used on the sales start page
-
Filters all approved or denied other appointments for a user in the next 4 weeks
Forms
TE_A3_OtherAppointments
-
Consists of the SearchView widget and the ExpandView widget below, both based on the A3 field group. It can be accessed using the Daily Business -> Other Appointments application menu entry.
Approval process
-
Other appointments in “Holiday” type need approval by superior (manager). Functionality has been implemented in the start pages of sales and sales managers. If managers use the Approve and Reject buttons then they can make a decision about the requested holiday, etc., and the employee is informed about it on his start page.
Call Planning
Technical Intro
This tool is mainly used by sales or technical reps to plan their customer visits in the near future in a fully automated way. The best customers are selected from a large pool of customers based on their priority, actual and target visits, location and opening times.
The aim is to save planning time, optimize driving distances, increase the number of visits per day and make sure that the visit quotas are met.
Quick Setup
- Create the “Use geo-coordinates” parameter (link).
-
Fill it with the QueriesInfo XML (link).
PROBLEMS?
If something does not seem to be working correctly check out the Troubleshooting section in the User Guide.
The Call Planning lets you generate an optimized route to visit your customers one or more days in advance. You can also use it to plan the actual day from the actual time onwards, for instance to find the next best customer to replace a canceled meeting.
You are still in control of who you want to visit and when with the Call Planning. It merely suggests the most efficient way so you don’t have to worry about hundreds of different customer opening hours, geographical proximity, or your sales targets. In just a few seconds you are presented with an optimized sequence of suggested activities that you can convieniently see on a map, edit and turn into real activities.
In case you already planned some activities in your calendar, they are taken into account and the suggested activities are geographically optimized. You can use this feature to easily fill your day if you already planned some activities manually but still have some time between them.
Back office employees can also use it to plan activities for other reps if the rights are set accordingly.
Start GUI
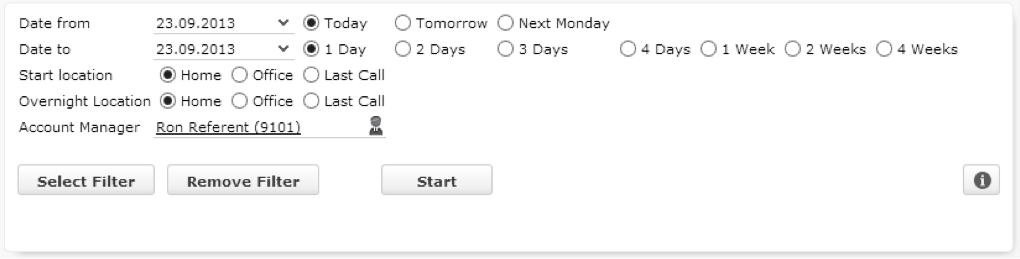
Quick start:
- Select when you want to start.
- Select the number of days for your route.
- Select where you want to start from.
- Select if you want to make a round trip (Last Call).
- Press Start.
Selecting a Start and End Date
The “Today/Tomorrow/Next Monday” and “1/2/3/4 Days” or “1/2/4 weeks” radio buttons allow you to define the start as well as the end date without directly changing the date fields. You can also edit the date fields.
If “Today” is checked, today’s day is planned starting from the current user’s local client time. Example: If it is 14:30 and you execute the call planning for “today”, then your day is planned from 14:30 on.
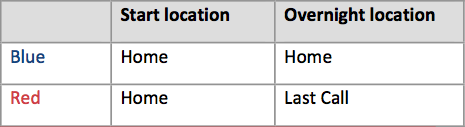
Selecting the Start Location
With the “Start location” option you can choose whether your route should start
-
from home (address/coordinates must be specified in the ID/user mask),
-
or from your office (address/coordinates must be specified in the company related to the ID/user
mask),
-
or from your last call/visit (as specified in your calendar).
The last call is the last call of your calendar just before a given point in time. For instance, if you selected Start location = last call, and you plan your route for today (Monday), then your last call is the last call you did the previous Friday. If you plan that route for 3 days with Overnight location = last call, then when planning the Tuesday, the last call is the last call planned by the Call Planning on Monday. If you start the Call Planning with today and last call, and it’s 11 am, the last call is the one planned for that day at 10 am, for instance.
Planning More than 1 Day
“Overnight location” is used within a multiple day trip to decide from where to start the days from the 2nd day on: home, office or last call.
When planning more than 1 day you can configure not only the start location of your trip but also where you want the 2nd and the following days to start. Select “Last Call” if you want to make a round trip through your territory without starting every day from your home or office address.
Note that if you want to remain flexible with your planning (i.e. if you need to get unexpected high priority activities you need to take care of from time to time), it may be better not to plan to far ahead in time. Instead use the call planning more frequently in order to let it plan “around” your unexpected activities.
Filtering the Pool of Customers to Visit
As a rep you have a set of customers that are assigned to you and that you should visit, probably according to KPIs. It may happen that for a particular trip you want to restrict your visit to a specific area in your territory or to a specific type of customers. You can do this by adding a filter to your customer pool. Possible use cases:
-
Visit a specific territory area
-
Visit a specific group of customers (by type, revenue, etc)
-
Visit customers with a (active) ticket
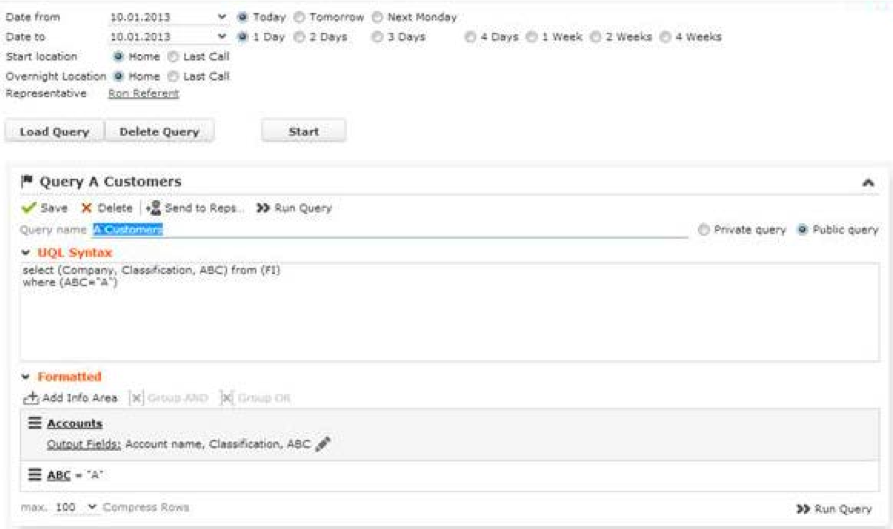
By clicking “Select Filter” you can load predefined filters or define your own ones in order to restrict the target group.
The „Remove Filter“button removes a selected filter (if present) from the mask and the query editor component. It does not delete the filter from the system.
Starting the Planning Procedure
The “Start” button starts the planning process and leads to a new tab that displays the results from the U005 info area for the specified user. These results can be edited before they are used to create “real” calls (MA).
Bug Reporting
If you encounter problems and need to open a call with the helpdesk, send the content displayed after clicking the “i” (info) button along with the call.
Route Planning GUI
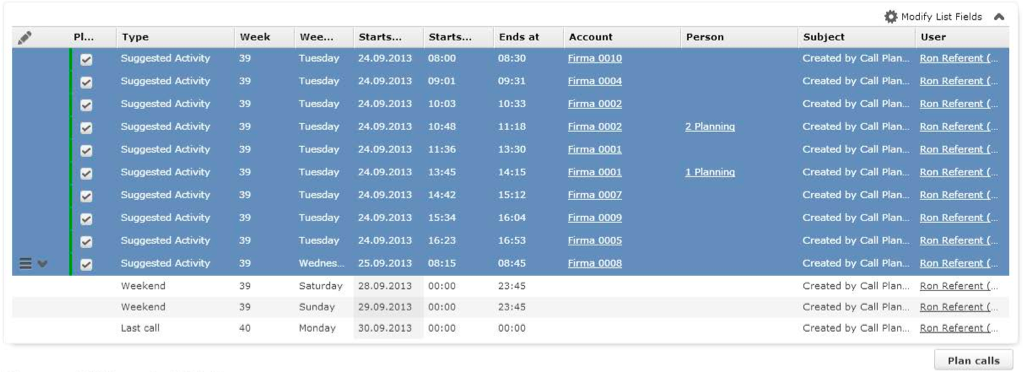
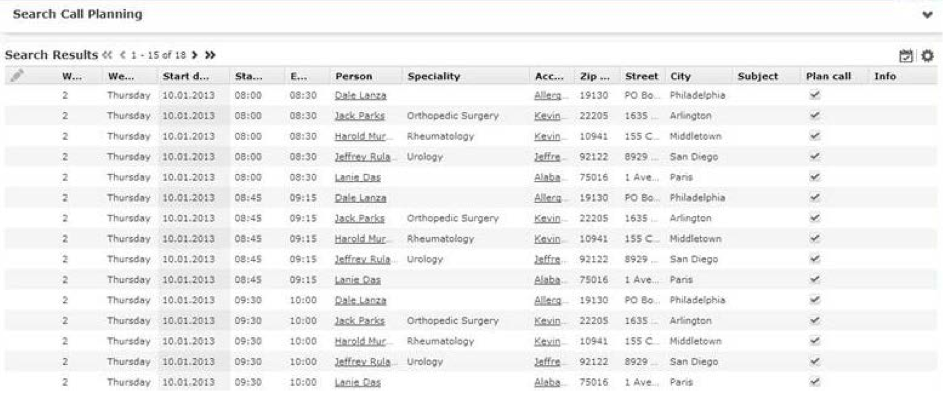
A few seconds (depending on your system) after you click the “Start” button, a result list with a map is displayed. These are suggested calls: these calls are not yet in your calendar, you can now modify them and choose which ones should be added to your calendar.
Suggested Activities and Placeholders in the Result List
The result list may display the following entries (Type column):
-
Suggested Activity: these are the temporary activities or calls that can be transferred to your calendar. The Start, End and Subject fields can be edited. If you modify the start and end times or dates, you need to make sure yourself that the affected calls can still be reached in time.
-
Home / Office: a placeholder for the start location. It is only displayed if Home (address defined in the User record “ID”) and / or Office (address defined in the Company “FI” linked to User record) have valid coordinates.
-
Weekend / Holiday: a placeholder for the weekends or holidays. Weekend are those days where you don’t work: by default Saturday and Sunday, or as defined in the user mask (ID).
-
Calendar activity: an activity already in your calendar. If this activity has valid coordinates, the route is optimized towards it.
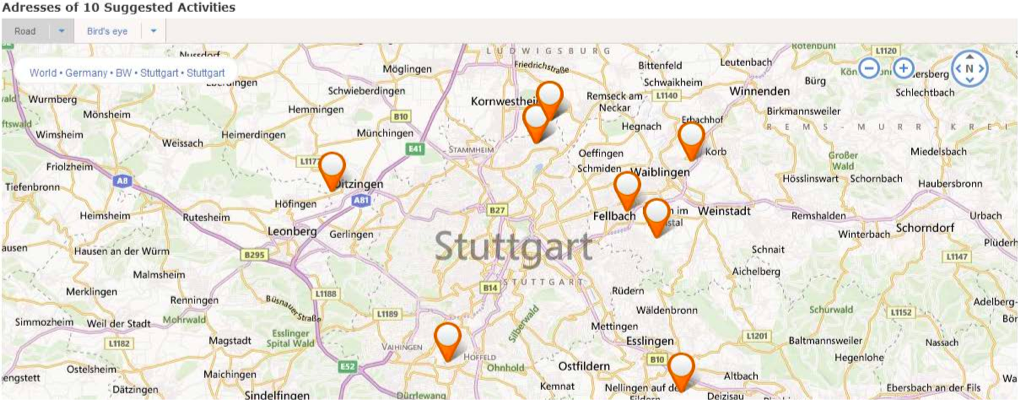
Displaying Suggested Calls on the Map
Select one or more suggested activities or calendar activities (using SHIFT or CTRL) to display them on the map.
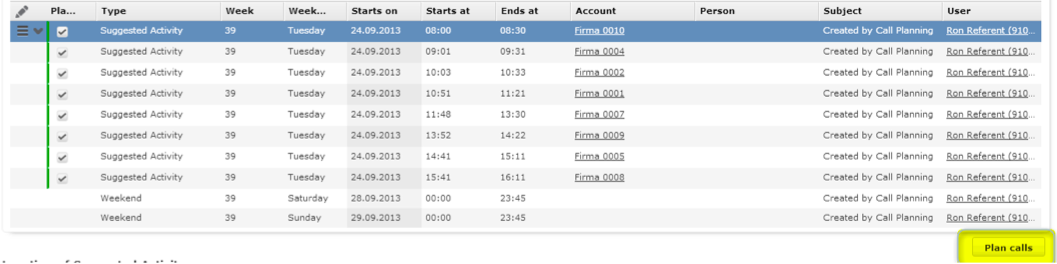
Transferring Suggested Activities to your Calendar
Check the “Plan Visit” box from the suggested activities that you want transferred to your calendar and click “Plan calls”. You can check the “Plan visit” box:
• using the edit-in-list functionality
• by selecting the activities and clicking on the context menu and selecting “Plan call”

Rep Working Hours
Standard working hours for a user are from 8:00 – 17:00, without lunch break. Saturday and Sunday are defined as non-working days.
The working days and times can be set for each user individually within the user (ID) mask.
-
The “Individual working hours” box must be checked,
-
For each working day, the hours must be given,
-
For non-working days, leave time fields empty.
Afternoon To is the last possible time at which a rep can be at a call.
In the call planning, a day begins at the chosen start location at the “Morning From” time, but ends at “Afternoon To” with the last call (without the way home). I.e., if you choose “Home” and Morning From = 8:00, then you’ll start from your Home at 8:00 (so you won’t be at your first visit at 8:00).
Customer Visiting Times
By default, customers are open from 8:00 to 17:00 from Monday to Friday. If the candidate query is configured accordingly, individual visiting times can be configured for each customer.
To define visit times for a customer you can:
• Define no times at all at customer level: default times are used.
• Define one or more days where the customer is open. As soon as the visit times for at least one day are defined, the other days that are not defined are treated as closed.
Definitions
Mode: 1 or 2, indicates whether the call planning is executed with bee-line distance (1), or with street level optimization (2).
Candidates: a set of possible records for the rep to visit. Represents the pool of records from which the Call Planning tool chooses the best elements to visit from.
QueriesInfo XML: an XML that defines which designer queries to use for the algorithm and how to assign variables. See below.
Priority bonus: the “bonus” a candidate receives based on its actual-to-target visits and classification. Distance malus: the “malus” a candidate gets from the distance to the previous and next visits.
Waiting time malus: the “malus” a candidate gets from the time the rep wastes waiting for the candidate to open (if the candidate is closed / absent at the time the reps arrives).
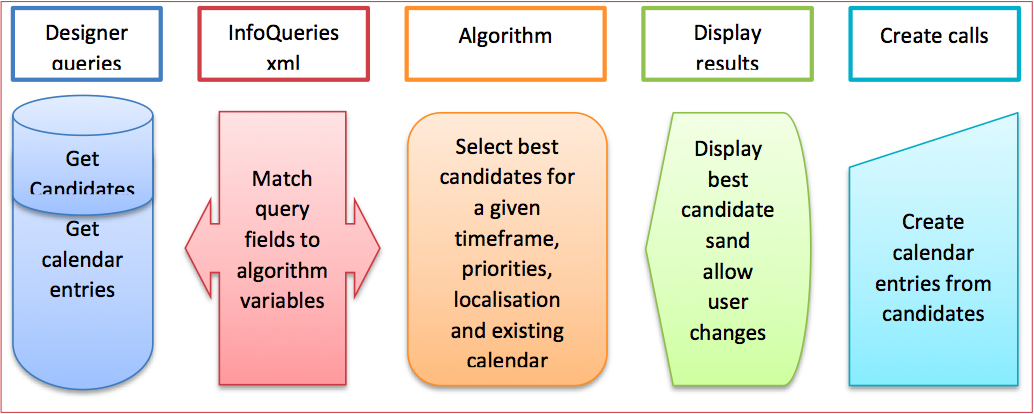
Overview Workflows
General Workflow Overview
Algorithm Workflow
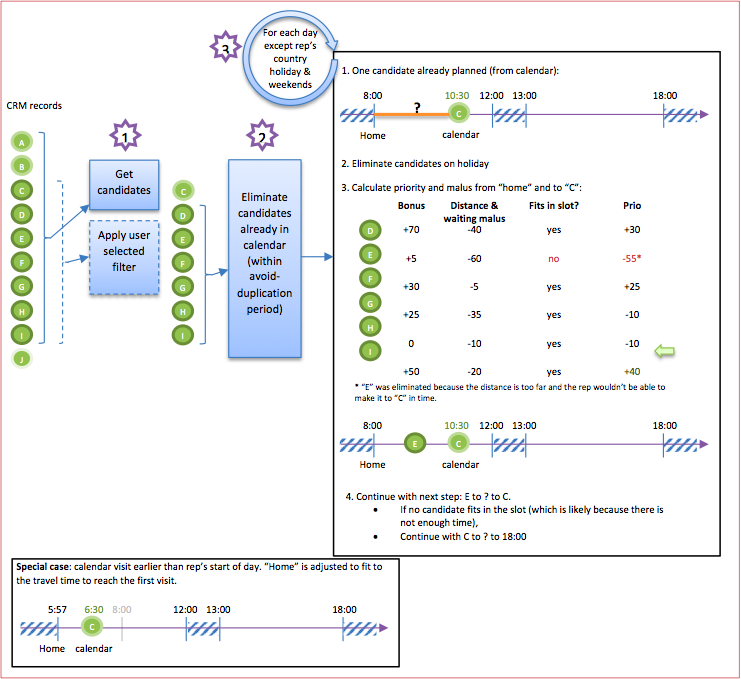
Distance Optimization Algorithm
To simplify the following example, we assume that all candidates have the same priority and are always open, and that the rep can do 4 visits per day.
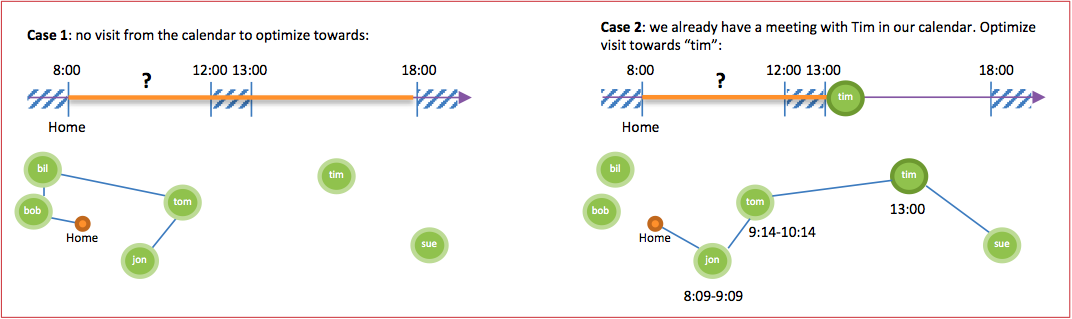
For each day except rep’s country holiday & weekends
Table shows travel time in minutes:
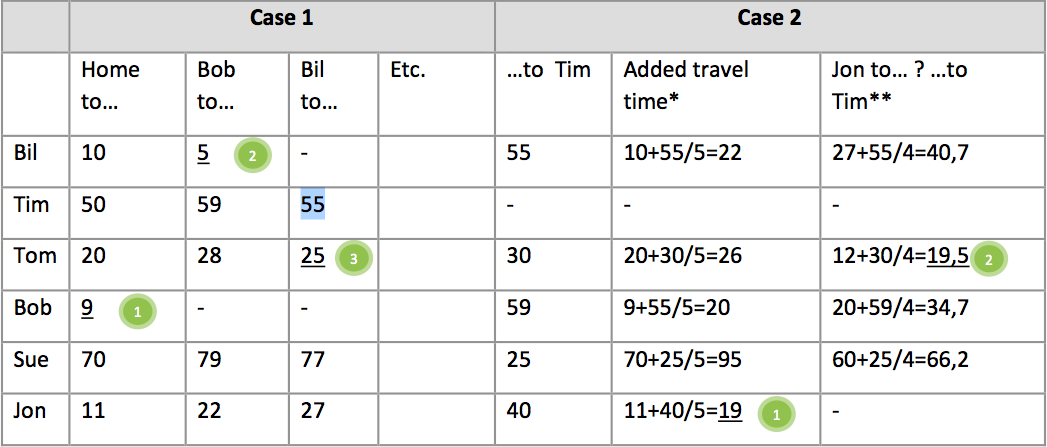
*We add the travel time from Home to the potential candidates and from that candidate to the next planned visit (Tim). Since the meeting with Tim is more than 2 hours away (from 8:00), we divide the distance by the amount of hours between now (8:00) and the meeting with Tim: 13:00-8:00=5 hours.
**To calculate the best candidate we take the distance from Jon and to Tim. We divide that last distance by 4 (13:00-9:09). The meeting with Tom finishes at 10:14 and the rep’s break is at 12:00 which leaves 1:46: not enough for another visit in between.
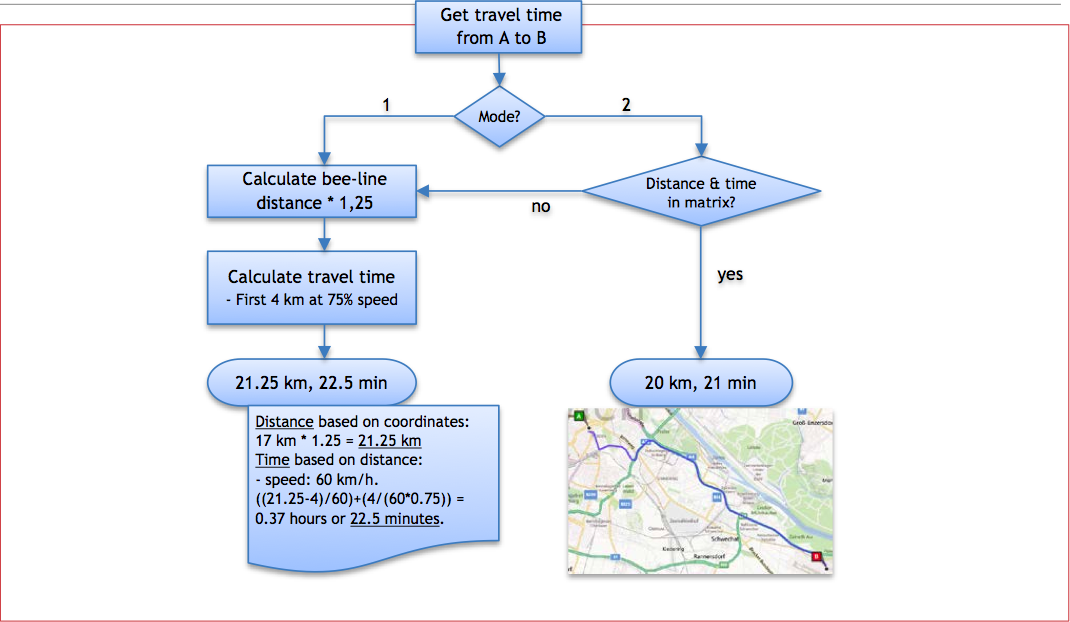
Distance and Time Calculation Workflow
The distance and travel time between 2 points can be retrieved from the distance matrix (mode 2) or calculated on-the-fly by the algorithm (mode 1 or as backup in mode 2).
Components
Buttons
TE_LSI_PB_CallPlanning_CreatePlan
The „Create Calls“button (located in the table header) processes the route planning on the server- side with all selected entries (“Plan call” column checked)
Main Form

Filters
U005.TE_CallPlaning:
This filter is transferred to the search mask as „FixedFilter“. So only records are shown where the current user equals U005.USER.
Forms
TE_LSI_CallPlanning
Masks
List View U005
Configuration
Checklist

Where to set the Parameters
Log on as e.g. “SU9501” to set parameters:
How to Set the Parameters
- Each rep is assigned to a country.
- The LSI configuration parameters must be set for that country.
- One or more options can be set for each selected parameter.
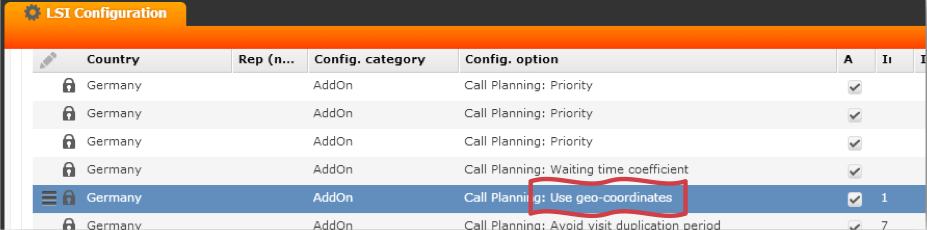
- Some parameters can be defined multiple times per country (like Priority, see screenshot above, because you usually have a value for A, B and C or even more).
If no parameters are set for a rep’s country, then the default values is used (see below).
The call planning only works if at least the “Use geo-coordinates” parameter and the “Integer 1” and “Customer parameter” fields are set!
It is recommended to only set the parameters that really need to be changed.
-
The first level of the bullets below describes the Config option,
-
the second level describes which fields can set.
Default values in “()”.
-
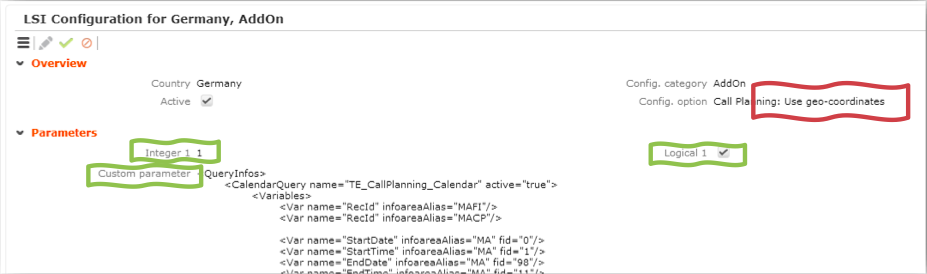
Use geo-coordinates: set depending on what your system supports (check with your Aurea CRM project manager).
- Integer 1 / Mode: (1) defines if the system has access to geo-coding and
route-optimization.
- 1: geo-coding available, a route-optimization based on bee-line distances is performed.
-
2: geo-coding and street-level route optimization is performed (distance matrix required).
- Customer parameter / QueriesInfo: (empty) an XML-structured text that set the candidate and calendar queries and assigns variables and filters.
- Logical 1: (unchecked) an optional checkbox that can be checked in order to display information on how the candidates were selected (in each temp call (U005) description).
-
Default times: default customer’s visiting hours if no custom times defined. o Time 1: start of day (08:00)
o Time 2 (optional): end of morning (00:00)
o Time 3 (optional): start of afternoon (00:00) o Time 4: end of day (17:00)
-
Call duration: duration of a visit.
o Integer 1: duration in minutes (30)
-
Call time-out: time after a call (i.e. small break).
o Integer 1: duration in minutes (15)
-
Waiting time coefficient: importance you give to wasted time waiting for the customer to open
(early arrival). A higher number results in less waiting time. o Decimal 1: (1)
-
Priority coefficient: importance you give to the priority (see Algorithm workflow). A higher number puts the focus on important visit.
o Decimal 1: (0.2)
-
Priority: coefficient that multiplies the priority number obtained with the target and actual visits per year to give them more or less importance (if the user entered an “Indiv. Target/Year”, it is used instead of the standard target/year). This parameter can be entered multiple times, once for each letter of the ABC classification. If a record is not classified, it is designated as “-”. The system uses A, B, and C by default. The coefficient for “-“ being 0 (resulting in a priority of 0).
o Text 1: (A; B; C)
o Decimal 1: (1; 0.5; 0.25)
-
Avoid visit duplication period: if “3” is entered, the system gets all customers the rep visited
in the last 3 days or plans to visit in the next 3 days, and discard them from the possible customers to visit to avoid visiting the same customer twice in that period.
o Integer 1: duration in days (7)
-
Subject: text to be written in the planned calls’ subject.
o Text 1: (created by Call Planning)
-
No planning: if checked, the “Plan Call” checkbox is not checked by default.
o Logical 1: (unchecked).
-
Travel speed (only for bee-line mode): mean speed in km/h the rep is travelling between visits.
-
Integer 1: (60)
-
Distance coefficient: importance you give to the distance between locations. A higher number results in shorter travel distances (giving less importance to priority).
o Decimal 1: (5)
Release notes:
The main query can now be defined within the designer. The following parameters are deprecated and can be removed: Visit time (switch between visit and open time), User Working Hours (now defined in ID), Max suggestions per time slot (since mode 0 is deprecated).
Defining the QueriesInfo
Overview
This setting must be defined in the “customer parameter” field of the “Use geo-coordinates” parameter (see Configuration Parameters section).
It defines which designer query to use to load the pool of potential records (candidates) the rep must visit as well as the designer query that gets the visits already planned in the rep’s calendar.
It is also used to assign variables used by the CallPlanning to the data returned by the queries. Finally it matchs rep-definable parameters to a query’s info area and field.
XML structure
<QueryInfos>
    <CalendarQuery name="designerQueryName" active="true">
        <Variables>
            <Var name="fromEnum" infoareaAlias="fromQuery"/>
        </Variables>
        <Filters>
            <Filter name=" fromEnum" operator="xxx" infoarea="fromQuery" fid="fromQuery"/>
        </Filters>
    </CalendarQuery>

    <CandidatesQuery name=" designerQueryName" active="true">
        <Variables>
            <Var name=" fromEnum" infoareaAlias="fromQuery"/>
        </Variables>
        <Filters>
            <Filter name=" fromEnum" operator="xxx" infoarea="fromQuery" fid="fromQuery"/>
        </Filters>
    </CandidatesQuery>
</QueryInfos>Variables
The algorithm uses some information from records to calculate the distance between records, their priority and opening time. Since the queries can be freely defined in the designer we need to tell the algorithm where to look for the information.
Calen.: The variable can be used in the Calendar query.
Candid.: The variable can be used in the Candidate query.
Attributes: The attributes that must be defined for a variable.
| Cal en. | Ca ndi d. | Available variables | Attributes | Type | Purpose |
|---|---|---|---|---|---|
| x | x | RecId | info areaAlias | n/a | Mandatory. Identifies the info area that holds the unique RecordId for a candidate to avoid duplicates and match candidates to possible records from the calendar. Multiple entries allowed (see example below). The info area (not alias!) from both candidate and calendar queries must match. |
| x | x | Longitude | info areaAlias, fid | coord | Mandatory if mode = 1 or 2. Assign to the geo- coordinates fields. |
| x | x | Latitude | |||
| x | ActualVisits | info areaAlias, fid | Int | Optional. Used for the priority calculation. If defined multiple times, “0” values overwrite preceding ones. | |
| x | TargetVisits | info areaAlias, fid | Int | Optional. Used for the priority calculation. If defined multiple times, “0” values do not overwrite preceding ones. |
| Cal en. | Ca ndi d. | Available variables | Attributes | Type | Purpose | |
|---|---|---|---|---|---|---|
| x | ABC | info areaAlias, fid | String or catalog | Optional. Used for the priority calculation. | ||
| x | OpenWeekday | info areaAlias, fid | Int | Option al. Use to retrieve the openin g / visit times. | OpenWeekDay must be in 1st position of the block! The weekday (1 to 7) to which the times below belong to. | |
| x | OpenMorFrom | info areaAlias, fid | Time | Morning From time. | ||
| x | OpenMorTo | info areaAlias, fid | Time | Morning To time. | ||
| x | OpenAftFrom | info areaAlias, fid | Time | Afternoon From time. | ||
| x | OpenAftTo | info areaAlias, fid | Time | Afternoon To time. | ||
| x | HolFrom | info areaAlias, fid | Date | Option al. Use to retrieve the holiday s | Holiday start date. | |
| x | HolTo | info areaAlias, fid | Date | Holiday end date. | ||
| x | StartDate | info areaAlias, fid | Date | Always define the Date var before the Time. | ||
| x | StartTime | info areaAlias, fid | Time | |||
| x | EndDate | info areaAlias, fid | Date | Always define the Date var before the Time. | ||
| x | EndTime | info areaAlias, fid | Time | |||
The variables above can be defined more than once per query. The lower they are in the XML definition, the higher their prio. Meaning the outcome (or value) of the 2nd definition of the variable overwrites the 1st one, the 3rd overwrites the 2nd and so forth.
A higher prio definition of the same variable overwrites the previous one by default if its outcome is not null (i.e. if a records was found). There can be an exception to that rule (as for TargetVisits), see the table above.
Example
Let’s say you want your reps to visit FIs or CPs that are linked to an SB and also have a KPI record. The actual visits and target visits used to calculate a record’s priority are located for example in the KPI records.
Our query looks like this (kpi = U007):

And the CandidatesQuery’s variables contain:

Since we defined the Actual and TargetVisits for FI before those for CP, the ones for CP has a higher prio, if of course we have a CP record.
Outcome:

Row1: SBFIU007 and SBCPU0071 are both not null, so SBCPU0071 is used (2nd in variable definition).
Row2 and Row3: SBCPU0071 is null, so SBFIU007 is used.
Filters
Most conditions are defined directly in the designer queries but there are 2 exceptions: in the CallPlanning GUI the rep can choose for whom the CallPlanning should be executed. We need to map the selected User and its BusinessArea to the desired info areas and fields.
| Cal en. | Ca ndi d. | Availab le filters | Attributes | Type | Purpose |
|---|---|---|---|---|---|
| x | x | RepId | Operator + info areaAlias or info area + fid | User id | Mandatory. Filter records by selected repId. |
| x | x | RepBu | Catalog | Optional. Additional filter records by selected rep’s business area. |
| Cal en. | Ca ndi d. | Available filters | Attributes | Type | Purpose |
|---|---|---|---|---|---|
| x | StartDa te | info areaAlias or info area + fid | Date | Mandatory (performance issues may arise if filter is not set). Limits the selected calendar records to the specified period. |
Operator: Can be any of the query operators supported by Aurea CRM, e.g. =, <, <=, etc...
Info areaAlias or info area: If the alias is used, then the condition is only applied to one info area. If info area is used, the condition is applied to all info areas of the given name.
Fid: The field id, e.g. 3 or 5001.
Filter addition: If the same filter is defined many times for one info area (different fields), the filters are added using AND.
Example
If we executed the example above, we would get all records the user can see, plus the user selection from the CallPlanning GUI would not work. To fix that we use filter for the root info area (SB).
Our query looks like this (kpi = U007):

And the CandidatesQuery’s Filters contain:

Outcome: the user only sees the SB records “where SB.5 = selectedRep.id and SB.56 = selectedRep.bu”.
Candidates Query
Now that we know which variables and filters are available and how they work, we can design the query that provides the algorithm with a pool of records (candidates) from which it selects the best ones (see Algorithm workflow).
The query typically consists of:
-
A mandatory („with“) info area and one or more optional („plus“) info areas where the coordinates, actual and target visits, and classification information is located.
-
An optional info area where the opening times are located (typically “CT”).
See the full example below.
Calendar Query
The calendar query is used to retrieve the records already planned in the rep’s calendar. They are used:
- as placeholders to block time slots,
- to optimize the distance of potential candidates towards these planned records,
- and to avoid the duplicate planning of records during a given period of time. Note: You must make sure that the main info area from the candidate query (referenced in the RecId variable) is the same as the info area in the calendar query. The RecId variables from both queries must reference the same info areas (the alias itself can be different).
Full Example
Here is a full example for a candidate query based on SB with mandatory FI and optional U007 (KPI) and optional CT (opening times).
Candidate query (‘TE_CallPlanning_SB_KPI’ as shipped with the LSI template).

CT: Remember to filter the type of time (opening, visit, etc). Otherwise the records of different types overwrites each other. The CT table is used for contact times. If no CT records are found, then the parent record is considered as always open. If a CT record is found for a particular day but has no date defined, the record is considered as closed for that day (open from 0:00 to 0:00). The CT table is also used for holidays. Every record contains a period from-to where the parent is on holiday (closed). When using the Call Planning in mode 1 or 2, always use a where clause for the record holding the coordinates to exclude records with no coordinates (see statement above).
Calendar query (‘TE_CallPlanning_Calendar’ as shipped with the LSI template).

QueryInfos
See Config parameters on how to save the xml below.
<QueryInfos>
    <CalendarQuery name="TE_CallPlanning_Calendar" active="true">
        <Variables>
            <Var name="RecId" infoareaAlias="MAFI"/>
            <Var name="StartDate" infoareaAlias="MA" fid="0"/>
            <Var name="StartTime" infoareaAlias="MA" fid="1"/>
            <Var name="EndDate" infoareaAlias="MA" fid="98"/>
            <Var name="EndTime" infoareaAlias="MA" fid="11"/>
            <Var name="Longitude" infoareaAlias="MAFI" fid="204"/>
            <Var name="Latitude" infoareaAlias="MAFI" fid="203"/>
        </Variables>
        <Filters>
            <Filter name="RepId" operator="=" infoarea="MA" fid="15"/>
            <Filter name="StartDate" operator="=" infoarea="MA" fid="0"/>
        </Filters>
    </CalendarQuery>


    <CandidatesQuery name="TE_CallPlanning_SB_KPI" active="true">
        <Variables>
            <Var name="RecId" infoareaAlias="SBFI"/>
            <Var name="RecId" infoareaAlias="SBCP"/>
            <Var name="ActualVisits" infoareaAlias="SBFIU007" fid="5016"/>
            <Var name="TargetVisits" infoareaAlias="SBFIU007" fid="5015"/>
            <Var name="TargetVisits" infoareaAlias="SBFIU007" fid="5028"/>
            <Var name="ABC" info areaAlias="SBFIU007" fid="5029"/>
            <Var name="ActualVisits" infoareaAlias="SBCPU0071" fid="5016"/>
            <Var name="TargetVisits" infoareaAlias="SBCPU0071" fid="5015"/>
            <Var name="TargetVisits" infoareaAlias="SBCPU0071" fid="5028"/>
             <Var name="ABC" info areaAlias="SBCPU0071" fid="5029"/>
            <Var name="Longitude" infoareaAlias="SBFI" fid="204"/>
            <Var name="Latitude" infoareaAlias="SBFI" fid="203"/>
            <Var name="OpenWeekday" infoareaAlias="SBFICT" fid="9"/>
            <Var name="OpenMorFrom" infoareaAlias="SBFICT" fid="10"/>
            <Var name="OpenMorTo" infoareaAlias="SBFICT" fid="11"/>
            <Var name="OpenAftFrom" infoareaAlias="SBFICT" fid="12"/>
            <Var name="OpenAftTo" infoareaAlias="SBFICT" fid="13"/>
            <Var name="OpenWeekday" infoareaAlias="SBCPCT2" fid="9"/>
            <Var name="OpenMorFrom" infoareaAlias="SBCPCT2" fid="10"/>
            <Var name="OpenMorTo" infoareaAlias="SBCPCT2" fid="11"/>
            <Var name="OpenAftFrom" infoareaAlias="SBCPCT2" fid="12"/>
            <Var name="OpenAftTo" infoareaAlias="SBCPCT2" fid="13"/>
            <Var name="HolFrom" infoareaAlias="SBFICT1" fid="5000"/>
            <Var name="HolTo" infoareaAlias="SBFICT1" fid="5001"/>
            <Var name="HolFrom" infoareaAlias="SBCPCT3" fid="5000"/>
            <Var name="HolTo" infoareaAlias="SBCPCT3" fid="5001"/>
        </Variables>
        <Filters>
            <Filter name="RepId" operator="=" infoarea="SB" fid="5"/>
            <Filter name="RepBu" operator="=" infoarea="SB" fid="56"/>
        </Filters>
    </CandidatesQuery>
</QueryInfos>
Var RecId: Both queries have 2 of them:
-
CalendarQuery: MAFI (if you want to plan your visits CP-related as well you have to add also MACP)
-
CandidatesQuery: SBFI and SBCP
First comes FI then CP. That means that if a CP record exists, the candidate has the recId of CP (CP overwrites FI), else the recId of FI. The algorithm uses that recId to match candidates to calendar entries and elimate candidates that where already selected.
Therefore, make sure that both queries are referencing the same info areas in the same order. The info areaAliases may be different as in our example.
Distance Optimization
In order to enable the distance optimization modes (1 or 2), the latitude and longitude information must be saved within the info area’s records as defined in the queries above. The coordinates of the reps (ID) and rep’s FI also need to be set if the reps want to use the start and overnight locations “Home” and “Office”. The coordinates can be generated and updated by Bing, for which a separate license is required.
Calculation Distance Starting Point:
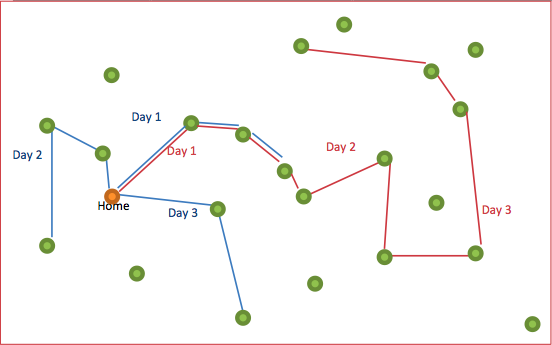
The distance optimization needs to take into account from which location the rep starts his day. The “Start location” describes the starting point of the first day in the route, while “Overnight location” is the starting point for the following days of a route.
For example if the rep has a large area to cover, he might want to plan a route for the next 3 days starting from Home, with an overnight location as the last call. Thus, instead of starting each day from his home, he starts from the previous day’s call (meaning he has to sleep in a hotel) which may lead him further away from his home.
The graphic below illustrates the difference between planning 3 days around your Home or as a round-trip:
Enabling Street-Level Optimization
To enable street-level optimization (as opposed to bee-line optimization which does not consider the road network):
-
The optimization mode must be set to “2”.
-
The database holding the distance matrix must be installed and the connection string set in the settings.xml from Aurea CRM web (see Setting up the Distance Matrix).
-
The distance matrix DB must be created from the geo-coordinates used in the CRM (see Filling the Distance Matrix).
Setting up the Distance Matrix:
• Add to the configuration.xml as a new node in the <update> section:
<!--
Configuration for the Distance Matrix table containing the from-to coordinates, the distance and time between them.
The entries need to be genereated for the CRM records and imported.
-->
<GeoT ools>
<GeoMatrix>
<ConnectionString>user id=xxx;password=xxx;server=xxx;trusted_connection=no;database=xxx;connection timeout=3</ConnectionString>
<TableName>GeoMatrix</T ableName>
</GeoMatrix>
</GeoT ools>
• Install the DB that holds the distance matrix.
USE [ GeoDB]
GO
SET ANSI_NULLS ON
GO
SET QUOTED_IDENTIFIER ON
GO
CREATE TABLE [dbo].[GeoMatrix](
[longitude_from] [int] NOT NULL,
[latitude_from] [int] NOT NULL,
[longitude_to] [int] NOT NULL,
[latitude_to] [int] NOT NULL,
[distance] [int] NOT NULL,
[time] [real] NOT NULL,
[createdOn] [smalldatetime] NULL ) ON [PRIMARY]
GO
EXEC sys.sp_addextendedproperty @name=N'MS_Description', @value=N'Distance between coordinates in meters' , @level0type=N'SCHEMA',@level0name=N'dbo', @level1type=N'TABLE',@level1name=N'GeoMatrix', @level2type=N'COLUMN',@level2name=N'distance'
GO
EXEC sys.sp_addextendedproperty @name=N'MS_Description', @value=N'Time between coordinates in minutes' , @level0type=N'SCHEMA',@level0name=N'dbo', @level1type=N'TABLE',@level1name=N'GeoMatrix', @level2type=N'COLUMN',@level2name=N'time'
GO
EXEC sys.sp_addextendedproperty @name=N'MS_Description', @value=N'Date the distance and time were calculated on' , @level0type=N'SCHEMA',@level0name=N'dbo', @level1type=N'TABLE',@level1name=N'GeoMatrix', @level2type=N'COLUMN',@level2name=N'createdOn'
GO
ALTER TABLE [dbo].[GeoMatrix] ADD CONSTRAINT [DF_GeoMatrix_createdOn] DEFAULT (getdate()) FOR [createdOn] GO
CREATE UNIQUE NONCLUSTERED INDEX [from-to-unique-index] ON [dbo].[GeoMatrix]
(
[longitude_from] ASC,
[latitude_from] ASC,
[longitude_to] ASC,
[latitude_to] ASC
)WITH (PAD_INDEX = OFF, STATISTICS_NORECOMPUTE = OFF, SORT_IN_TEMPDB = OFF, IGNORE_DUP_KEY = ON, DROP_EXISTING = OFF, ONLINE = OFF, ALLOW_ROW_LOCKS = ON, ALLOW_PAGE_LOCKS = ON) ON [PRIMARY] GO
Filling the Distance Matrix
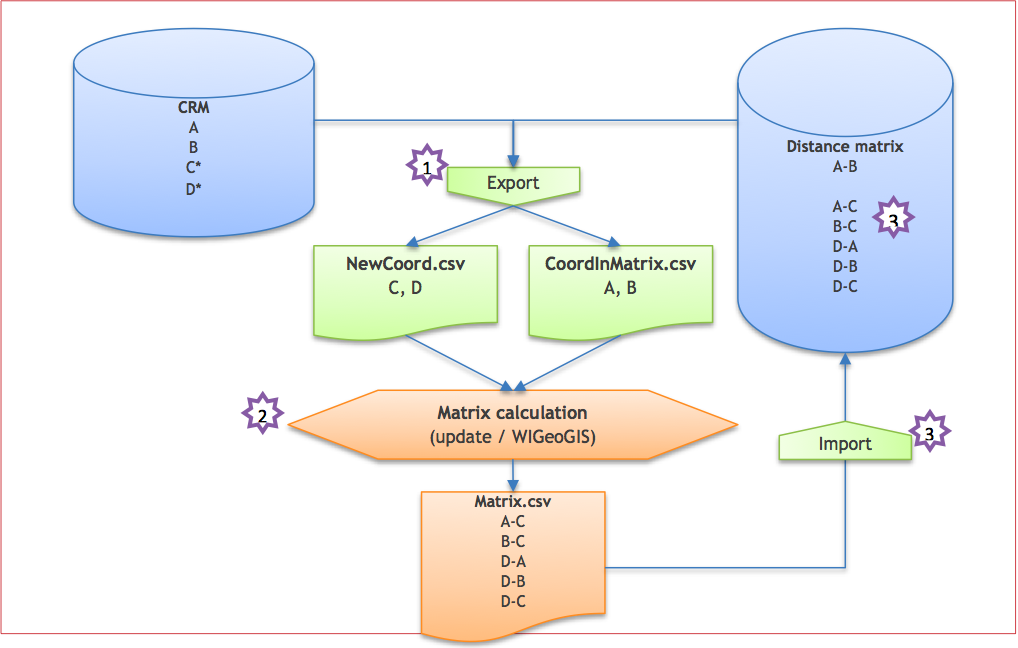
The distance matrix holds all the distances between all points of the info areas relevant for the call planning. The following steps are required to fill the matrix:
- Customer exports all coordinates from the relevant info areas in 2 packages: those already in the matrix and the new ones.
- Customer sends the exported coordinates to update for a calculation of the matrix with the information about how far apart the points can be for them to have a connection in the distance matrix (see the chapter Size matters).
- Aurea CRM sends back the matrix flat file.
- Customer imports the generated matrix in the distance matrix database.
Aurea CRM takes over the customer’s tasks in the SaaS environment. Exports and imports are done with a special tool, see below:
The GeoDbTools.exe
To perform step 1 (export) and step 4 (import), use the update.Template.Base.GeoDbTools.exe provided with the template. Start it with a command line tool. To display the help instructions enter the following:
update.Template.Base.GeoDbTools ?
Before using any other functions, the tool needs to be configured.
Open the update.Template.Base.GeoDbTools.exe.config with Notepad and add a new customer section at the end of <configSections> with your company’s name (without spaces or special characters):


1. The section’s open and close tags must be named after the section name defined in the <configSections> section.
2. CommonConnectionString: Both the CRM and Matrix databases must be reachable from the same connection string.
3. CrmDb: The name of the CRM database.
4. CrmTablesPrefix: The prefix used in the CRM table names, e.g. “TE_LSI_”.
5. CrmTable_xx: Defines the longitude and latitude fields for a given table. The field names must be the
ones used in the SQL database. Define one entry per table from which to grab the coordinate records.
For instance use <add key="CrmTable_FI" value="Longitude,Latitude"/> to read coordinates from the TE_LSI_FI.Longitude and TE_LSI_FI.Latitude fields. Note that you should also include the ID table that holds the reps’ home coordinates.
6. GeoDb: Name of the database where the distance matrix is located.
7. GeoTableName: Name of the distance matrix table.
Exporting the geo-coordinates to generate the distance matrix.
To export the coordinates from your CRM database use the command:
update.Template.Base.GeoDbTools e customer=myCompany
This generates 2 files in the folder where the exe is located:
myCompany_ExportNewCoord_yyy.mm.dd_HHhmm.csv and
myCompany_ExportCoordInMatrix_yyy.mm.dd_HHhmm.csv
Send these 2 files to update for processing.
Importing the distance matrix.
Once the distance matrix was generated (which can take a few days depending on the amount of connections to calculate), it can be imported using the following command:
i customer=myCompany file=Matrix.csv
The matrix can be generated by the tool for testing purposes only.
Instead of providing a street-level distance and travel time, it calculates an approximate time based on the geographical distance between the points:
xm maxkm=1000 file= myCompany_ExportNewCoord_datetime.csv file2= myCompany_ExportCoordInMatrix_datetime.csv
-
Maxkm: The maximum distance between 2 points for which the distance should be calculated in the matrix (see the chapter Size matters). If you don’t see all expected connections in the generated matrix, the reason could be that the maximum distance is too small.
-
File: The *ExportNewCoord*.csv generated by the export command.
-
File2: The *ExportCoordInMatrix*.csv generated by the export command. It is optional for initial
imports where that file is empty (the matrix DB is empty).
Size Matters
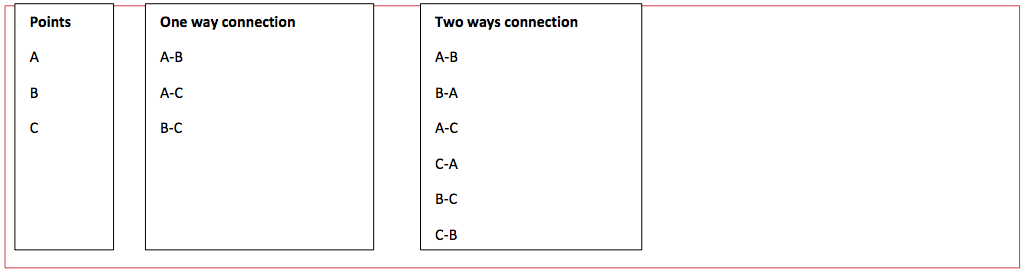
The size of the distance matrix grows exponentially with the amount of points to connect. In order to maintain performance and lower costs (DB hosting), distances should only be calculated one way and the connection between 2 points should only be calculated if the points are close to each other.
For instance, if the info areas relevant for the Call Planning are ID (user), CP (person) and FI (company) and you have 100 ID, 10.000 CP and 2.000 FI, then you have a total of 12,100 points.
If all those points are connected with each other, you’ll get 12,100^2 – 12,100 = 146,397,900 connections if you calculate both ways (going from A to B doesn’t necessarily take the same time than going from B to A).
In order to keep the size of the matrix manageable, it is usually enough to calculate the distance from A to B and use the same for B to A. That way we can reduce the number of calculated connections by 2 (=73,198,950).
To further decrease the matrix’s size we need to ask ourselves the following question: “What is the maximum distance a rep should travel between 2 visits (in 90% of the cases)?”.
If the response is 50km, the matrix only holds distance information for points that are not further away than 50km from each other. In the example below the connections are only saved for A to B and B to C but not for A to C because they are further than 50km apart.

What Happens to Distances that are not in the Matrix?
Due to the fact that we don’t save the connection of points that are too far apart and the fact that new points may appear regularly in daily business (or addresses changed), it is always a fact that some points are not referenced in the distance matrix.
When that happens, the call planning simply does a fallback to mode 1 for that particular distance (see Distance and time calculation workflow).
Use Cases
The standard use case covered by the call planning involves users having to visit multiple locations per day without having to schedule a meeting and for roughly the same amount of time.
If your users need to additionally visit specific locations from time to time (for instance if the locations were being assigned a ticket), a filter can be defined (e.g. where location has an open ticket) so that the call planning only chooses locations within that filtered pool. The users can choose whether to start the call planning based on all available locations or only based on the defined filter.
Troubleshooting
NO RESULTS RETURNED
If the call planning returns no results besides “Weekend”, make sure of the following:
-
The home, office or last call address is not too far away from any of his candidates: if he has to travel longer than his working hours allow him to, no candidate is returned.
-
There is not a planned visit in the rep’s calendar, for the planning period, which is too far away from the rep’s candidates.
-
The candidates as defined in the CalendarQuery have coordinates.
-
If “Individual working hours” is checked for the rep, the working days have valid working hours
defined. If no working hours are defined for a given day, this day is defined as close and appears
in the call planning results as “weekend”.
-
The “Default times” parameter is either not set at all or set properly: fields are not empty or
“00:00”, “From” is not > to “To”.
-
The opening times (CT) of the candidates must be either not set at all (“Default times” are used) or
if set, then for each open day. If for instance only 1 day is defined with opening times for a candidate, then all the other days of the week are closed, and the candidate is not considered for those.
DUPLICATE KEY WHILE IMPORTING THE GEOMATRIX
Route Planning
Overview
The data model looks like this:

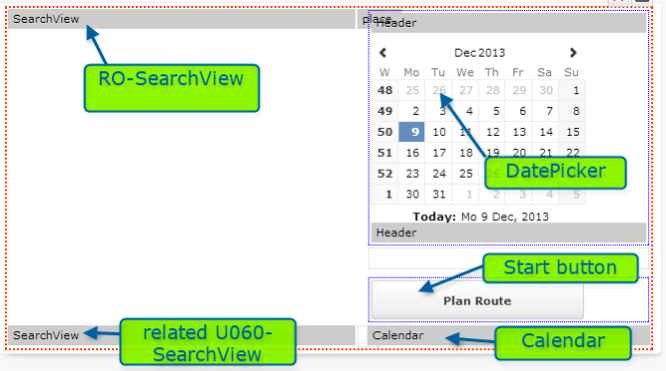
Selecting a date in the DatePicker is calling the onValueChange eventHandler which is calling the u8.TeLSI.RoutePlanning.synchronizeCalendar(sender) function;
This function is keeping the DatePicker and the calendar below up to date and sets the view to “workweek”.
The buttonPlanRoute button is calling the u8.TeLSI.RoutePlanning.planRoute(sender) function; which is planning the selected route. The function is reading the selected DatePicker value, reading the selected RO record, checking if U060 records with field.id 5013 (Plan)=checked exist, writing the selectedDate to the RO record and calling the TE_RO_RoutePlanning_CreateMAs workflow.
The workflow loops through all child U060 records and creates MA records for the PlanDate. The workflow currently can only handle a single day but no work weeks. The workflow starts at 8:00 and takes care of the “duration” and “travel time” U060 fields when creating MA records. The calendar widget is updated after execution.
Add Route Members to Route
Basically there is the possibility to add a FI, CP or PE record as a new route member to a route. Therefore there are three different buttons which open a search and list view. There is a button to add the selected records as route members to the route. Multiselect for adding records is possible. You can also double-click the record – the default-action creates a U060 record.
Known Issue
A backoffice user can create routes and participants for other users (e.g. a sales rep). The backoffice user sees all accounts and therefore could create participants, for which the sales rep is not an account manager! If the route is planned for the sales rep or by the sales rep himself, then those participants are not planned because the sales rep cannot see this account due to the right settings.
Buttons
There are three buttons to add data in the U060 search results header.

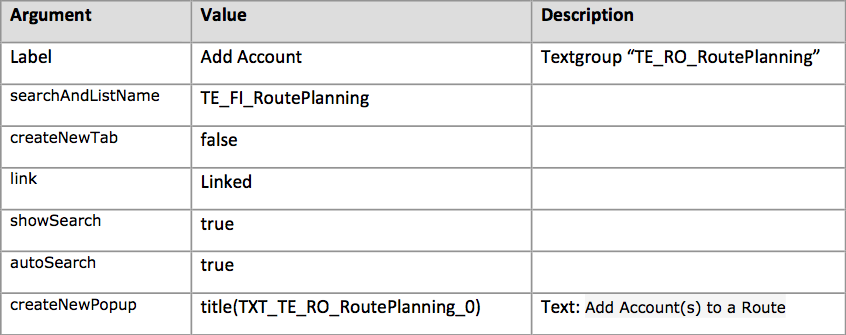
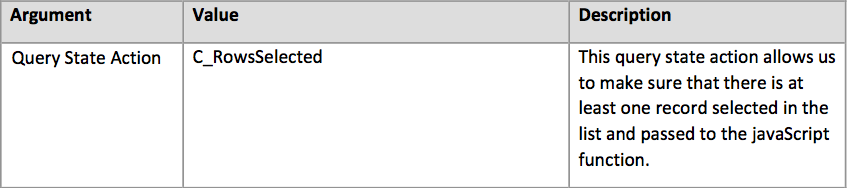
TE_U060_ToNewFI
This button uses the “Search”. QueryStateAction “CORE_C_CanNew_disabled” action template that is used for disabling the button if there is no FI record selected. Furthermore, the CRMprocess “Route (6018000)” is used.
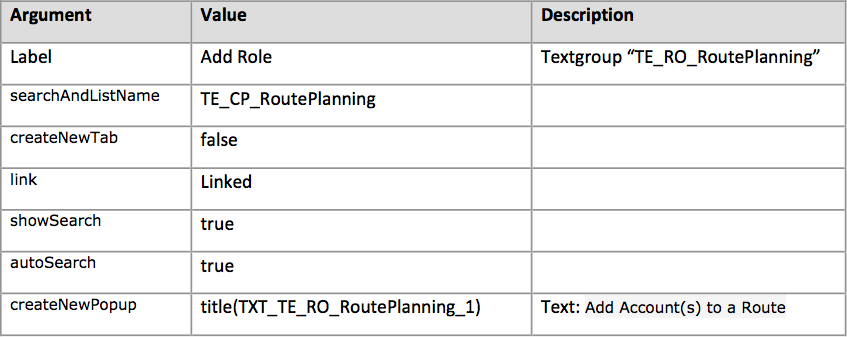
TE_U060_ToNewCP
This button uses the “Search”. QueryStateAction “CORE_C_CanNew_disabled” action template that is used for disabling the button if there is no FI record selected. Furthermore, the CRMprocess “Route (6018000)” is used.
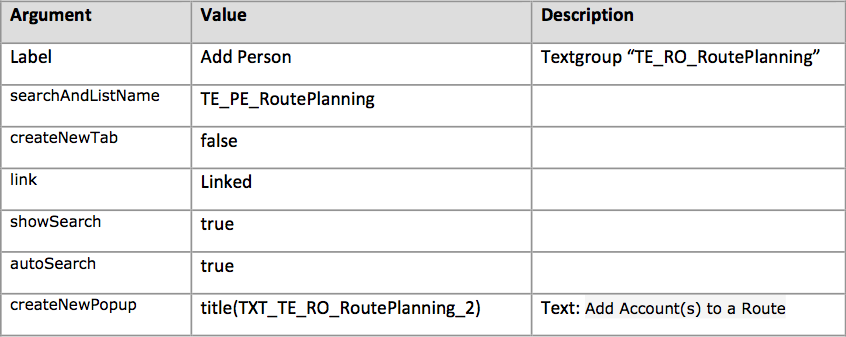
TE_U060_ToNewPE
This button uses the “Search”. QueryStateAction “CORE_C_CanNew_disabled” action template that is used for disabling the button if there is no FI record selected. Furthermore, the CRMprocess “Route (6018000)” is used.
TE_U060_AddToRoute
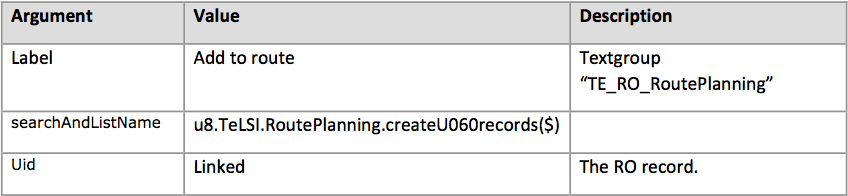
The buttons are referenced by the following headers:
| TE_CP_RoutePlanning.SearchResultsLinked |
| TE_FI_RoutePlanning.SearchResultsLinked |
| TE_PE_RoutePlanning.SearchResultsLinked |
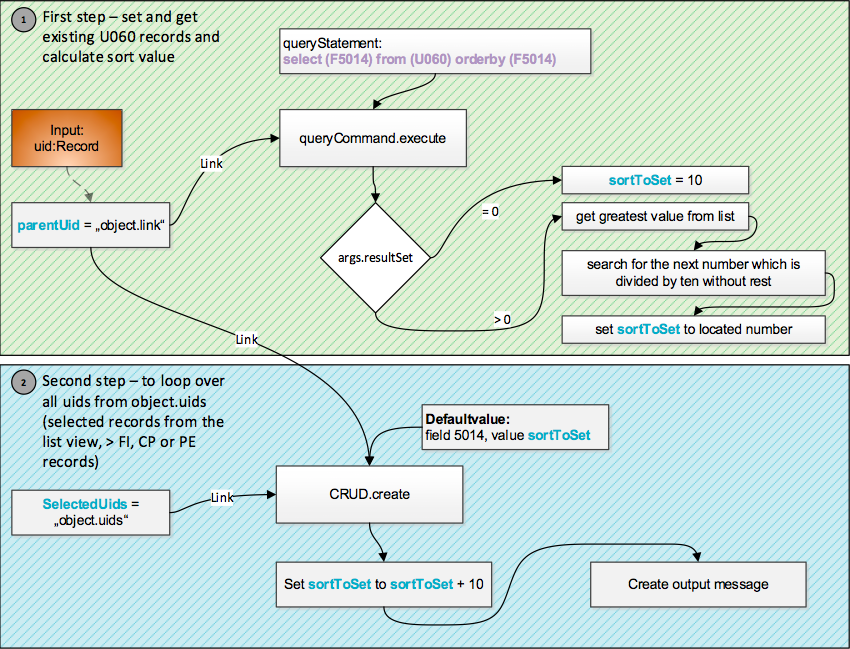
“createU060records” JavaScript function
The following picture shows how the javascript function works. We generate the U060 records using the CRUD channel.
Variables (Z5) and Variable Value (Z6)
Please define the variable values (Z6) for your customer’s station. Currently it is only defined for station 10002 with value 30.
| Variable Name | Description |
|---|---|
| TE_RoutePlanning_U060_Duration | Default Duration (min) for U060 records - used in TE_U060_DV Trigger |
| TE_RoutePlanning_U060_TravelTime | Default Duration (min) for U060 records - used in TE_U060_DV Trigger |
Visit Planning with map support
You can use this feature using two different entry points:
From the main menu for general usage:
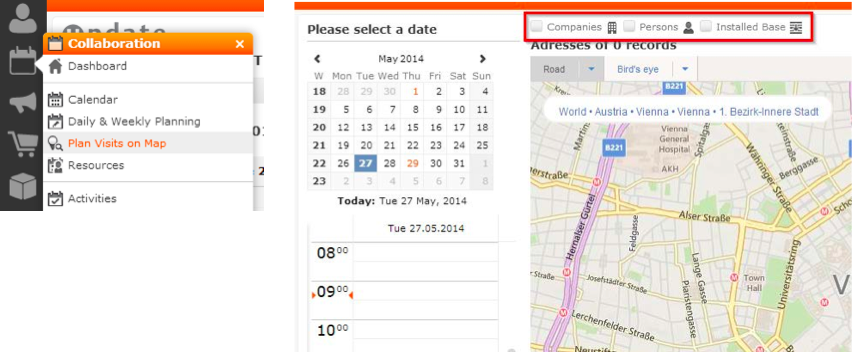
Here you can see all activities today and you can select companies, persons and installed bases which you also want to see on the map, to have a general overview.
This view uses the menu ‘CORE_ID_NET_GeoPlanVisits’ which calls the form ‘CORE_GeoPlanVisits’.
You can also open the map from a company, person or installed base to have the selected record in focus:
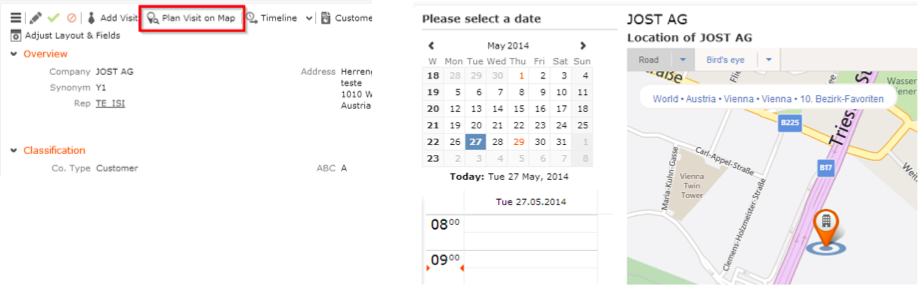
The selected record is in focus and you can plan your visit with the calendar on the left side.
The button which is used is ‘CORE_GeoPlanVisit’ which calls the form ‘CORE_A_GeoPlanVisit’.
The jscript used is ‘..\scripts\te.base\basegeoplanvisit.js’, the following queries are used to select which records are shown on the maps:
• TE_FI_GeoPlanVisit
• TE_IB_GeoPlanVisit
• TE_KP_GeoPlanVisit
• TE_MA_GeoPlanVisit