Calendar
Use the calendar to display activities, tasks, absences and To-Dos.
To open the calendar:
- Select
 (Collaboration) > Calendar.
- Different types of appointment are indicated using different icons (for telephone
calls, visits etc.). Click on
 (Edit Settings) to determine how appointments are color-coded
(e.g. by type or rep).
 - Click on
 (Legend) to display an overview of the color-coding in the
calendar.
 - Private activities (i.e. where the Private field is enabled) are
indicated with the
 icon.
icon. - Click on the entries in the header to determine whether to display a Day, Work Week, full Week or Month in the calendar.
- The orange cursor in the time bar indicates the current time.
- Appointments lasting all day or spanning several days are displayed in a bar at the top
of the calendar (below the date).

- Concurrent appointments cannot be displayed in the calendar’s week view. Click on "..."
to display these appointments in a new window.

- Only a limited number of appointments can be displayed per day in the monthly view. Click on + x more to display all the appointments in a separate window.
- If appointments have been entered that cannot be displayed in the visible area, the
following icon is displayed at the bottom edge of the visible area:

- You can display your most important appointments (e.g. your next 5 activities or
To-Dos) in the sidebar. Click on
 (Settings) > User Configuration to
select which items to display in the sidebar (Activities tab).
Your administrator can determine how many records are displayed.
 - You can filter the records displayed in the calendar to only display those you
require.Note: In order to display To-Dos in the calendar, you need to enable the Calendar check box in the To-Do record.
- You can display or hide the sidebar

- Holidays are color-coded. To determine which holiday calendar you wish to use, click on
 (Settings) > User
Configuration.
 - If the time zone used by your device is changed (automatically or manually), you can determine that Aurea CRM takes the current time zone into account (provided you have the necessary access rights). You need to close and restart your web browser to display the new time zone in the calendar.
Navigating in the Calendar
You can navigate in the calendar using the following options:
- Use the arrows to switch between pages in the calendar:

- You can use the calendar in the sidebar to:
- Click on a day to switch the view to just that day.
- Click on a calendar week to display that work week.
- Click on the month or year and select an entry from the drop-down list update
the calendar accordingly (the view type remains unchanged).

- Use the arrows to move forward or back one month
- When in the day view, hold down Ctrl and click on days in the calendar to display multiple days at once.
- Click on Today to display the current date in the day view.
- Click on
 (Daily & Weekly Planning) to open the daily and weekly
planner.
Adding Appointments
To add a new appointment:
- Select
 (Collaboration) > New Activity,
New Absence or New Task from the
menu.
 - When adding an activity, select the company or person you wish to add the activity for.
- Enter the necessary data and save.
To add a new appointment in the calendar:
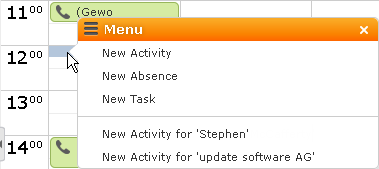
- Double-click on a free time slot in the calendar or click on a free time slot and click on New Calendar Entry.
- Select whether to add a new activity, absence or task, or to add a new activity for
yourself, your company or the last company/person you viewed.

- When adding an activity, select the company or person to add the activity for.
- Enter the details and save.
Note: If the system is configured to check for conflicting appointments,
the appointment planning area is displayed if an activity or absence conflicts with an
existing appointment. Your administrator can determine which types of appointments are
checked for conflicts.
You can also add an activity for yourself as follows:
- Switch to the day, work week or week view in the calendar.
- Click on a free time slot in the calendar. A quarter hour period is highlighted in gray.
- Start typing to enter a subject for the activity and confirm your entry with Enter. The appointment is added, and you are automatically entered as the rep.
Opening Appointments
To open an appointment:
- Double-click on an appointment to open it in tabbed view.
- Click on the appointment’s icon to open it in a popup window.

- Select Tab View from the menu in the popup window to open the record in tabbed view.
- You can also open appointments in the sidebar by clicking on their icon.
- You can reschedule appointments by dragging the appointment to the desired time (in all views except the month view) or to the desired date (in all views except the day view). Drag the top or bottom edge of the appointment to change the length of the appointment not available in the month view.
Editing Appointments
Edit an appointment by entering the desired data in the fields.
To delete an appointment:
- Select the appointment in the calendar and press the Delete key on your keyboard. Hold down Ctrl while clicking to select multiple appointments to delete at once.
- Select Delete from the context menu.