Elements Contained in all Sections
Learn about the elements contained in all sections.
The <infoarea> element defines which table and which fields are searched.
You must add an <infoarea> element for each info area.
<infoarea> element contains:<table>element (mandatory)<fields>element (mandatory). You must add a<field>element for each field to be searched.<group>element (mandatory)<field>element (mandatory)
Example:
<infoarea>
 <table tablename="Person" table="KP">
  <table tablename="Company" table="FI"/>
 </table>
 <fields>
  <group>
   <field tablename="KP" fieldname="E-mail1"/>
   <field tablename="KP" fieldname="E-mail2"/>
   <field tablename="KP" fieldname="E-mailPriv"/>
  </group>
 </fields>
</infoarea>
In this example, the Person and the Company tables are searched for matching records.
<table> Element
The <table> element defines the tables that are accessed. You need to add
a <table> element for each table within the first
<table> element.
Attributes:
<table> element:tablename(mandatory): This name is displayed in CRM.connectLive, e.g. Company, Contact Person, Appointments.table(mandatory): The ID of the table that is accessed, e.g. FI, KP, MA.mmlink="true": Attribute that the user can link e-mails with this table. Exception: You cannot link e-mails with company or person records.Exception: This attribute is not valid in the
<searcharea>element of the<vcard>section.Possible values:
true/false.flags="256": If you set the attributeflags="256", records are only listed if a record exists both, the parent and the child record.Exception:This attribute is not valid in the
<searcharea>element of the<vcard>section.Example: Objects and object participants are read from the database. If
flags=256is set, only the records where the e-mail sender is a participant are displayed. If you do not set this attribute, no objects, but all object participants are listed.
Example:
<table tablename="Property Participant" table="OB">
     <table tablename="Projects" table="OJ" mmlink="true" flags="256"/>
     </table>
As the mmlink and flags attributes are set, this is a
<table> tag from the <display> section.
<fields> Element
The <fields> element defines which fields are searched or displayed. You
need to add a <field> element for each field within the <fields>
element.
Example:
<fields>
     <group label="Contact">
     <field tablename="KP" fieldname="E-mail1" icon="mail"/>
     <field tablename="KP" fieldname="Telephone" icon="phone"/>
     <field tablename="KP" fieldname="MobileNo" icon="phone"/>
     </group>
     <group label="Address">
     <field tablename="FI" fieldname="Street"/>
     <field tablename="FI" fieldname="ZipCode"/>
     <field tablename="FI" fieldname="City" newline="false"/>
     <field tablename="FI" fieldname="Country"/>
     </group>
     </fields>
This example is displayed in CRM.connectLive as follows:

<group> Element
You can group fields, e. g. you can combine first and last name to be displayed in a group.
The groups are displayed in the application in the same order they are added in the
configuration.xml file.
The <field> elements of a section must always be within a
<group> element.
Attribute:
label: The given term is displayed as heading for the group.If you run CRM.connectLive in several languages, you can also enter the StringID defined in the ConnectLiveLanguages.xml file (instead of a term). For example,
Exception: Labels are not applied to the first two groups in thelabel='#200'displays the term that was assigned to this value.<display>element of the<vcard>section.
Example:
<group label="Contact Person">
     <field tablename="KP" fieldname="Sex"/>
     <field tablename="KP" fieldname="FirstName" newline="false"/>
     <field tablename="KP" fieldname="LastName" newline="false"/>
     </group
<field> Element
The <field> elements define which fields are accessed, searched or
displayed. You must add a <field> element for each field in the database you
want to access, search or display.
All <field> elements of an area must always be within a
<group> element.
tablename(mandatory): The ID of the table that is accessed, e.g. FI, KP, MA.fieldname(mandatory): The field name of the field you want to search, display or access, e. g. Street or ZipCode.icon: You can define that an icon is displayed at the left side of a field: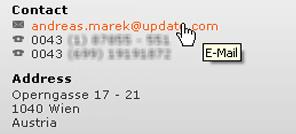 Note: Currently only three icons can be displayed: phone, mail and company.
maps: If you add this attribute, the (Show location on
map) button is displayed in the application besides the address. If the user
clicks this button, the address is displayed in Google Maps. The fields that have this attribute set to
(Show location on
map) button is displayed in the application besides the address. If the user
clicks this button, the address is displayed in Google Maps. The fields that have this attribute set totrue(default value =false) are used in the Google Maps URL:<group label="Company Address"> <field tablename="FI" fieldname="Street" uselabel="false" maps='true'/> <field tablename="FI" fieldname="ZipCode" uselabel="false" maps='false'/> <field tablename="FI" fieldname="City" newline="false" uselabel="false" maps='true'/> <field tablename="FI" fieldname="Country" uselabel="false" maps='true'/> </group>newline: By default, if you add several fields, each field is displayed in a new line. Use thenewlineattribute to display more than one field in the same line. The first field to be displayed in one line does not need this attribute.Exception:This attribute is not valid in the
<searcharea>element of the<vcard>Section.Values:
true(default) /false.-
uselabel: Defines whether a text label is applied.Exception: This attribute is not valid in the
<searcharea>element of the<vcard>Section.Possible values:
true(default)/false.