Mapping
The number of info areas to which information is transferred from the info area is displayed in the Mapping cell.
A link needs to exist between the source and target info areas for data to be transferred between info areas in this manner, see Link.
You can display existing settings and define additional fields that are mapped:
- Click in the Mapping cell for the desired info area.
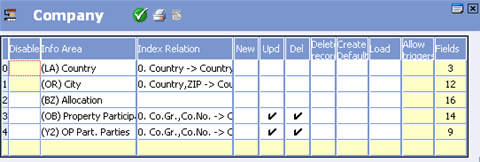
The target info areas are listed in the Info Area column. The Index Relationship column displays the index relationship with the target info area.
- The following options are available:
- Disable: Use this option to turn off the mapping. For example, if the City info area mapping is disabled, adding a new company in a new city no longer automatically adds the city to the city table, see Adding New Cities (Aurea CRM win Main Module).
- New: Enable this option to determine that a new record should be added to the target info area whenever a new record is added to the source info area. The appropriate field values are transferred from the source record.
- Del: Enable this option to determine that the contents of mapped fields should be deleted in the target info area if the corresponding source record is deleted.
- Delete record: Enable this option to determine that the record in the target info area is deleted if the record in the source info area is deleted. This feature is already included in the data model for dependent info areas (e.g. deleting a company also deletes all persons in the company).
Note: The options New, Del and Delete record are only available for info areas that are linked via a 1:n or 1:1 relationship. The source record must contain the station number and serial number of the target record.-
Upd: Enable this option to determine that edits are
transferred between the info areas:
1 :n and 1:1 relationships: Changes to the record in the source info area are transferred to the mapped fields in the target info area.
n:1 relationship: Changes to fields linked to a function (see Field Mappings) in the source record result in updates to the fields defined in the function in the target info area
- Create Default: Enable this option to determine that the contents of mapped fields are transferred to the source record when a new record is added. The source info area must be a child of the target info area (child n-1 or child 1-1), see Adding New Info Areas.
- Load: Enable this option to determine that the contents of mapped fields are transferred as soon as a record in the source info area is linked to a record in the target info area.
Note: This option is only available for info areas linked via an n:1relationship.- Allow triggers: By default, triggers initiated by events in the database (new, update, delete) are not executed for the target info area of a mapping. Enable this option to execute triggers in the target info area.
- Click in the Fields cell to display and edit the mapping for the corresponding info area, see Field Mappings.
- Click in an empty line to define a new mapping, see Defining Mappings.
- Click on
 (OK).
(OK).
Defining Mappings
To define a new mapping:
- Click in the Mapping cell of the source info area.
- Click in an empty line.
A dialog box is displayed.
- Select the desired target info area.Note: If you wish to map an info area to itself or add a second mapping to an existing target info area, you need to add an additional link first, see Link.
- Select an Index Relationship and click OK.
- Click in the Fields column to define the field mappings, see Field Mappings.
- Click on
(OK).
Field Mappings
To display and edit the list of mapped fields:
- Click in the Fields column of the desired mapping.
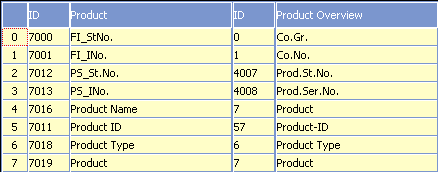
(In this example for the FS vertical, a mapping has been defined between a new info area named Product and the Product Overview info area (1:n link, index: Sno, lno -> Link Type, Prod.St.No., Prod.Ser.No.".)
The table displays the IDs and the mapped fields in the source and target info areas.
- Click in an empty line to define a new field mapping.
A dialog box is displayed listing the fields in the target info area.
- Select a field and click OK.
A dialog box is displayed listing the fields in the source info area.
- Select a field and click OK.Note: Ensure that you map fields of the same type, see Aurea CRM Field Types. If the value is invalid for the field in the target info area, the field is left empty or the contents truncated. For example, if you transfer a field of the type "decimal (8 Byte)" to a field of the type "int (4 Byte)", the decimal places are lost.
Mapping catalog fields is only possible for fields using the same catalog.
- Click in the Function cell to select the function to be
applied to the target info area.Note: Functions are only available if the info areas are linked via an n:1 relationship and the Upd option is enabled for the mapping.
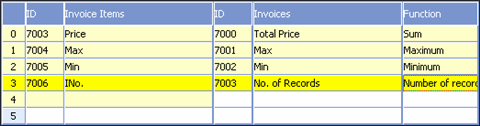
The following functions are available:
- Number of records: Writes the number of child records to the parent record.
- Sum: Writes the sum total of the corresponding values in the child records to the parent records.
- Minimum: Writes the lowest value in the corresponding fields in all child records to the parent record.
- Maximum: Writes the highest value in the corresponding fields in all child records to the parent record.
If the link between the records is changed (i.e. the source record is linked to a different record in the target info area), values in the old and new records are recalculated.
- Click on
(OK).
You can use field mappings to transfer data from linked records, e.g. to transfer an item name from the Item Master. In this case, the info area to which data is to be transferred must be defined as the source info area. An n:1 link must exist between the source and target info areas, and the Upd option must not be enabled under Mapping.
Alternatively, you can add a reference field to the info area you wish to transfer the data to, see Adding New Fields.